
User Manual

14
FastwayTrailer.com
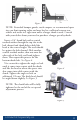
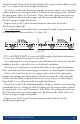
Slide the L-brackets onto the link plate studs
with the spring arm plate facing away from the
trailer. For the initial setup, leave two (2) holes
showing at the top above the studs and two (2)
below. ey may need to be adjusted up or down
later. read on the nylock nuts and tighten
them. See Figure 10. When weight distribution
setup is complete, torque the L-bracket nuts to
75ft-lbs.
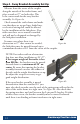
Step 5 - Install Spring Arms:
Apply a thin layer of bearing grease to the shorter, notched end of one of the
spring arms. Either arm will t either side of the hitch, they are not side-
specic. See Step 10 - Regular Maintenance.
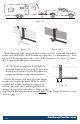
Push the arm up into the bottom of the
hitch head. Make sure that it seats well, and
that the keeper tab snaps into place to hold
the arm in the head. See Figure 11.
Repeat for the 2nd arm.
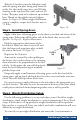
Arms can be removed by either pulling on
the keeper tab to release them, or by swinging
them outward to be perpendicular to the tow
vehicle. At this point, the arm will drop freely
from the head without having to manually
pull the keeper tab.
Frequently apply a small amount of bearing grease to the head end of the
spring arms, and up inside the hitch head to reduce wear and make insertion
easier. is will also help reduce hitch noise.
It is not necessary to apply lubricant to the joint where the spring arms rest
on the L-bracket. is may decrease the amount of friction at this joint which
could prevent the hitch from dampening trailer sway as well as possible.
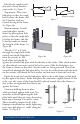
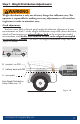
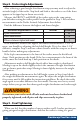
Step 6 - Weight Distribution Setup:
Use the following guidelines to set up and adjust your e2 hitch for weight
distribution. Good weight distribution is a critical component of the e2 hitch
setup. A hitch that is set up poorly for weight distribution will not perform
like one that is set up well. Every tow vehicle and trailer combination will react
dierently to weight distribution.
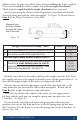
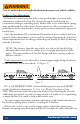
To correctly set up weight distribution you must take 3 measurements at
Figure 11
Keeper
tab
Figure 10