
Instruction Manual


4
5
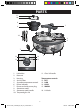
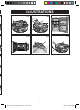
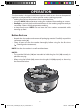
PARTS
WARM
HIGH
LOW
OFF
16
6 45
7
8
9
10
11
13
14
15
12
1
2
3
Lid holders1.
Base unit2.
Housing3.
Anti-slip feet4.
Separate temperature controls5.
Power indicator6.
Power cord with power plug7.
Stoneware crocks8.
Stoneware crock handle9.
Tempered glass lid10.
Glass lid handle11.
Temperature controls
OFF12.
LOW13.
HIGH14.
WARM15.
Lid locks16.
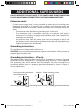
ADDITIONAL SAFEGUARDS
DO NOT OPERATE THIS APPLIANCE, IF THE POWER CORD SHOWS DAMAGE OR
IS APPLIANCE WORKS INTERMITTENTLY OR STOPS WORKING ENTIRELY.
Extension cords
A short power-supply cord is to be provided to reduce the risk resulting from •
becoming entangled in or tripping over a longer cord. Extension cords are
available and may be used if care is exercised in their use. If an extension cord is
used,
The extension cord should be a grounding-type 3-wire cord. -
If an extension cord is absolutely necessary, an extension cord rated a -
minimum of 15 ampere, 14-gauge cord should be used. Cords rated for less
amperage may overheat.
An extension cord with the power cord must be arranged so that it will -
not drape over the countertop or tabletop where they can be pulled on by
children or tripped over accidentally.
Grounding instructions
This appliance must be grounded while in use.
CAUTION: To ensure continued protection against risk of electric shock, connect to
properly ground outlets only.
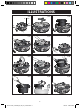
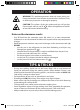
Grounding instructions – US only
The appliance has a plug that looks like Figure A. An adaptor, as shown in Figure B,
should be used for connecting a 3 -prong grounding plug to a 2-wire receptacle.
The grounding tab, which extends from the adaptor, must be connected to a
permanent ground such as a properly grounded receptacle as shown in Figure C,
using a metal screw.
Cover of grounded outlet box
Slow Cooker_104559_IM_US_V4_121203.indd 5 12/3/12 3:48:55 PM