TOASTER OVEN Model Number:103738 UPC: 681131037389 Customer Assistance 1-855-451-2897 (US) Please consider the option to recycle the packaging material and donate any appliance you are no longer using. Toaster Oven_103738_IM_US_V7_121212.
IMPORTANT SAFEGUARDS When using electrical appliances, basic safety precautions should always be followed, including the following: • Read all instructions before use. • Do not touch hot surfaces. Use handles or knobs. • To protect against electric shock do not immerse cord or plug in water or other liquid. • Close supervision is necessary when any appliance is used by or near children. • Unplug from wall outlet when not in use and before cleaning.
Additional Safeguards • This appliance is for household use only. DO NOT OPERATE THIS APPLIANCE, IF THE POWER CORD SHOWS DAMAGE OR IS APPLIANCE WORKS INTERMITTENTLY OR STOPS WORKING ENTIRELY. • • • A short power-supply cord is to be provided to reduce the risk resulting from becoming entangled in or tripping over a longer cord. Longer extension cords are available and may be used if care is exercised in their use.
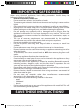
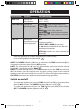
Parts 1 2 3 4 17 16 15 14 13 12 11 5 6 10 8 7 9 30 18 22 19 1. 2. 3. 4. 5. 6. 7. 8. 9. 10. 11. 23 20 24 21 25 Air vents Housing Control panel Cord storage Power cord with plug Anti-slip feet Drive mount Convection fan Handle Door Crumb tray 12. Lower heating elements (x2) 13. Baking/drip tray 14. Broil rack 15. Support mount 16. Oven rails 17. Upper heating elements (x2) 18. POWER indicator 19. TEMP control knob 20. FUNCTION control knob 21. 22. 23. 24. 25. 26. 27. 28. 29. 30.
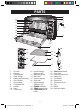
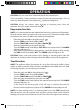
ILLUSTRATIONS a b c d e f g h i j k l 5 Toaster Oven_103738_IM_US_V7_121212.
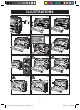
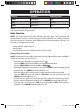
ILLUSTRATIONS n m o • • A OPERATION Before first use • • Remove all packaging materials, labels and/or stickers from your appliance. Check package contents for completeness and damage. Do not operate the appliance if package content is incomplete or appears damaged. Return it immediately to the dealer. CAUTION: Danger of suffocation! Packaging materials are not toys. Always keep plastic bags, foils and Styrofoam parts away from babies and children.
g , e OPERATION • • Let the appliance cool completely. Clean the appliance ( Cleaning).
OPERATION Control knob Function Possible settings TEMP (19) Setting the temperature 150°F - 450°F (65°C - 230°C) FUNCTION (20) Setting the operating mode TIME (21) WARM - keep cooked food warm TOAST - bread, muffins, frozen waffles, etc. BAKE - cakes, pies, meat, etc. ROTISSERIE - up to 5lb of roast or chicken BROIL - fish, steak, poultry, pork chops, etc. Setting the OFF operating time and Clockwise rotation: switching on/off LIGHT / MED / DARK (for toasting) 1 – 60 minutes (marked in 10 min.
s l OPERATION CAUTION: Only use accessories recommended by the manufacturer. Only use cooking / baking containers made of metal and ovenproof glass. Do not place any other materials in the appliance ( Additional Safeguards). CAUTION: Always use mittens when inserting or removing items from the appliance. Do not use your bare hands (ill. h ). Keep warm function NOTE: It is recommended to keep cooked food warm for a maximum of 30 minutes. After 30 minutes food may become dry and start to spoil.
OPERATION Setting Duration Browning level LIGHT about 4min light MED about 5min medium DARK about 7min dark NOTE: Do not leave food in the appliance longer then recommended above, as this may cause the food to get burned. Bake function NOTE: The bake function provides constant and even heat. The convection fan (8) circulates the hot air around the inside of the appliance. All heating elements are used during this function.
n s s OPERATION Baking pizza NOTE: The appliance is suitable for a pizza of up to 12 inches in diameter. Instructions for baking one pizza: Place pizza on oven rack (22) and position the rack on middle rails (16). Instructions for baking two pizzas: Place first pizza on broil rack (14) on top rails and the second pizza on the oven rack (22) on bottom rails. Please note that the pizza placed at the top rail may be ready a few minutes before the pizza placed at the bottom rail.
OPERATION • • • Turn the TIME control knob (21) to STAY ON or to the required time. The POWER indicator (18) turns on. If a time was set, a bell will ring at the end of the cycle, to indicate the cycle has finished, and the appliance switches off. The POWER indicator (18) turns off. If no time was set, turning the TIME control knob (21) to OFF when the roasting is completed. The POWER indicator (18) turns off. NOTE: The following roasting temperatures and times are recommendations only.
e g . e o ) e ) OPERATION Place the pointy end of the spit (28) in the drive mount (7) located on the right hand side of the oven wall (ill. e ). • Place the square end of the spit (28) in the support mount (15) located on the left hand side of the oven wall (ill. e ). NOTE: Pay attention to correct direction of the spit otherwise will not be functional. • Place the baking/drip tray (13) on the lowest oven rails (16). • Turn the TEMP control knob (19) to the 450°F.
OPERATION Broil function NOTE: When using the broiling function, only the upper heating elements (17) are being used. They continuously cycle on and off to maintain a maximum temperature in the appliance. Place the broil rack (14) on the top oven rails (16) while the drip tray (13) is placed on the middle rails. • • • • • • • • • • • Place the baking/drip tray (13) on the lowest oven rails (16) (ill. d ). Turn the TEMP control knob (19) to 450°F. Turn the FUNCTION control knob (20) to BROIL .
e e p o t r . . HINTS AND TIPS • • • • It is recommended to always preheat the appliance, as this will reduce cooking times. It is recommended to only cook defrosted food and cook from a fridge temperature. The appliance is switched off, when the TIME control knob (21) is in the OFF position. In the event of food flare-ups, keep the door (10) closed, turn the TIME control knob (21) to OFF and unplug the appliance. CLEANING Proper maintenance will ensure many years of service from your appliance.
CLEANING Storage • • • • Before storage, always make sure the appliance is completely cool, clean and dry. It is recommended to store the appliance in a dry place. Store the power cord on cord storage (4) of the appliance (ill. o ). Store the appliance on a stable shelf or in a cupboard, preferably in its original packaging. To avoid accidents, ensure that both the appliance and its power cord are beyond reach of children or pets.
d Technical data Rated voltage: Rated current: 120V ~ 60Hz 12.5A Rated power input: Volume: 1500W 21L l t 17 Toaster Oven_103738_IM_US_V7_121212.
Customer Assistance If you have a claim under this warranty, please call our Customer Assistance Number. For faster service, please have the model number and product name ready for the operator to assist you. This number can be found on the bottom of your appliance and on the front page of this manual.