Netopia ISDN PC Card User’s Guide for Windows Farallon
Copyright © 1997 Farallon Communications, Inc. v.597 All rights reserved. Printed in the U.S.A. This manual and any associated artwork, software, and product designs are copyrighted with all rights reserved. Under the copyright laws this manual, artwork, software, and product designs may not be copied, in whole or part, without the written consent of Farallon Communications. Under the law, copying includes translation to another language or format. Farallon Communications, Inc.
Contents Chapter 1 — About the Netopia ISDN PC Card...............................5 Chapter 2 — Installation...............................................................7 Step 1: Inserting the PC Card.........................................................7 Step 2: Connecting your equipment ................................................8 U Interface.................................................................................8 S/T Interface .......................................................
Contents Chapter 5 — Operation ...............................................................31 Making a connection ...................................................................31 Windows 95.............................................................................32 Windows NT 4.0.......................................................................34 Windows NT 3.51.....................................................................37 Windows 3.x ............................................
Chapter 1 About the Netopia ISDN PC Card Congratulations on your purchase of the Farallon Netopia ISDN PC Card! The Netopia ISDN PC Card provides easy and affordable high-speed Basic Rate ISDN connection to the Internet or to your office local area network (LAN). Internet access. The Netopia ISDN PC Card allows Internet connections over an ISDN line at speeds of up to 512 kilobits per second.
Chapter 1 Your plug and play ISDN solution. Once your telephone company has installed your ISDN line, you can insert the Netopia ISDN PC Card into your PC Card slot and enter appropriate parameters to configure and use the card. A connection to your office LAN or the Internet can be established over your ISDN line with a remote access client application. You can use client applications that are included with your operating system or supplied by your network administrator or Internet Service Provider.
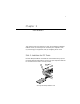
Chapter 2 Installation This chapter covers the three basic steps for installing your Netopia ISDN PC Card: (1) inserting the PC Card into your computer’s slot; (2) connecting your equipment; and (3) configuring the PC Card. STEP 1: INSERTING THE PC CARD Hold the Netopia ISDN PC Card with the colored label facing up and the arrow pointing toward the PC Card slot on your computer. Slide the PC Card into the slot until it is firmly seated.
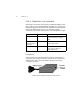
Chapter 2 STEP 2: CONNECTING YOUR EQUIPMENT Depending on the product you purchased, the Netopia ISDN PC Card with U interface or the Netopia ISDN PC Card with S/T interface, the appropriate equipment is provided. Your geographical location typically dictates the ISDN interface type to use.
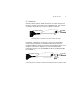
Installation 9 S/T INTERFACE Outside of North America, ISDN connections are made using the S/T interface. Plug the RJ-45 cable into your ISDN wall jack. Then connect the cable to the RJ-45 port on the S/T interface connector. Connecting the S/T interface connector and RJ-45 cable In Australia, a different S/T interface is used, and a terminating resistor may be required.
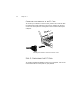
Chapter 2 CONNECTING YOUR INTERFACE TO THE PC CARD To connect your interface to the PC Card, position the connector with the embossed arrows toward the card. Push it straight into the port on the card. Then push the locking tab on the connector toward your computer. Attaching the interface connector to the PC Card STEP 3: CONFIGURING THE PC CARD To configure the Netopia ISDN PC Card for your computer, refer to the section below which corresponds to your platform.
Installation 11 WINDOWS 95 1. The first time you insert the Netopia ISDN PC Card, the New Hardware Found screen appears: 2. Be sure that “Driver from disk provided by hardware manufacturer” is selected, and click OK. The Install From Disk screen appears: 3. Insert the Netopia ISDN PC Card Disk 1, then click OK. 4. Go to Chapter 3, “Windows Configuration Tool,” and continue from there.
Chapter 2 WINDOWS NT 4.0 1. Open the Control Panel and select Modems. 2. Click Add in the Modems Properties screen. Netopia COM2 3. Select “Don’t detect my modem”, then click Next.
Installation 4. Select Have Disk. 5. Insert Netopia ISDN PC Card Disk 1, then click OK. The Netopia .INF file will be installed.
Chapter 2 6. The Netopia ISDN PC Card will be detected. Select Netopia ISDN PC Card, then click Next. Netopia ISDN PC Card 7. Select COM Port, then click Next. Netopia ISDN PC Card 8. Click Finish. 9. Go to Chapter 3, “Windows Configuration Tool,” and continue from there.
Installation 15 WINDOWS NT 3.51 1. Open the Accessories and select Terminal. 2. From the Settings menu, select Communications, and the following screen will appear: 3. Select a COM port from the Connector list and click OK. 4. Type the following command: ATI8 If the response “Farallon Communications, Inc. Netopia ISDN PC Card” is returned, then the correct COM port for the Netopia ISDN PC Card has been selected.
Chapter 2 WINDOWS 3.X AND DOS 1. Make sure that a Card Services software is installed on your computer. This section uses CardSoft as an example, so the commands you enter may differ from those used here. Refer to your vendor’s documentation for the correct commands, if needed. 2. Enter the following command at the prompt: C:\CARDINFO If the Netopia ISDN PC Card is detected, the following message is returned: Slot 0: Card Type = Modem (COM2) Manufacturer = Farallon Communications, Inc.
Chapter 3 Windows Configuration Tool For Windows 95, Windows NT 4.0, and Windows NT 3.51, the Netopia ISDN PC Card Windows Configuration Tool provides an easy-to-use interface for completing your PC Card configuration. The Windows Configuration Tool allows you to view the PC Card version and firmware properties, configure dialing and communication information, and download updated versions of the firmware. This chapter covers how to install and run the Windows Configuration Tool.
Chapter 3 2. Click Next in the window that appears: 3. Specify where the Netopia ISDN PC Card software is to be installed. 4. Click Next. The Setup Wizard will install all files and create a Netopia ISDN PC Card program directory. Follow the on-screen instructions for inserting the other disks.
Windows Configuration Tool 19 5. When the window below appears on your screen, click Finish. 6. The Netopia ISDN PC Card Configuration Tool launches and the Properties window appears: 7. Complete your PC Card configuration by continuing with the “Profile Configuration” section on the next page.
Chapter 3 PROFILE CONFIGURATION Netopia ISDN PC Card configuration settings are saved into profiles. Your Netopia ISDN PC Card is already equipped with a factory profile which requires only your ISDN information to establish a connection. Using the factory profile as a basis, you can create your own profile. Up to three user-defined profiles can be created for different connection scenarios, but only one profile may be active at one time. To configure a profile, follow the steps below. 1.
Windows Configuration Tool ■ ■ 21 North American Profile Configuration window: International Profile Configuration window: A profile holds the phone numbers for up to two locations, with one being designated as the Primary Location, and the other as the Alternate Location. It makes no difference which number is specified where, as the Netopia ISDN PC Card automatically calls the other number should the first call not be completed.
Chapter 3 4. For either the Primary or Alternate Location, the following parameters must be configured: Parameter Description The local switch is of type: Specifies the ISDN switch type used by your ISDN service provider. North American firmware: For most locations, the default of North America (Auto-Detect) should be used. If the ISDN Switch Type cannot be automatically detected, National ISDN-1 (NI-1) or AT&T (5ESS) can be explicitly specified. International (Excl.
Windows Configuration Tool UPDATING 23 FIRMWARE This section tells you how to load firmware into your PC Card’s ROM. You may need to do this in order to use your PC Card in a different geographical region, or simply to update your PC Card with new firmware versions. To download firmware into your PC Card, follow the steps below. 1. Open the Netopia ISDN PC Card Configuration Tool and click “Farallon Netopia ISDN PC Card” to select it.
Chapter 3 2. Click the Properties button. The Card Properties screen appears: 3. Perform one of the following: To download: Follow these steps: Different regional firmware a. Select your geographic location within the ISDN Type field. b. Confirm your firmware change by clicking Yes in the Configuration Tool’s prompt window. New firmware version a. Click Download to access the Download dialog box. b. Use Browse to navigate to the new firmware file from Farallon and click Open. c.
Chapter 4 VT100 Configuration Tool For Windows 3.x and DOS, the Netopia ISDN PC Card VT100 Configuration Tool provides a quick and easy way to complete your PC Card configuration. The VT100 Configuration Tool is built into the Netopia ISDN PC Card firmware and lets you configure basic ISDNspecific parameters. It is also available as an alternative to the Windows Configuration Tool. VT100 CONFIGURATION TOOL ACTIVATION 1. Start your VT100-compatible terminal emulation program.
Chapter 4 2. Verify that the terminal emulation program uses the same COM port that the Netopia ISDN PC Card is emulating. 3. Enter the following command at the prompt and press Enter: AT@MENU The main VT100 Configuration Tool screen appears: VT100 CONFIGURATION TOOL SCREEN NAVIGATION The following table lists the keys used to move within the VT100 Configuration Tool screens: Key Description Up arrow Moves the cursor to the previous field. Down arrow Moves the cursor to the next field.
VT100 Configuration Tool Key 27 Description Space bar For fields with multiple choices. Displays the next choice available for the field. F2 Moves to a desired menu. Press the appropriate letter key (indicated by underline) corresponding to the menu you want to access. ESC Cancels your configuration setting if a change was made. If no change was made, moves to the previous menu level. 4. Select the B-channel protocol to be used.
Chapter 4 PROFILE CONFIGURATION Netopia ISDN PC Card configuration settings are saved into profiles. Your Netopia ISDN PC Card is already equipped with a factory profile which requires only your ISDN information to establish a connection. Using the factory profile as a basis, you can create your own profile. Up to three user-defined profiles can be created for different connection scenarios, but only one profile may be active at one time.
VT100 Configuration Tool 29 The North American and International firmware versions each have their own screen.
Chapter 4 3. For either the Primary or Alternate Location, the following parameters must be configured: Parameter Description The local switch is of type: Specifies the ISDN switch type used by your ISDN service provider. North American firmware: For most locations, the default of North America (Auto-Detect) should be used. If the ISDN Switch Type cannot be automatically detected, National ISDN-1 (NI-1) or AT&T (5ESS) can be explicitly specified. International (Excl.
Chapter 5 Operation Once you have installed and configured your Netopia ISDN PC Card, you are ready to dial into your office or to the Internet. Computers with the Netopia ISDN PC Card connecting to private LANs and to the Internet Before preceeding, be sure you have remote access client software, such as Microsoft Dial-Up Networking, or the Shiva PPP or Microsoft RAS client software.
Chapter 5 WINDOWS 95 1. Open Dial-Up Networking. 2. Click Make New Connection. The Make New Connection Wizard appears: 3. Select the Netopia ISDN PC Card, then click Next. 4. Enter the telephone number and country code of the location you wish to call, then click Next.
Operation 5. 33 Click Finish. 6. In the Dial-Up Networking window, double-click My Connection. 7. Enter your user name and password, then click Connect. 8. If the connection was successfully completed, you can communicate with the remote host. If the connection could not be established, verify your Server Type and TCP/IP settings and alter them as required.
Chapter 5 WINDOWS NT 4.0 1. Open Dial-Up Networking. 2. Click New. The New Phonebook Entry Wizard appears.
Operation 3. Click Next. The Server window appears: 4. Check all the statements that apply, then click Next.
Chapter 5 5. Enter the phone number of the location you are calling, then click Next. 6. Click Finish. This takes you back to the Dial-Up Networking window. 7. Click Dial. 8. Enter your user name and password, then click OK. 9. If the connection was successfully completed, you can communicate with the remote host. If the connection could not be established, verify your configuration and TCP/IP settings, and alter them as required.
Operation 37 WINDOWS NT 3.51 For RAS connections, open the WFWNTEIC.INF file from the Netopia ISDN PC Card Disk with a text editor and add the entire contents to your system’s MODEM.INF file. Save this file and restart your computer for the changes to take effect. 1. In the Program Manager, double-click Remote Access Service. 2. Double-click Remote Access. 3. In the Remote Access window, click Add.
Chapter 5 4. Enter the name and phone number of the location you are calling, then click OK. TEST 555-1212 5. Click Dial. TEST 555-1212 6. Enter your user name and password, then click OK. 7. If the connection was successfully completed, you can communicate with the remote host. If the connection could not be established, verify your configuration and TCP/IP settings, and alter them as required.
Operation 39 WINDOWS 3.X 1. Ensure that ShivaRemote connectivity software has been installed on your computer. 2. Click ShivaRemote Connect. 3. Enter your dial-in name, password, and the phone number to be dialed. 4. Click Port Setup from the Tools menu. Select Netopia ISDN PC Card as the modem, then click OK.
Chapter 5 5. In the ShivaRemote Connect window, click Options. 6. Enable at least one of the Desired Protocols (e.g., IPX or IP), then click OK. (Netopia ISDN PC Card) 7. In the ShivaRemote Connect window, click Connect. 8. If the connection was successfully completed, you can communicate with the remote host. If the connection could not be established, verify your configuration and TCP/IP settings, and alter them as required.
Operation 41 DOS 1. Ensure that ShivaRemote connectivity software has been installed on your computer. 2. Enter the following command: C:\SHIVA\CONNECT 3. Select Port Setup from the Tools menu, then select the COM port. Netopia ISDN PC Card 4. Select Modem. You need to create a modem profile. Enter Netopia ISDN PC Card as the modem and set the speed to 115200 bps, then select OK. Netopia ISDN PC Card 5. In the Connect screen, select Options.
Chapter 5 6. Enable at least one of the Desired Protocols (e.g., IP or IPX), then select OK. 7. Back in the Connect screen, enter your user name, password, and the phone number to be dialed, then select Connect. 8. If the connection was successfully completed, you can communicate with the remote host. If the connection could not be established, verify your configuration and TCP/IP settings, and alter them as required.
Operation 43 For Windows 95 and Windows NT 4.0 only. When making long-distance calls, the Country Code, Area Code, and PBX Prefix (if required) must be included in the dialing string for the second Bchannel.
Chapter 5 USING OTHER COMMUNICATIONS APPLICATIONS Your Netopia ISDN PC Card works with any standard communications application that uses AT commands. When configuring your application, select the Netopia ISDN PC Card, if it is listed. If no special setting is available for Netopia, select a Hayes-compatible modem configuration, such as “generic modem”. Refer to your communications software documentation for more details.
Operation DATA 45 COMPRESSION Data compression is a process where the effective throughput is increased by encoding data in such a way that fewer bits are required to represent it. Popular compression algorithms typically reduce the size of the data by half, effectively doubling the rate at which it is transmitted. And with four-to-one compression, the data rate may quadruple. No configuration is required to enable the Netopia ISDN PC Card's compression functionality.
Chapter 6 Troubleshooting This chapter provides information on troubleshooting problems that may arise while you are using your Netopia ISDN PC Card. Many factors may cause a communications problem: your device, the cables, the telephone line, the remote device, or the Netopia ISDN PC Card itself.
Chapter 6 Depending upon the location you are dialing, there may be an incompatible local or toll telephone company. Though this is uncommon, if you suspect a telephone company problem when dialing local or toll data connections, contact your local telephone company and have it verify that you can dial a data call to the destination telephone number. 3. Make sure that the local and remote data applications have communication capability and are properly configured.
Troubleshooting 49 ■ 0x10 - Normal Call Clearing. As far as the ISDN network is concerned, the call completed normally, but one of the two devices chose to hang up and the other device acknowledged it. You would get this code if your client software was able to connect to the server device, but some element of the configuration, such as the user name or password, was incorrect. ■ 0x11 - User Busy. The device connected to the number dialed is not able to accept an additional connection.
Chapter 6 pany to see how many digits their switches are expecting for the data rate (i.e., 56 kbps or 64 kbps per B-channel) that you intend to use. ■ 0x6F - Protocol Error, Unspecified. This cause is commonly receieved when trying to dial from a Centrex ISDN line without putting a 9 at the beginning of the number. SOLUTIONS TO COMMON PROBLEMS Below are possible solutions for common problems: THE PC CARD IS NOT RECOGNIZED BY CARD SERVICES.
Troubleshooting 51 THE “COM PORT IS EITHER IN USE OR UNAVAILABLE” OR “PORT NOT OPEN” ERROR MESSAGE APPEARS. An incorrect Interrupt Request Line (IRQ) may be assigned to the COM port. Most computers have pre-assigned an IRQ# to each COM#. These include the following: ■ COM1 and IRQ4 ■ COM2 and IRQ3 ■ COM3 and IRQ4 ■ COM4 and IRQ3 If PC Card Services has assigned different combinations for the COM port and IRQ, you must reassign these numbers accordingly.
Chapter 6 To stop the Xmit test, press Enter again; the Netopia ISDN PC Card responds with the following: Xmit test terminated Warning: The IRQ may conflict with another COM port and cause the Netopia ISDN PC Card not to respond to a simple $ test. You may need to remove the mouse driver to diagnose the problem. YOUR COMPUTER BECOMES LOCKED. You may have removed the Netopia ISDN PC Card from the PC Card slot while a communications program was running.
Appendix A Technical Specifications NETOPIA ISDN PC CARD FIRMWARE SPECIFICATIONS Software Feature Supported on Terminal Adapter WAN Protocols • PPP (Point-to-Point Protocol) • ISDN (Q.921/Q.931: NI-1, AT&T 5ESS Custom, EuroISDN, TS013, and NTT JATE) • V.
Appendix A NETOPIA ISDN PC CARD HARDWARE SPECIFICATIONS Hardware Feature Supported on Terminal Adapter WAN Interface • 1 RJ-45 ISDN U or ISDN S/T BRI Non-volatile Configuration • 4 Kbyte non-volatile memory for storing configuration profiles Operating Temperature • 32F to 122F (0C to 50C) Operating Humidity • 0 to 90% non-condensing Operating Pressure • 86 to 106 kPa Power Requirements • 200 mA at +5 Volts (+/- 5% maximum variation in power supply) PC CARD CHARACTERISTICS The Netopia ISDN
Technical Specifications 55 SUPPORTED ISDN SWITCH TYPES The following table lists the ISDN switch types and corresponding geographical regions supported by the Netopia ISDN PC Card: ISDN Switch Type Geographical Region National ISDN NI-1 and AT&T Custom 5ESS North America (Canada and United States) EuroISDN Europe (including France and Germany) TS013 Australia NTT (JATE) Japan The Netopia ISDN PC Card includes firmware for both inside and outside of North America.
Appendix A REGULATORY NOTICES REGULATORY INFORMATION FOR THE UNITED STATES FCC Warning: Changes or modifications to this unit not expressly approved by Farallon Communications could void the user's authority to operate the equipment. Note: This equipment has been tested and found to comply with the limits for a Class B digital device, pursuant to Part 15 of the FCC Rules. These limits are designed to provide reasonable protection against harmful interference in a residential installation.
Technical Specifications 57 This digital apparatus does not exceed the Class B limits for radio noise emissions from digital apparatus set out in the Radio Interference Regulations of the Canadian Department of Communications. Le présent appareil numérique n'émet pas de bruits radioélectriques dépassant les limites applicables aux appareils numériques de la classe B prescrites dans le Règlement sur le brouillage radioélectrique édicté par le ministère des Communications du Canada.
Appendix A Proximity to Hazardous Voltages This information is provided for the benefit of manufacturers of PCs which include a PC Card slot. Users should verify that their PC has been constructed in accordance with the following guidelines. In order to comply with safety regulations there must be adequate separation between Netopia ISDN PC Card and adjacent modules.
Appendix B AT Commands The following table lists the Netopia ISDN PC Card AT commands. Commands marked with an asterisk (*) are configuration settings (static parameters) that do not take effect until the Netopia ISDN PC Card is restarted. The lowercase letters c, n, s, and v are variables that take different types of values. Expanded explanations of the AT commands, with default values and parameter ranges, may be found in the README.TXT file on the Netopia ISDN PC Card Disk 1.
Appendix B AT Command Description AT!E5=n V.120 N200 (Maximum Retry Count) AT!E6=n V.120 T203 (Link Integrity Timer) AT!E7=n V.
AT Commands AT Command Description AT>Hs View Help Information for Command s AT>VC View Current Profile AT>VCC View the Call and COM Port Dynamic Parameters AT>VCD View All Dynamic Parameters (Call, COM, V.120, PPP, MLPPP) AT>VCP View the Protocol Parameters (V.
Appendix B AT COMMAND RESULT CODES Result codes, or status messages, are displayed after an AT command is issued. Result codes can be displayed as a long-form word message or as a short-form number code. The Result Code Format command (ATVn) determines short- or long-form usage.
Farallon Technical Support Farallon is committed to providing its customers with reliable products and excellent technical support. Please take a moment now to fill out the registration card enclosed in your Netopia ISDN PC Card package so that we can notify you about any updated product information. Before contacting Farallon Customer Service, please look in this user’s guide for answers to your questions and possible solutions to a problem.
Farallon Technical Support FARALLON BBS Farallon Bulletin Board Service: (510) 865-1321 You can also contact the Farallon Bulletin Board Service over your ISDN line. This allows you to test your ISDN connection and also download information from the BBS. Farallon BBS ISDN line: (510) 864-5562 or (510) 864-5563 FARALLON FAX-BACK This service provides technical notes which answer the most commonly asked questions, and offers solutions for many common problems encountered with Farallon products.
Warranty LIMITED WARRANTY AND LIMITATION OF REMEDIES Farallon warrants to you, the end user, that the accompanying Farallon product, which may include third party products or technology (the “Product”) will be free from defects in materials and workmanship under normal use. This warranty will expire five (5) years from date of purchase.
THE ABOVE WARRANTIES ARE MADE BY FARALLON ALONE, AND THEY ARE the ONLY WARRANTIES MADE BY ANYONE REGARDING THE ENCLOSED PRODUCT. Farallon and its licensor(s) make no other warranties, express or implied, including without limitation the implied warranties of merchantability and fitness for a particular purpose, regarding the enclosed product.