
User's Manual
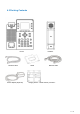
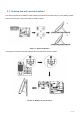
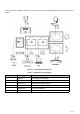
Table Of Contents
- Directory
- 1Picture
- 2Table
- 3Safety Instruction
- 4Overview
- 5Desktop Installation
- 6Appendix Table
- 7Introduction to the User
- 8Basic Function
- 9Advance Function
- 10Phone Settings
- 11Web Configurations
- 12Network >> Basic
- 12.1Network >> Service Port
- 12.2Network >> VPN
- 12.3Network >> Advanced
- 12.4Line >> SIP
- 12.5Line >> SIP Hotspot
- 12.6Line >> Dial Plan
- 12.7Line >> Basic Settings
- 12.8Line >> RTCP-XR
- 12.9Phone settings >> Features
- 12.10Phone settings >> Media Settings
- 12.11Phone settings >> MCAST
- 12.12Phone settings >> Action
- 12.13Phone settings >> Time/Date
- 12.14Phone settings >> Tone
- 12.15Phone settings >> Advanced
- 12.16Phonebook >> Contact
- 12.17Phonebook >> Cloud phonebook
- 12.18Phonebook >> Call List
- 12.19Phonebook >> Web Dial
- 12.20Phonebook >> Advanced
- 12.21Call Log
- 12.22Function Key >> Function Key
- 12.23Function Key >> Side Key
- 12.24Function Key >> Softkey
- 12.25Function Key >> Advanced
- 12.26Application >> Manage Recording
- 12.27Security >> Web Filter
- 12.28Security >> Trust Certificates
- 12.29Security >> Device Certificates
- 12.30Security >> Firewall
- 12.31Device Log >> Device Log
- 13Trouble Shooting

17
/
125
5.2 Desktop and wall mounted method
The device supports two installation modes, desktop and wall mounted.If the phone is on the desktop, please
follow the instructions in the picture below to install the phone.
Picture 1 - Device installation
If the phone is mounted on the wall, please follow the instructions below to install it.
Picture 2 - Desktop to wall-mounted