
Installation Guide

Installing the Sloped Ceiling Kit (SCK1-52**) Instructions Sheet
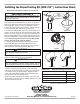
Be sure the electricity to the fan is turned off!
Figure 2
10983 Bennett Parkway
Zionsville, IN 46077
(888) 567-2055
FAX (866) 482-5215
Visit Our Website @ www.fanimation.com
Copyright 2012 Fanimation
2012/03
Figure 1a
Description Part #
AP255BL
AP260**
tekcarB regnaH
**551GP yponaC gnilieC
APG245BLllaB regnaH
Canopy Screw Cover
Pin
Setscrew
Hanger
Ball
Pin
Figure 1b
1. Remove the Hanger Ball by loosening the setscrew in
the Hanger Ball until the ball falls freely down the Downrod.
(Figure 1a) Remove the Pin from the Downrod, then remove
the Hanger Ball. Retain the Pin for reinstallation in Step 3.
2. Route wires through opening in Canopy. Position Canopy
on fan shown with open side facing up. (Figure 1b)
3. Reinstall the Hanger Ball (Figure 1b) on the Downrod as
follows. Route the three 80˝ wires through the Hanger Ball.
Position the Pin through the two holes in the Downrod and
align the Hanger Ball so the Pin is captured in the groove in the
top of the Hanger Ball. Pull the Hanger Ball up tight against
the pin. Securely tighten the setscrew in the Hanger Ball.
A loose setscrew could create fan wobble.
4. Carefully lift the assembled fan and seat the downrod/
hanger ball assembly on the Hanger Bracket that was
attached to the ceiling joist. Be sure the groove in the ball is
lined up with tab on the hanger bracket (Figure 2).
Figure 3bFigure 3a
INSTALLATION NOTE
When installing your ceiling fan on a sloped ceiling, the
hanger bracket must be mounted with the opening parallel
to the slope (Figure 2a).
WARNING
To avoid possible fire or shock, make sure that the electrical
wires are completely inside the canopy housing and not
pinched between the bracket, the housing and/or the ceiling.
NOTE: The threaded rods in the hanger bracket serves as
guides for easier (Canopy Housing) installation.
Failure to seat tab in groove could cause damage to electrical
wires and possible shock or fire hazard.
WARNING
Tab
SCK1-52** – Sloped Ceiling Kit Parts List
**
Insert FINISH CODES (Refer to fan model number
located on downrod support)
Ground
Lead
5. Remove one of the two shoulder screws in the hanger
bracket. Loosen the second shoulder screw without fully
removing it. Assemble canopy by rotating key slot in canopy
over shoulder screw in hanger bracket. Tighten shoulder
screw. Fully assemble and tighten second shoulder screw
that was previously removed (Figure 3a).
6. Securely attach and tighten the canopy screw cover over
the shoulder screws in the hanger bracket utilizing the key slot
twist-lock feature (Figure 3b).