
Installation Guide
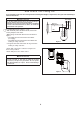

Hairpin
Clip
Clevis Pin
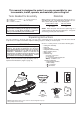
NOTE: Do not set Ceiling Fan Assembly on fl oor or hard
surface. Prior to assembly, set aside and save the hardware
bag(s) packed in the packing.
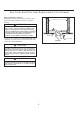
1. Remove the hairpin clip and clevis pin from the bottom
of the downrod support . Retain the pin and clip for
reinstallation in Step 3. (Figure 1)
CAUTION
To prevent damage to housing and/or blade, leave the
Ceiling Fan Assembly in its original packing during
installation of down rod, motor coupling cover and
ceiling canopy.
Figure 2
Figure 1
6
2. To prevent damage to housing and/or blade, leave
the Ceiling Fan Assembly in its original packing during
installation of down rod, motor coupling cover and ceiling
canopy.
NOTE: Do not set Ceiling Fan Assembly on fl oor or hard
surface.
3. Prior to assembly, set aside and save the hardware
bag(s) packed in the packing.
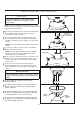
NOTE: If using a downrod other than what is supplied
with the fan, you must remove rubber sleeve from 6˝
downrod and put on new downrod.
4. The fan comes with black, white, green 80˝ wires and
support cable. Separate and untwist the wires. Route
the wires and support cable through the downrod with
rubber sleeve.
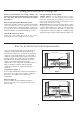
5. Be sure to line up the holes while pushing the
downrod with rubber sleeve into the downrod support
prior to installing clevis pin and hairpin clip. (Figure 2 &
Figure 3)
How to Assemble Your Ceiling Fan
Figure 4
Figure 5
▲
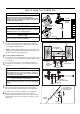
WARNING
It is critical that the clevis pin in the downrod support
is properly installed. Failure to verify that the pin and
hairpin clip are properly installed could result in the fan
falling.
Line up the
holes for clevis
pin installation
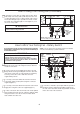
Ceiling
Canopy
Motor
Coupling
Cover
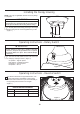
7. Slide the motor coupling cover down until it touches
the top of the motor and assemble ceiling canopy as
shown. (Figure 5)
8. Before installing fan, measure up approximately 6-9
inches above top of downrod. Cut off excess wire and
strip back insulation ½” from each end of wire.
9. You have now completed the assembly of your new
ceiling fan. You can now proceed with the hanging and
the electrical wiring of your fan.
6. Disassembly the hanger bracket and ceiling
canopy. (Figure 4)
Figure 3
Clevis Pin
Hairpin Clip