Installation Guide
Manuals
Brands
Fanimation Manuals
Ceiling Fans
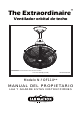
Extraordinaire 18-in Satin Nickel Indoor/Outdoor Downrod Ceiling Fan and Remote (3-blade)
11
12
13
14
15
16
17
18
19
20
13
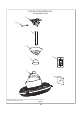
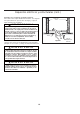
NOTE:
The illustration shown is not to scale or its actual con
fi
guration may vary
.
Wires partially removed for clarity
.
Exploded-View
T
he Extr
aor
dinair
e
™
Figure 1
5
2
7
6
3
4
1
1 (ref)
1
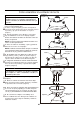
...
...
11
12
13
14
15
...
...
28