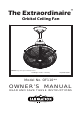
™ The Extraordinaire Orbital Ceiling Fan WARNING: Support Directly From Building Structure Net Weight 14.5 lbs. or 6.59 kg. U.S. patent # 7,887,293 Model No.
Important Safety Instructions WARNING: To avoid fire, shock and serious personal injury, follow these instructions. 1. Read your owner’s manual and safety information before installing your new fan. Review the accompanying assembly diagrams. 2. Before servicing or cleaning unit, switch power off at service panel and lock service panel disconnecting means to prevent power from being switched on accidentally.
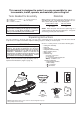
This manual is designed to make it as easy as possible for you to assemble, install, operate, and maintain your ceiling fan Tools Needed for Assembly Materials • One Phillips head screwdriver • 7⁄16˝ Socket head wrench • One stepladder • One wire stripper • One ¼˝ blade screwdriver Wiring outlet box and box connectors must be of type required by local code.
Energy Efficient Use of Ceiling Fans Ceiling fan performance and energy savings rely heavily on the proper installation and use of the ceiling fan. Here are a few tips to ensure efficient product performance. Using the Ceiling Fan Year Round Summer Season: Use the ceiling fan in the counterclockwise direction. The airflow produced by the ceiling fan creates a wind-chill effect, making you “feel” cooler. Select a fan speed that provides a comfortable breeze, lower speeds consume less energy.
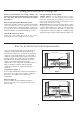
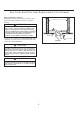
Electrical and Structural Requirements (Continued) Deep box with brace (Figure 3) Paired with a deep box, this hanger is meant to span between two joists and takes the place of wooden blocking. CEILING JOIST WARNING To reduce the risk of fire, electric shock, or personal injury, mount to outlet box marked acceptable for fan support of 15.9 kg (35 lbs) or less and use mounting screws provided with the outlet box.
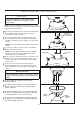
How to Assemble Your Ceiling Fan CAUTION Clevis Pin Hairpin Clip To prevent damage to housing and/or blade, leave the Ceiling Fan Assembly in its original packing during installation of down rod, motor coupling cover and ceiling canopy. NOTE: Do not set Ceiling Fan Assembly on floor or hard surface. Prior to assembly, set aside and save the hardware bag(s) packed in the packing. Figure 1 1. Remove the hairpin clip and clevis pin from the bottom of the downrod support .
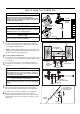
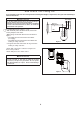
How to Hang Your Ceiling Fan ▲WARNING Ceiling To avoid possible electrical shock, be sure electricity is turned off at the main fuse box before hanging. NOTE: If you are not sure if the outlet box is grounded, contact a licensed electrician for advice, as it must be grounded for safe operation. 2 ft min.
How to Hang Your Ceiling Fan (continued) 6. Attach the safety cable to ceiling support cable. Slide cable clamp onto safety cable (from fan). Place the end of cable through the loop of ceiling support cable. Pull as much cable through loop as possible. Feed end of cable into clamp hole and firmly tighten screw (Figure 5). Cut off excess safety cable. ▲WARNING To avoid possible shock, do not pinch wires between the downrod and the hanger bracket.
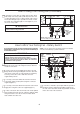
How to Wire Your Ceiling Fan If you feel that you do not have enough electrical wiring knowledge or experience, have your fan installed by a licensed electrician. ▲WARNING 1. Installing Wall Control (Figures 1 & 2): • With electrical power still disconnected, remove the existing wall plate and switch. • Make wiring connections with wire nuts as shown in Figure 1. – One black wire from wall control unit to black (hot supply).
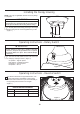
Installing the Canopy Housing NOTE: This step is applicable after the necessary wiring is completed. ▲WARNING To avoid possible fire or shock, make sure that the electrical wires are completely inside the canopy housing and not pinched between the housing and the ceiling. 1.
Operating Instructions - CW110WH Wall Control 1. Restore electrical power to the outlet box by turning the electricity on at the main fuse box. 2. NOTE: Set the rotary switch to High speed before using the wall control. The operating sequence is as follows: • 3 Slide Switch – low fan speed • 2 Slide Switch – medium fan speed • 1 Slide Switch – high fan speed • 0 Slide Switch – fan off Figure 1 Maintenance CAUTION Periodic cleaning of your new ceiling fan is the only maintenance that is needed.
Parts List Model #OF110** Ref.
The Extraordinaire™ Exploded-View 1 1 (ref) 2 3 6 4 5 7 NOTE: The illustration shown is not to scale or its actual configuration may vary. Wires partially removed for clarity.
Copyright 2015 Fanimation 10983 Bennett Parkway Zionsville, IN 46077 Toll Free (888) 567-2055 FAX (866) 482-5215 Outside U.S. call (317) 733-4113 Visit Our Website @ www.fanimation.com 2015/06 V.
™ The Extraordinaire Ventilador orbital de techo ADVERTENCIA: monte directamente en la estructura del edificio Peso neto 6,59 kg (14,5 lb) U.S. Patente # 7,887,293 Modelo N.
Instrucciones importantes de seguridad ADVERTENCIA: siga estas instrucciones para prevenir incendios, descargas eléctricas y lesiones personales graves. 1. Lea el manual del propietario y la información de seguridad antes de instalar su nuevo ventilador. Observe los diagramas de ensamblaje adjuntos. 2. Antes de llevar a cabo el mantenimiento o la limpieza de la unidad, desconecte la electricidad en el panel de servicio y bloquee los medios de desconexión del mismo para evitar que se active accidentalmente.
Este manual está diseñado para facilitar, en la medida de lo posible, el ensamblaje, la instalación, el funcionamiento y el mantenimiento de su ventilador de techo Materiales Herramientas necesarias para el ensamblaje • Destornillador Phillips • Escalera de tijera • Destornillador de ¼˝ • Pelacables • Cuatro conectores de cables (incluidos) La caja de distribución eléctrica y los conectores de la caja deben ser del tipo requerido por el código local.
Uso eficiente de la energía en ventiladores de techo El nivel de rendimiento y ahorro de energía de los ventiladores de techo dependen de su correcta instalación yuso.Acontinuaciónlepresentamosalgunassugerencias para asegurar un rendimiento eficiente del producto. Uso del ventilador de techo todo el año En verano: Use el ventilador de techo en sentido contrario a las agujas del reloj. El flujo de aire que produce el ventilador creará un efecto frío del aire que lo refrescará más.
Requisitos eléctricos y estructurales (cont.) Profunda caja con aparato ortopédico (Figura 3) Conectado a una caja de distribución eléctrica, este colgador sirve para abarcar el espacio entre dos vigas y ocupar el lugar de bloqueo de la madera.
Cómo ensamblar el ventilador de techo Pasador de horquilla PRECAUCIÓN Pasador Para prevenir daños en la cubierta o en las aspas, deje el ventilador de techo en su empaque original durante la instalación del barral, la cubierta de unión del motor y el capuchón. NOTA: no apoye la unidad del ventilador de techo en el suelo o en otra superficie dura. 1. Retire . el clip de horquilla y pasador de horquilla de la parte inferior de la bola para soporte de barral.
Cómo colgar el ventilador de techo ▲ADVERTENCIA Ceiling Techo Para evitar posibles descargas eléctricas, asegúrese de que la electricidad esté desconectada de la caja de fusibles principal antes de colgar el ventilador. NOTA: si no está seguro si la caja de distribución eléctrica tiene conexión a tierra, pida asesoramiento a un electricista autorizado, ya que la conexión a tierra es importante para un funcionamiento seguro. 2 ft min.
Cómo colgar el ventilador de techo (cont.) 6. Fije el cable de seguridad al cable de soporte para techo. Deslice la abrazadera de cables por el cable de seguridad (del ventilador). Pase el extremo del cable a través del aro que forma el cable de soporte para techo. Tire lo más posible del cable a través del aro. Inserte el extremo del cable en el orificio de la abrazadera y ajuste firmemente el tornillo (Figura 5). Corte el exceso de cable de seguridad.
Cómo realizar la instalación eléctrica del ventilador de techo ▲ADVERTENCIA Si siente que no posee la experiencia o los conocimientos eléctricos necesarios, contrate a un electricista autorizado para instalar el ventilador. Para evitar posibles descargas eléctricas, asegúrese de que la electricidad esté desconectada de la caja de fusibles principal antes de realizar la instalación eléctrica.
Instalación de la cubierta del capuchón NOTA: este paso se debe realizar luego de completar la instalación eléctrica necesaria. ▲ADVERTENCIA Para evitar posibles incendios o descargas eléctricas, asegúrese de que los cables eléctricos se encuentran completamente adentro de la cubierta del capuchón y de que no están aprisionados entre la cubierta y el techo. 1.
Instrucciones de funcionamiento: control de pared CW110WH 1. Vuelva a conectar la corriente eléctrica en la caja de distribución eléctrica mediante la conexión de la electricidad en la caja de fusibles principal. 2. NOTA: fije el interruptor giratorio en velocidad Alta antes de utilizar el control de pared.
Lista de piezas Modelo N.º OF110** N.° de Ref. Descripción Pieza N.
The Extraordinaire™ Despiece 1 1 (ref) 2 3 6 4 5 7 NOTA: la ilustración que se muestra no está hecha a escala y su configuración real puede variar. Los cables se dibujaron en forma parcial para mayor claridad.
Copyright 2015 Fanimation 10983 Bennett Parkway Zionsville, IN 46077 Llame Sin Cargo al (888) 567-2055 FAX (866) 482-5215 Desde fuera de los EE.UU. llame al (317) 733-4113 Visite nuestro sitio Web en www.fanimation.com 2015/06 V.