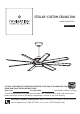
STELLAR ™ CUSTOM CEILING FAN MODEL #MAD7997** Español p. 27 ATTACH YOUR RECEIPT HERE AND REGISTER YOUR FAN AT FANIMATION.COM READ AND SAVE THESE INSTRUCTIONS Net Weight 18.92 lbs (8.58 kg) Date Code Purchase Date For best and quickest service please provide date code. You can find the date code on the carton, hand-held remote (inside of the battery compartment), receiver or top of fan housing.
Important Safety Instructions WARNING: To avoid fire, shock and serious personal injury, follow these instructions. 1. Read your owner’s manual and safety information before installing your new fan. Review the accompanying assembly diagrams. 2. Before servicing or cleaning unit, switch power off at service panel and lock service panel disconnecting means to prevent power from being switched on accidentally.
LIMITED LIFETIME WARRANTY Extends to the original purchaser of a Fanimation fan from an authorized Fanimation dealer/retailer only 1. LIMITED LIFETIME MOTOR WARRANTY - If any part of your fan motor fails, due to a defect in materials or workmanship during the lifetime of the original purchaser, Fanimation will provide the replacement part free of charge, when the defective fan is returned to our national service center. Proof of purchase is required.
This manual is designed to make it as easy as possible for you to assemble, install, operate, and maintain your ceiling fan. Tools Needed for Assembly (Not included) Materials Wiring outlet box and box connectors must be of type required by local code. The minimum wire would be a 3conductor (2-wire with ground) of the following size: 1/4 flat head screwdriver Installed Wire Length WARNING Up to 50 ft. 50 - 100 ft.
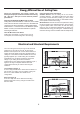
Energy Efficient Use of Ceiling Fans Ceiling fan performance and energy savings rely heavily on the proper installation and use of the ceiling fan. Here are a few tips to ensure efficient product performance. Using the Ceiling Fan Year Round Summer Season: Use the ceiling fan in the counterclockwise direction. The airflow produced by the ceiling fan creates a wind-chill effect, making you “feel” cooler.
Electrical and Structural Requirements (Continued) Deep box with brace (Figure 3) Paired with a deep box, this hanger is meant to span between two joists and takes the place of wooden blocking. WARNING To reduce the risk of fire, electric shock, or personal injury, mount to outlet box marked acceptable for fan support of 15.9 kg (35 lbs) or less and use mounting screws provided with the outlet box.
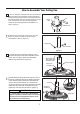
How to Assemble Your Ceiling Fan 1. Prior to assembly, set aside and save the hardware bags included in the packaging. Remove the hanger ball by loosening the set screw in the hanger ball until the ball falls freely down the downrod. Remove the pin from the downrod, then remove the hanger ball. Retain the pin and hanger ball for reinstallation in Step 6. (Figure1) Pin Hanger Ball Set screw Figure 1 2. Remove the hairpin clip and clevis pin from the bottom of downrod.
How to Assemble Your Ceiling Fan (continued) 5. Route wires and safety cable through motor coupling cover, canopy screw cover and ceiling canopy. (Figure 5) Ceiling Canopy Canopy Screw Cover Motor Coupling Cover Figure 5 6. Reinstall the hanger ball on the downrod as follows. Route the brown, blue, red, gray, yellow wires and safety cable through the hanger ball.
How to Hang Your Ceiling Fan WARNING To avoid possible fire or shock, be sure electricity is turned off at the main fuse box before hanging. (Figure 1) Main Fuse Box NOTE: If you are not sure if the outlet box is grounded, contact a licensed electrician for advice, as it must be grounded for safe operation. Figure 1 WARNING Ceiling The fan must be hung with at least 7’ of clearance from floor to blades. (Figure 2) 1.
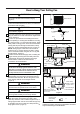
How to Wire Your Ceiling Fan NOTE: If fan or supply wires are different colors than indicated, ha 1. To set the code on receiver unit, slide dip switches to the same positions as set on the remote control. (Figure 1) Receiver NOTE: The remote unit has 32 different code Dip Switch ON other remote units, simply change the combination code 1 NOTE: Factory setting is all up. Do not use this position.
How to Wire Your Ceiling Fan (continued) 3. Connect wires using connectors as shown in Figure 4. WARNING RECEIVER HARDWARE USED: Wire Connectors Check to see that all connections are tight, including ground, and that no bare wire is visible at the wire connectors. Do not operate fan until the blades are in place. Noise and motor damage could result. AC POWER L BLACK N WHITE L1 RED x9 CAUTION: INCORRECT WIRE CONNECTION COULD DAMAGE THIS RECEIVER.
How to Wire Your Ceiling Fan (continued) 5. The receiver has a wifi antenna that can be used if you experience range issues. (Figure 6) After Installation Ceiling WIFI Antenna mount to ceiling using wood screw WIFI antenna Figure 6 (Optional) How to Install Your Canopy Housing NOTE: This step is applicable after the necessary wiring is completed.
How to Assemble Your Ceiling Fan Blades CAUTION Blade Plate Blade Do not connect fan blades until the fan is completely installed. Installing the fan with blades assembled may result in damage to the fan blades. WARNING Hex Socket Screw To reduce the risk of personal injury, do not bend the blades when installing, balancing or cleaning the fan. Do not insert foreign objects in between the rotating blades. #10-24 Button Head Screws (4 each per blade) 1.
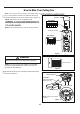
How to Assemble Your Light Kit or Cap (continued) 3. Remove the three screws in the light kit and retain the screws for later. (Figure 3) Light Kit Figure 3 4. If installing the light kit, skip this step. Assemble the light kit wire cover to the light kit using the previously removed screws and secure all three screws. (Figure 4) Light Kit Light Kit Wire Cover 5A. For use with light kit. Connect the 2 single pin connectors from the LED assembly to the 2 single pin connectors from motor assembly.
How to Operate Your Ceiling Fan 1. IMPORTANT: Using a full range dimmer switch (not included) to control fan speed will damage the fan. To reduce the risk of fire or electrical shock, do not use a full range dimmer switch to control the fan speed. (Figure 1) 2. Restore electrical power to the outlet box by turning the electricity on at the main fuse box.
How to Operate Your Ceiling Fan (continued) 5. If you have multiple fans and want to program all fans to one handheld control. Slide the Dip Switch with the same position in ALL receiver to ONE handheld to set up the code for each fans and follow Step 1 of the remote control speed set up process. Each fan needs to be no more than 30 feet from the handheld control that you would like to program.
How to Operate Your Ceiling Fan (continued) 9. Replace battery cover on the remote control and secure with the previously removed screw. (Figure 7) Figure 7 10. Remote functions: (Figure 8) • Indicator LED light: fan speed and light dimmer indicator • button: Tap once to turn off the fan. Press and hold this button for 5 seconds to turn on or turn off the buzzer. • Fan Speed: Turn on fan and turn speed up. Turn on fan and turn speed down. • Light button: Turn ON\OFF the light. Increase light output level.
How to Set Up the fanSync WiFi APP 1. Visit the Apple APP Store or the Google Play Store to download the free fanSync WiFi APP. Create your Fanimation fanSync account. (Figure 1) 10:37 AM All 80% Home Your dashboard is empty Add a Fanimation Ceiling Fans Figure 1 2. At this stage, your ceiling fan WiFi receiver should be installed and within range of your WiFi router. With the APP open, select "add device". (Figure 2) 10:37 AM 80% Add Fainmation..
How to Set Up the fanSync WiFi APP (continued) 4. Select your WiFi router and enter the WiFi password to connect your fanSync WiFi receiver. It will take 1-2 minutes to connect. After your WiFi receiver is connected, you can now name your ceiling fan in the APP and customize your settings. (Figure 4) 10:40 AM 80% Add Fainmation.. Set Up Wi-Fi Network Enter your network settings below to connect your device online. SSID XXXXX PASSWORD Remember my SSID and pa...
How to Set Up the fanSync WiFi APP (continued) ● Share Device After one smart device is connected to a fan, you must share the device with other users in order to control the fan with their device's APP. 10:45 AM 80% Settings DEVICE NAME Lounge Save EXTRA DEVICE CONTROLS ! HIDE FAN DIRECTION HIDE LIGHT POWER HIDE LIGHT DIMMER FAMILY SHARING SHARE DEVICE ● Link with Amazon Echo, Google Home and IFTTT Select the device you want to connect and follow the instructions in the set up procedure.
How to Install Your Remote Control 1. Installing Wall Plate: (Figure 1) Attach wall plate using the two provided screws. Screws (2) Wall Plate Figure 1 Maintenance 1. Periodic cleaning of your new ceiling fan is the only maintenance that is needed. When cleaning, use only a soft brush or lint free cloth to avoid scratching the finish. Abrasive cleaning agents are not required and should be avoided to prevent damage to finish. CAUTION Do not use solvents when cleaning your ceiling fan.
Troubleshooting WARNING For your own safety turn off power at fuse box or circuit breaker before trouble shooting your fan. Trouble 1. FAN WILL NOT START Probable Cause 1. Fuse or circuit breaker blown. 2. Loose power line connections to the fan, or loose switch wire connections in the switch housing. Suggested Remedy 1. Check main and branch circuit fuses or circuit breakers. 2. Check line wire connections to fan and switch wire connections in the switch housings.
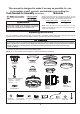
Parts List Model #MAD7997** Ref.
Fan Blades—Sold Separately B7993**-84 1 B7997**-72 Blade Set B7997**-64 B7997**-56 NOTE: The illustration shown is not to scale or its actual configuration may vary. Before discarding packaging material, be certain all parts have been removed. HOW TO ORDER REPAIR PARTS When ordering repair parts, always give the following information: • • • • Fan Model Number Part Number Part Description Date Code Contact techsupport@fanimation.com or call 1.888.567.2055 for repair parts.
Stellar ™ Custom Model MAD7997** Exploded-View Illustration 1 13 2 3 4 5 6 13 8 7 11 9 13 10 NOTE: The illustration shown is not to scale or its actual configuration may vary.
10983 Bennett Parkway Zionsville, IN 46077 Phone: 888-567-2055 Outside U.S.: 317-733-4113 FAX: 866-482-5215 FANIMATION.COM 2021/03 V.
VENTILADOR DE TECHO STELLAR™ CUSTOM MODELO#MAD7997** ADJUNTE SU RECIBO AQUÍ Y REGISTRE SU VENTILADOR EN FANIMATION.COM LEA Y GUARDE ESTAS INSTRUCCIONES Código de fecha Fecha de compra Peso neto 8.58 kg (18.92 lbs) Para ofrecer un servicio rápido y de calidad, por favor suministre el código de fecha. Puede encontrar el código de fecha en el paquete, en el mando a distancia (dentro del compartimento de las pilas), en el receptor o en la parte superior de la carcasa del ventilador.
Instrucciones de seguridad importantes ADVERTENCIA: Siga estas instrucciones paraprevenir incendios, descargas eléctricas y lesiones personales graves. AVERTISSEMENT: Suivez ces instructions pour éviter un incendie, une électrocution et des blessures graves. 1. Lea el manual del propietario y la información de seguridad antes de instalar su nuevo ventilador. Observe los diagramas de ensamblaje adjuntos. 2.
Instrucciones de seguridad adicionales (1) Este equipo no causará interferencias perjudiciales y (2) este equipo tolerará cualquier interferencia recibida, incluidas las interferencias que puedan provocar un funcionamiento no deseado. Las modifications que no estén aprobadas por la parte responsable del cumplimiento podrían anular la autorización del usuario para utilizear el equipo.
Este manual está diseñado para facilitar, en la medida de lo posible, el ensamblaje, la instalación, el funcionamiento y el mantenimiento de su ventilador de techo Materiales Herramientas necesarias para el ensamblaje (No incluido) • Destornillador Phillips • Escalera de tijera • • Pelacables ADVERTENCIA La caja de distribución eléctrica y los conectores de la caja deben ser del tipo requerido por el código local.
Instrucciones para el desempaque (cont.) 1. Verifique que haya recibido las siguientes piezas: NOTA: Si no está seguro de la descripción de una pieza, consulte la ilustración del despiece.
Uso eficiente de la energía en ventiladores de techo Uso del ventilador de techo todo el año El nivel de rendimiento y ahorro de energía de los ventiladores de techo dependen de su correcta instalación yuso.Acontinuaciónlepresentamosalgunassugerencias para asegurar un rendimiento eficiente del producto. En verano: Use el ventilador de techo en sentido contrario a las agujas del reloj. El flujo de aire que produce el ventilador creará un efecto frío del aire que lo refrescará más.
Requisitos eléctricos y estructurales (cont.) Uso del soporte (Figura 3) Conectado a una caja de distribución eléctrica, este colgador sirve para abarcar el espacio entre dos vigas y ocupar el lugar de bloqueo de la madera. Vigas del techo ADVERTENCIA Para reducir el riesgo de incendios, descargas eléctricas o lesiones personales, fije el ventilador a la caja de distribución eléctrica marcada como aceptable para soporte de ventilador de 15,88kg (35lb).
Cómo ensamblar el ventilador de techo 1. Extraiga la pieza de la bola colgante de la unidad de la bola colgante / varilla aflojando el tornillo de presión de la bola colgante hasta que la bola se libere de la varilla. Retire el pasador del barral y luego extraiga la semiesfera. Conserve el pasador y la semiesfera para su reinstalación en el Paso 6. (Figura 1) Pasador Bola colgante Tornillo de fijación Figura 1 2.
Cómo ensamblar el ventilador de techo (cont.) 5. Pase los cables y cable de seguridad a través de la cubierta de unión del motor, la cubierta para el tornillo del capuchón y el capuchón con el lado abierto apuntando hacia arriba. (Figura 5) Capuchón de techo Cubierta del tornillo de la base Cubierta de unión del motor Figura 5 6. Vuelva a colocar la semiesfera en el barral como se indica a continuación.
Cómo colgar el ventilador de techo ADVERTENCIA Para evitar una posible descarga eléctrica, asegúrese de cortar la alimentación eléctrica de la caja de fusiblesprincipal antes de colgar el ventilador. (Figura 1) Principal Caja De Fusibles AVERTISSEMENT Figura 1 Assurez-vous que l'alimentation électrique est coupée au niveau du boîtier à fusibles principal avant de suspendre le ventilateur afin d'éviter tout risque d'électrocution.
Cómo colgar el ventilador de techo (cont.) 1. Perfore un orificio de 1/4" en la estructura del edificio para evitar grietas con la instalación del tornillo de intervalo. Utilice el tornillo de intervalo de 3/8" x 2" y la arandela plana para fijar el cable de seguridad a la viga del techo o a la estructura de madera. Dicho tornillo pasará a través de arandela plana, la presilla del cable de seguridad y se fijará en la estructura del edificio. (Figura 3) 2.
Cómo realizar la instalación eléctrica del ventilador de techo NOTA: Si los cables de suministro o del ventilador son de colores diferentes que los indicados, contrate a un electricista calificado para que realice la instalación. 1. Para configurar el código de unidad del receptor. Deslice los interruptores de código a las mismas posiciones que en el transmisor. (Figura 1) Receptor Interruptores NOTA: Los ajustes de fábricas vienen con todos los interruptores hacia arriba. No utilice esta posición.
Cómo realizar la instalación eléctrica del ventilador de techo (cont.) 3. Realice las conexiones de cables al bloque del terminal como se muestra en la Figura 4. AVERTISSEMENT ADVERTENCIA Verifique que todas las conexiones estén ajustadas, incluida la conexión a tierra, y que no haya conductores desnudos visibles en los conectores. No opere el ventilador hasta que las aspas estén instaladas. Podría ocasionar ruidos y daños al motor.
Cómo realizar la instalación eléctrica del ventilador de techo (cont.) 4. Una vez realizadas las conexiones, los cables deben ser colocados de forma extendida poniendo el conductor de la toma de tierra y el conductor de toma de tierra del equipo a un lado de la caja, colocando el conductor sin toma de tierra en el otro lado de la caja.
Cómo instalar la carcasa de la cubierta NOTA: Este paso se debe realizar luego de completar lacompleted. instalación eléctrica necesaria. 1. Ensamble la base girando y teniendo cuidado de no pisar los cables el chavetero de la base sobre el tornillo de reborde de la abrazadera para colgar. Presionesligeramente e incline el motor para tener más espacios para fijar los tornillos del hombro. Ajusteel tornillo de reborde. Ensamble por completo elsegundo tornillo de reborde que antes había retiradoy ajústelo.
Cómo ensamblar su el kit de iluminación o la tapa 1. Guárdelos para después y afloje levemente los otros dos tronillos. (Figura 1) Unidad del motor del ventilador Figura 1 2. Instale la ensamble de la placa de iluminación en el soporte utilizando las dos ranuras principales de conexión. Vuelva a colocar el tercer tornillo y asegure los tres tronillos. (Figura 2) Ensamble de la placa de iluminación Figura 2 3. Extraiga el tres tornillos del ensamble de la placa de iluminación y guárdelos para después.
Cómo ensamblar su el kit de iluminación o la tapa (Cont.) 6. Instale la unidad LED en la ernsamble de la placa de iluminación usandos el tornillo previamente retirado y asegure los tres tronillos. (Figura 6) Ensamble de la placa de iluminación PRECAUCIÓN La fuente de luz está diseñado para esta aplicación específica y puede recalentarse si reparado por personal no capacitado.
Cómo utilizar su ventilador de techo (Cont.) AVERTISSEMENT AVERTISSEMENT N'utilisez pas ce ventilateur avec un contrôleur mural (rhéostat) variable ou un gradateur. Cela pourrait endommager la télécommande du ventilateur de plafond. 3. Retire la cubierta de la batería del control remoto con un destornillador y conserve el tornillo para luego.
Cómo utilizar su ventilador de techo (Cont.) 7. Para configurar el código del mando a distancia a las mismas posiciones que en el receptor. Mueva los interruptores de código hasta colocar elcódigo de selección en la posición arriba o abajo. Con un destornillador pequeño o con una lapicera (no se incluye) deslice firmemente hacia arriba o hacia abajo. (Figrua 5) Mando a distancia Interruptores NOTA: Los ajustes de fábricas vienen con todos los interruptores hacia arriba. No utilice esta posición.
Cómo utilizar su ventilador de techo (Cont.) 9. Vuelva a colocar la cubierta de la batería en el mando a distancia con un tornillo retirados previamente. (Figura 7) Figura 7 10. Funciones del control remoto: (Figura 8) • Luz LED del indicador: Velocidad del ventilador e indicador atenuante de la iluminación • Botón: Toque este botón apaga el ventilador. Mantenga pulsado el botón durante 5 segundos para encender o apagalo el zumbador.
Cómo Configuración de la App fanSync Wifi 1. Visite el App Store de Apple o el Play Store de Google para descargarse la App gratuita fanSinc Wifi. Cree su cuenta Fanimation fanSync. (Figura 1) 10:37 AM All 80% Home Your dashboard is empty Add a Fanimation Ceiling Fans Figura 1 2. En este paso, el receptor Wifi de su ventilador de techo debe estar instalado y dentro del rango de su router Wifi. Con la App abierta, seleccione “añadir dispositivo”. (Figura 2) 10:37 AM 80% Add Fainmation..
Cómo Configuración de la App fanSync Wifi (Cont.) 4. Seleccione su router Wifi e introduzca la contraseña Wifi para conectarse a su receptor Wifi fanSync. Tardará 1 - 2 minutos en conectarse. Una vez que su receptor Wifi se haya conectado, ahora puede nombrar su ventilador de techo en la App y personalizar sus ajustes. (Figura 4) 10:40 AM 80% Add Fainmation.. Set Up Wi-Fi Network Enter your network settings below to connect your device online. SSID XXXXX PASSWORD Remember my SSID and pa...
Cómo Configuración de la App fanSync Wifi (Cont.) ● Compartir dispositivo Una vez que un dispositivo inteligente es conectado al ventilador, debe compartir el dispositivo con otros usuarios para que otros usuarios de la App puedan controlar el ventilador.
Cómo instalar su mando a distancia 1. Instalación de la placa de la pared: (Figura 1) Fije la placa de la pared usando los dos tornillos suministrados. Tornillos (2) Placa de la pared Figura 1 Mantenimiento El único mantenimiento necesario para el ventilador de techo es una limpieza periódica. Al llevar a cabo la limpieza, use sólo un cepillo suave o un paño sin pelusas, para evitar rayar el acabado.
Solución de problemas ADVERTENCIA Para su propia seguridad, desconecte la electricidad de la caja de fusibles o disyuntor antes de solucionar problemas en su ventilador. AVERTISSEMENT Pour votre sécurité, placez le coffret à fusibles ou le disjoncteur hors tension avant de tenter d’identifier tout problème pouvant affecter votre ventilateur. Problema 1. EL VENTILADOR NO ARRANCA Causa posible Solución sugerida 1. El fusible o el disyuntor están fundidos. 1.
Lista de piezas Modelos N.° MAD7997** N.° de Ref. Descripción Pieza # N.
Pala de ventilador—Se compra por separado B7993**-84 1 B7997**-72 Juego de spas B7997**-64 B7997**-56 NOTA: La ilustración que se muestra no está hecha a escala y su configuración real y/o terminación puede variar.
Stellar ™ Custom Modelo MAD7997** Ilustración del despiece 1 13 2 3 4 5 6 13 8 7 11 9 12 13 10 NOTA: La ilustración que se muestra no está hecha a escala y su configuración real y/o terminación puede variar.
10983 Bennett Parkway Zionsville, IN 46077 Llame sin cargo al (888) 567-2055 FAX (866) 482-5215 Desde fuera de los EE.UU., llame al (317) 733-4113 Visite nuestro sitio Web en www.fanimation.com 2021/03 V.