
Installation Guide


How to Assemble Your Ceiling Fan
(continued)
9
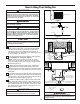
Figure 5
Figure 6
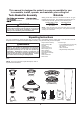
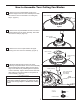
4. Slide downrod into the downrod support on top of
the motor. Install the clevis pin by aligning the holes
in the downrod support with holes in the downrod.
Secure clevis pin with hairpin clip. Tighten the two set
screws with nuts in the downrod support. (Figure 4)
WARNING
It is critical that the clevis pin in the downrod support
is properly installed and the set screws and nuts are
securely tightened. Failure to do so could result in
the fan falling.
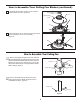
5. Route wires through motor coupling cover, canopy
screw cover and ceiling canopy. (Figure 5)
3. Route the black, white and blue wires and safety
cable through the downrod. (Figure 3)
Figure 4
Downrod
Set Screws and
Locking Nuts (2)
Hairpin Clip
Clevis Pin
Figure 3
Figure 7
Motor Coupling
Cover
Ceiling Canopy
Canopy Screw
Cover
7. Cut off excess lead wire approximately 6 to 9 inches
above top of the top of the downrod. Strip insulation off
1/2 inch from the end of each lead wire. (Figure 7)
NOTE:
All set screws must be checked, and retightened
where necessary, before installation.
Black, White, Blue wires
and Safety Cable
6. Reinstall the hanger ball on the downrod as follows.
Route the black, white and blue wires and safety cable
through the hanger ball. Position the pin through
the two holes in the downrod and align the hanger
ball so the pin is captured in the groove in the top
of the hanger ball. Pull the hanger ball up tight
against the pin. Securely tighten the set screw in the
hanger ball. A loose set screw could create fan
wobble. (Figure 6)