
Use and Care Guide


How to Operate Your Ceiling Fan
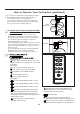
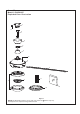
MAIN FUSE BOX
Figure 2
Figure 1
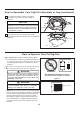
For illustrative purposes only-not
intended to cover all types of controls
1. IMPORTANT: Using a full range dimmer switch
(not included) to control fan speed will damage the fan.
To reduce the risk of fire or electrical shock, do not use
a full range dimmer switch to control the fan speed.
(Figure 1)
2. Restore electrical power to the outlet box by turning
the electricity on at the main fuse box. (Figure 2)
Check to see that all connections are tight, including
ground, and that no bare wire is visible at the wire
connectors, except for the ground wire. Do not
operate fan until the blades are in place. Noise and
fan damage could result.
WARNING
NOTE:
The fan's receiver features an automatic learning
function. There are no frequency switches on the receiver
unit. The receiver will automatically scan the frequency
from the hand held control if any changes are made.
The frequency settings should only be changed in the
case of interference or if multiple ceiling fans with the
same type of control system are installed in the same
structure.
WARNING
Do not operate this fan with a variable (Rheostat) wall
controller or dimmer switch. Doing so could result in
damage to the ceiling fan's remote control unit.
12
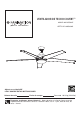
How to Assemble Your Light Kit Assembly or Cap (continued)
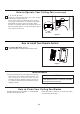
4. Assemble the LED assembly to the light kit
assembly use the removed screws in Step 2.
(Figure 4)
The light source is designed for this specific
application and can overheat if serviced by untrained
personnel. If any servicing is required, the product
should be returned to an authorized service facility
for examination or repair.
CAUTION
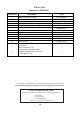
5. Assemble the glass to the light kit assembly
by twisting in a clockwise direction. Do not overtighten.
(Figure 5)
Light Kit Assembly
Figure 5
Glass
LED
Assembly
Light Kit
Assembly
Figure 4