
Use and Care Guide


14
Figure 5
Figure 4
12V 23A
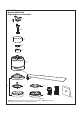
Battery (1 pcs)
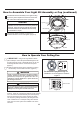
SET
Figure 3
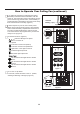
5. Remote functions: (Figure 5)
• Indicator LED light: fan speed
• button: Turns fan off.
• Fan Speed:
Turns fan on and turns speed up.
Turns fan on and turns speed down.
• Light button: Turns light on and off.
Increases light output level.
Decreases light output level.
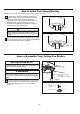
3. To make fan operational, install 23A/12V battery
(included) in hand-held remote transmitter, with fan
power off. Then follow the remote code setting process.
(If not used for long periods of time, remove battery to
prevent damage to transmitter). Store the remote away
from excessive heat or humidly. (Figure 3)
4. Shut off power to your fan, then restore power.
Within 30 seconds of restoring power, press the SET
button inside the battery compartment and hold for 3
seconds. The light will blink twice and fan running.
The remote will now be programmed to your fan and
ready for use. (Figure 4)
Tap and the fan and light will turn off after
3 hours.
Tap and the fan and light will turn off after
6 hours.
Tap and the fan and light will turn off after
1 hour.
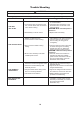
6. ˝D˝ and ˝O˝ dip switch:
For this fan, switch should be in the ˝D˝ position,
allowing for dimming of the light. (Figure 6 )
Figure 6
Dip Switch
O
D
How to Operate Your Ceiling Fan (continued)