INSTALLATION MANUAL Milano Genova 120 falmecau.
CONGRATULATIONS Congratulations and thank you for choosing a Falmec rangehood. To avoid the risks that are always present when you use an electrical appliance it is important that the rangehood is installed correctly and that you read the safety instructions carefully to avoid misuse and hazards. We recommend that you keep this instruction booklet for future reference and pass it on to any future owners.
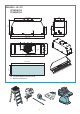
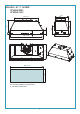
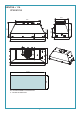
PRODUCT DESCRIPTION & CARTON CONTENTS CARTON 1 - HOOD UNIT INTEGRATED HOOD - REMOTE MOTOR Models include: MILANO FP3ML60S2, FP3ML90S2, MILANO FP3MLD90S2, FP3MLD12S2 GENOVA FP3GV12S2 Included in the carton: 1. Main hood housing including control module and lighting 2. Baffle filters 3. Grease trap 4. Fixing screws 5. Operating & installation guide Fig. A CARTON 2 - FAN MOTOR UNIT You will be supplied with one of the three fan motor options detailed. OPTION 1 - IN ROOF SOLUTION (Fig.
MILANO + 56 / 87 FP3ML60S2 FP3ML90S2 247 12 280 505 / 815 541 / 851 280 200 118 204 184 332 358 379 / 665 541 / 851 250 512 / 822 EN - HOLE MEASUREMENTS FOR INSTALLATION IT - MISURE FORO PER INCASSO 4
MILANO + 87 / 116 DEEP FP3MLD90S2 FP3MLD12S2 326 248 12 98 204 326 351 584 / 870 360 815 / 1101 360 200 118 851 / 1137 851 / 1137 330 824 / 1110 EN - HOLE MEASUREMENTS FOR INSTALLATION IT - MISURE FORO PER INCASSO 5
GENOVA + 116 FP3GV12S2 416 281 12 326 204 98 351 870 450 450 200 118 1101 1137 1137 420 1110 EN - HOLE MEASUREMENTS FOR INSTALLATION IT - MISURE FORO PER INCASSO 6
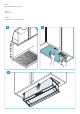
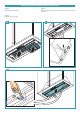
STEP 1: Minimum distance by cooktop. STEP 2: Wall unit hole. STEP 3: You push the hood in wall unit hole.
STEP 4: You screw the blocking devices. STEP 5: Connect the hood outlet (in the top or back ducted position) to 150mm ducting leading to an external output.
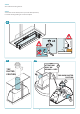
STEP 6: Attach the male plug of the rangehood unit to the main power supply. STEP 7: Assembling the metal filters.
SEQUENCE FOR REMOVING THE HOOD STEP 8: Remove the metal filters. STEP 10: With your finger enter the hole and pull the lever to unlock the stop. STEP 9: Remove the cover caps.
Before installing the hood, check that the electrical mains power supply corresponds with what is reported on the identification plate located inside the hood. If the supply cord is damaged, it must be replaced by the manufacturer, its service agent or similarly qualified persons in order to avoid a hazard. The socket used to connect the installed equipment to the electrical power supply must be within reach: otherwise, install a mains switch to disconnect the hood when required.
INTENDED USE INSTALLATION only intended for qualified personnel The equipment is solely intended to be used to extract fumes generated from cooking food in non-professional domestic kitchens: any other use is improper. Improper use can cause damage to persons, things, pets and exempts the Manufacturer from any liability. Before installing the hood, carefully read the chapter "SAFETY INSTRUCTIONS AND WARNINGS".
USING THE RADIO CONTROL (OPTIONAL) Speed 2 activation Place the hood away from sources of electromagnetic waves (e.g. microwave ovens), which could interfere with the radio control and with the hood electronics. The maximum operating distance is 5 metres, that may vary according to the presence of electromagnetic interferences. Radio control operated at 433.92MHz. The radio control consists of two parts: - the receiver built into the hood; - the transmitter shown here in the figure.
LIGHTING RADIO CONTROL CODE CHANGE With only one radio control, go directly to point 2. With several radio controls in the same room, a new code can be created by following the procedure below. The range hood is equipped with high efficiency, low consumption LED light. GREASE DRIP TRAY Disconnect the power to the hood before starting the procedure. It is advisable to clean the tray every 15 days. Do not use corrosive, acid or alkaline detergents.
DUCTING & EXTRACTION LEVELS PART 1: HOOD INSTALLATION GUIDE (REMOTE MOTORS ONLY) INTEGRATED HOODS - REMOTE MOTOR The Flexi ducting is designed to ensure optimum performance for your rangehood. Please follow the installation instructions carefully. Every FALMEC rangehood must be ducted to the external or in-roof motor unit by the use of non-flammable ducting. The rangehood must not be ducted into a wall cavity or a ceiling space where a build-up of grease can occur and become a potential fire risk.
REMOTE MOTOR SOLUTIONS 133 / 154 Ø 403 / 445 EXTERNAL ROOF SOLUTION 765, 1140 & 2010m3/h 1 597.5 / 599 1. Fan power supply connects to internal hood unit. 2. Tile or metal roof flashing (optional accessory). 3. Rigid duct mount (optional accessory). 4. 200mm flexi ducting (attached to internal hood unit)*. 2 3 * Advise to include gentle bend in duct run as well ensuring ducting is pulled tight and excess removed.
PART 2: MOTOR INSTALLATION GUIDE EXTERNAL ROOF SOLUTION - METAL ROOF INSTALLATION Inspection: IN ROOF SOLUTION Positioning your In-Roof Unit: It is recommended that the In-Roof motor unit be mounted in a roof space or wall cavity. Please ensure that the In-Roof motor unit is positioned in an environment that is free of other gases to enable an efficient expulsion of the cooking by-products and to ensure that back draft of external gases doesn’t take place.
EXTERNAL ROOF SOLUTION - TILE ROOF INSTALLATION EXTERNAL WALL SOLUTION Inspection: Inspection: Ensure the unit has arrived in good condition and that the impeller will spin freely. This product is designed to be installed on a roof up to 45° pitch. Ensure the unit has arrived in good condition and that the impeller will spin freely. Installation: 1. Installation of this product should be carried out by appropriately qualified persons. 2.
ENGLISH EW-765 / EW-1140 SPECIFICATIONS 325 130 162.5 80 419 123 6.5 4 holes 360 298 All measurements in mm EW-2010 SPECIFICATIONS 425 170 212.5 80 518 147 450 388 All measurements in mm 19 6.
PROFESSIONAL WARRANTY YOUR STATUTORY RIGHTS FALMEC products fully assures all customers that our goods come with guarantees that cannot be excluded under the Australian Consumer Law. You are entitled to have the goods repaired or replaced if the goods fail to be of acceptable quality and the failure does not amount to a major failure. You are also entitled to a replacement or refund for a major failure and for compensation for any other reasonably foreseeable loss or damage.
NOTE - NOTES 21
NOTE - NOTES 22
NOTE - NOTES 23
Code 110033077 Ed.