Italiano English Deutsch Français Español на русском языке INSTRUCTIONS BOOKLET BEDIENUNGSSANLEITUNG LIVRET D’INSTRUCTIONS Polska Cod. 110030279 (DOWNDRAFT EVO) Português LIBRETTO ISTRUZIONI MANUAL DE INSTRUCCIONES MANUAL DE INSTRUÇÕES àçëíêìäñàü èé ùäëèãìÄíÄñàà INSTRUKCJE OBSŁUGI Ed.
Gentile Signora/Signore, congratulazioni! Lei ha acquistato una cappa di prestigio e di sicura qualità. Perché Lei possa ottenere le migliori prestazioni, Le suggeriamo di seguire con attenzione le istruzioni per l’uso e manutenzione che troverà in questo libretto; inoltre, per ordinare i filtri di ricambio al carbone attivo utilizzi l’apposito tagliando che troverà allegato alla copertina. Dear Sir/Madam, congratulations! You have purchased a prestigious range hood of guaranteed quality.
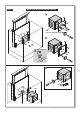
1 320 126 823,7 580 726 781 60 80 128 max 400 715 738 798 109 92 84 1,5 341 19 8 380 35
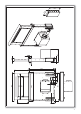
321 361 471 540mm quota minima con curva 90° Falmec 540mm using 90° bend Falmec 246 349 191 92 97 RECIRCULATION MODE
Fig.
Fig. F Recirculation mode 1 2 AIR KACL.784 AIR 3 KACL.
Fig. H1 1 2 AA TYPE A Fig. H2 KACL.
Fig.
8 Fig. 1 0 81 60 mm mm mm mi n. 738 mm max Fig.
Fig. 3A Motor (UM) mounted on the hood (a) 2 FM UM (separate box KACL.
Fig.
Fig. 4A Motor (UM) mounted in remote position (b) 220 90 TC 1 Fig. 4B Fig.
Fig.
I A LIBRETTO ISTRUZIONI AVVERTENZE È molto importante che questo libretto istruzioni sia conservato insieme all’apparecchiatura per qualsiasi futura consultazione. Se l’apparecchio dovesse essere venduto o trasferito ad un’altra persona, assicurarsi che il libretto venga fornito assieme, in modo che il nuovo utente possa essere messo al corrente del funzionamento della cappa e delle avvertenze relative.
AVVISO: Il presente prodotto deve essere smaltito al termine della sua vita utile conformemente alle normative in vigore. AVVERTENZE L’impianto elettrico è munito di collegamento a terra secondo le norme di sicurezza internazionali; è inoltre conforme alle normative Europee sull’antidisturbo radio. Non collegare l’apparecchio a condotti di scarico dei fumi prodotti dalla combustione (caldaie, caminetti,ecc).
D ALLACCIAMENTO ELETTRICO (parte riservata solo a persone qualificate per l’allacciamento) ATTENZIONE! Prima di effettuare qualsiasi operazione all’interno della cappa scollegare l’apparecchio dalla rete elettrica. Assicurarsi che non vengano scollegati o tagliati fili elettrici all’interno della cappa; nel caso si verifichino tali situazioni contattare il centro assistenza più vicino. Per l’allacciamento elettrico rivolgersi a personale qualificato.
F CAPPA VERSIONE A RICICLO INTERNO (filtrante) G FUNZIONAMENTO 1: TIMER - RESET FILTRO - APERTURA ANTA - CHIUSURA ANTA Timer: Con il motore in funzione la pressione del tasto attiva lo spegnimento temporizzato del motore dopo 15 minuti. Al termine dei 15’ il motore e la luce si spengono e la parte mobile si richiude. Il led rosso lampeggia ad indicare che la funzione è attiva. Variando la velocità del motore non si interrompe il conteggio.
5: 4° VELOCITÀ Se il motore è ad una velocità diversa dalla 4°, la pressione del tasto aziona la 4° velocità, e il tasto T5 lampeggia. Se il motore è fermo, il tasto è disattivato. La 4° velocità è temporizzata, se l’utente non cambia velocità, il motore rimane in 4° per 7 minuti e successivamente si posiziona in 3°. Il tasto T5 si spegne e si illumina il tasto T4. 6: - LUCE - REMOTE BINDING Luce: La pressione breve del tasto T6 accende e spegne la luce. Il tasto T6 si illumina se la luce è accesa.
I ILLUMINAZIONE MONTAGGIO E SOSTITUZIONE L MANUTENZIONE E PULIZIA Una costante manutenzione garantisce un buon funzionamento ed un buon rendimento nel tempo. Particolari attenzioni vanno rivolte ai filtri metallici antigrasso ed ai filtri al carbone attivo, infatti la pulizia frequente dei filtri e dei loro supporti garantisce che sulla cappa non si accumulino grassi che sono pericolosi per la facilità di incendio. 1.
M GARANZIA La sua nuova apparecchiatura è coperta da garanzia. Le condizioni di garanzia sono riportate per esteso sull’ultima pagina di copertina di questo libretto. La casa costruttrice non risponde delle possibili inesattezze, imputabili ad errori di stampa o di trascrizione, contenute nel presente libretto.
GB A INSTRUCTIONS BOOKLET WARNINGS CAUTION: This product must be disposed of at end of life according to the rules in force. 19 English This instruction booklet must be kept together with the appliance for future reference. If the appliance is sold or consigned to other parties, check that the booklet is supplied with it, to ensure that the new user has the correct information on the operation of the range hood and is aware of the warnings.
SAFETY WARNINGS The electrical system features an earth connection in compliance with international safety standards; furthermore, it is compliant with the European standard for electromagnetic compatibility. Do not connect the appliance to flues (from boilers, fireplaces, etc.). Make sure the mains voltage corresponds to the values on the rating plate located inside the range hood. Never cook on “open” flames under the range hood. Check deep-fryers during use: superheated oil may be flammable.
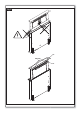
D ELECTRICAL CONNECTIONS (Section reserved for qualified installers) E RANGE HOOD WITH OUTSIDE DISCHARGE (exhaust) In this version, the fumes and steam from the kitchen are conveyed outside through an exhaust duct. The exhaust conveyor that protrudes from the upper part of the range hood must be connected to a duct that carries the fumes and steam outside. In this version, the charcoal filters, if fitted, should be removed; to do this, see the instructions in point F.
G OPERATION 1: TIMER - FILTER RESET - SHUTTER OPENING - SHUTTER CLOSING Timer: When the motor is active, pressing this key will activate the timer for motor shut-down after 15 minutes. At the end of the 15’ the motor and the light will switch off and the mobile part will close. The red LED flashes to indicate that the function is active. The countdown does not stop by varying the motor speed. If the motor is stopped with key 2, the function will automatically deactivate.
Function of the remote control Light Key ‘ - ‘ Key ‘ + ‘ Key Timer Key Code Change (only in case of malfunction) H DESCRIPTION Pressing the Light key will switch the light on/off Pressing the ‘-’ Key will decrease motor speed. If 1° (1st) speed is in gear, pressing the ‘-’ key will turn off the motor If the motor is turned off, pressing the ‘+’ key will activate the motor at 1° (1st) speed. If the motor is operating, pressing the ‘+’ key will increase motor speed up to the maximum.
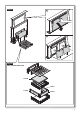
2. CARBON - ZEO FILTERS To replace the 4 carbon-zeo filters (3 TYPE A + 1 TYPE B) mounted on the filter structure kit KACL.930 see figure H2. To order the new carbon zeo filters (code of the filter kit only KACL.931) refer to the dealer/ seller. VALID ONLY FOR ITALY: Download the specific order form of the filter from www.falmec.com. I LIGHTING ASSEMBLY AND REPLACEMENT The range hood is equipped with high efficiency, low consumption LED strips with extremely long duration under normal use conditions.
Do not use abrasive products. All the above operations must be performed after having disconnected the appliance from the mains power supply. M WARRANTY N MOUNTING INSTRUCTIONS, RANGE HOODS WARNING: Failure to install the screws or fixing device in accordance with these instructions may result in electrical hazards. - Verify that the dimensions of the appliance base are compatible with the dimensions of the range hood (see quoted illustration of the range hood).
D A BEDIENUNGSANLEITUNG HINWEISE Diese Bedienungsanleitung muss unbedingt zusammen mit dem Gerät aufbewahrt werden, um in Zukunft nachgeschlagen werden zu können. Sollte das Gerät verkauft bzw. einer anderen Person übergeben werden, muss die Bedienungsanleitung unbedingt mitgeliefert werden, damit der neue Benutzer mit dem Betrieb der Dunstabzugshaube und den diesbezüglichen Hinweisen vertraut werden kann. Diese Hinweise sind für Ihre Sicherheit und die anderer Personen abgefasst worden.
Das obere Glas VS und das Lichtabschirmpaneel sind mit Magneten an der Kappe fixiert. Bei ungewollter Ablösung des oberen Glas oder des Lichtabschirmpaneel von der Kappe, prüfen Sie sie auf ihre Unversehrtheit, bevor Sie sie wieder anbringen. Im gegenteiligen Falle wenden Sie sich bitte an die technische Assistenz. VORSICHT: Dieses Produkt muss am Ende seiner Lebensdauer gemäß den geltenden Vorschriften entsorgt werden.
Für horizontale Strecken muss dem Rohr eine leichte Neigung (ca. 10%) nach Oben gegeben werden, um die Luft nach Außen abzuleiten. Es sollten möglichst wenig Kurven eingebaut werden und versichern Sie sich, dass die Rohrleitung so kurz wie möglich angelegt wird. Für die Abgabe der Abluft nach Außen, müssen die geltenden Vorschriften berücksichtigt werden. Falls gleichzeitig andere Ben utzereinheiten, welche mit Gas oder anderen Brennmaterialien betrieben werden (Heizkessel, Öfen, Cheminées usw.
F ABZUGSHAUBE IN VERSION INNENUMLUFT (filtrierend) Standard-Abzugshaube nicht für Kohlefilter vorgesehen. Um die Abzugshaube von Abluftauf Filterversion umzustellen, müssen die neue Slim-Motoreinheit (Code KACL.784) und das Carbon Zeo-Filterbausatz ( Code KACL.930), die al Optionals erhältlich sind, an den Abzugshaubenkörper angeschlossen werden. Für die Vorbereitung der Filterausführung siehe Abb. F.
Wenn diese Funktion aktiviert ist, können keine anderen Geschwindigkeiten gewählt werden. Um aus dieser Funktion auszutreten, hält man die Taste T2 3 Sekunden lang gedrückt. 3: 2° GESCHWINDIGKEIT Wenn der Motor mit einer Geschwindigkeit betrieben wird, die von der 2°abweicht, wird durch die Betätigung der Taste die Geschwindigkeit 2° aktiviert und die Taste T3 leuchtet auf. Wenn der Motor stillsteht, ist sie deaktiviert.
Code-Wechsel (nur im Falle von Funktionsstörungen) H Man drückt die Taste “Luce” (“Licht”) zusammen mit der Taste “Timer” (“Timer”) der Funksteuerung bis die blaue Led-Anzeige zu blinken beginnt. Wenn innerhalb von 5 Sekunden die Taste “-” der Funksteuerung gedrückt wird, wird der neue Code erstellt und gespeichert. Die Speicherung erfolgt durch Bestätigung mit dreimaligem kurzen Aufblinken der Led-Anzeige.
brauchsbedingungen wird empfohlen, die Filter nach 18 Monaten zu regenerieren und nach 3 Jahren zu wechseln. Vor jedwedem Eingriff die Abzugshaube vom Stromnetz trennen. Um die Filter zu entnehmen, siehe Abschnitt H2. Um den CARBON.ZEO (nach 18 Monaten) zu regenerieren, diesen in einen normalen Küchenofen bei 200°C für ca. 2 Stunden legen. Sobald der Filter abgekühlt ist, die 4 Filter (3 Type A und 1 Type B) wieder am Bausatz für Filter KACL.
33 Deutsch - Fixieren Sie die Unterlagen der Kappe an der Basis des Hängeschranks, nachdem sie die waag- und senkrechten Ausrichtungen festgestellt haben. - Legen Sie die Installationsweise für die Variante mit Absaugvorrichtung fest (a/b): a) Mit Motoreinheit (UM) auf der Abzugshaube: (siehe Abb. 3 a) den vorderen Blindtampon TC entfernen und den Flansch FM der Motoreinheit UM. Den Flansch FDL an UM montieren.
F A LIVRET D’INSTRUCTIONS AVERTISSEMENTS Conserver cette notice avec l’appareil pour pouvoir la consulter en cas de besoin. Si l’appareil est vendu ou cédé à tiers, veiller à ce que la notice soit fournie en même temps pour que le nouvel utilisateur puisse avoir toutes les indications concernant le fonctionnement de la hotte et les avertissements correspondants. La notice a été rédigée pour votre sécurité et celle d’autrui.
accidentelles, vérifier le parfait état et le/la remettre dans son siège. Dans le cas contraire, téléphoner à l’assistance technique. ATTENTION : Ce produit doit être éliminé en fin de vie, conformément aux règles en vigueur. SÉCURITÉ AVERTISSEMENTS B CARACTÉRISTIQUES TECHNIQUES Les données techniques de l’appareil sont reportées sur les plaques qui se trouvent à l’intérieur de la hotte (enlever les grilles métalliques pour voir l’étiquette.
Réduire au maximum les coudes, vérifier que les tuyaux ont une longueur minimum indispensable. Respecter les normes en vigueur sur l’évacuation de l’air à l’extérieur. En cas d’utilisation avec d’autres utilisateurs (chaudières, poêles, cheminées, etc.) alimentés au gaz ou autres combustibles, veuillez prévoir une bonne aération de la pièce où se vérifie l’aspiration de la fumée, conformément aux normes en vigueur. Instructions de montage : voir sect. “O” dans ce manuel.
tions reportées au point F. Le local doit être suffisamment aéré, conformément aux normes en vigueur, si la hotte est utilisée en même temps que d’autres appareils qui fonctionnent au gaz ou avec d’autres combustibles. Indication spécifique pour l’Allemagne: Quand la hotte fonctionne en même temps que des appareils alimentés avec de l’énergie autre que celle électrique, la pression négative dans le local ne doit pas dépasser les 4 Pa (4 x 10⁻⁵ bar).
Fonction Recirculation: Lorsque le moteur est arrêté la pression prolongée de la touche T2 active la fonction recirculation et la partie mobile s’ouvre. La touche T2 clignote. Pendant la fonction recirculation (d’une durée de 24 heures), la hotte reste allumée durant 1 heure à la 1ère vitesse, elle s’arrête ensuite pendant 3 heures et reprend à fonctionner pendant encore une heure. Ces cycles se répètent jusqu’au time out. Avec cette fonction activée on ne peut pas activer les autres vitesses.
Appuyer la touche “Eclairage” en même temps que la touche “Timer” de la radiocommande jusqu’à ce que la Led bleue ne commence à clignoter lentement. Changement de Si avant 5 secondes on appuie la touche “-” de la radiocommande, le nouveau code est généré et mémorisé. La mémorisation est confirmée par 3 clignotements Code brefs de la Led. Pour revenir au code par défaut il faut appuyer la touche “-” en (seulement en cas de dysfonc- même temps que la touche “+” de la radiocommande pendant plus de 5 secondes.
Ne nettoyer qu’avec un chiffon souple trempé dans de l’eau contenant du savon neutre si la surface a subi un traitement anti-empreinte (Fasteel), en ayant soin de rincer et d’essuyer soigneusement. Ne pas utiliser de produits contenant des substances abrasives, un chiffon rêche ni le type de chiffon pour nettoyer l’acier que l’on trouve généralement dans le commerce car cela abîmerait irrémédiablement le traitement superficiel de l’acier.
- Frontale ou postérieure avec un tuyau circulaire d’un diamètre de 150 mm (fig. 4c). Enlever le tampon TC, monter la bride FC sur la hotte, vérifier que la bride FM soit fixée sur UM et placer UM dans la position souhaitée. Brancher la sortie de l’air de la hotte avec l’entrée UM au moyen du tuyau et brancher la sortie du moteur UM au conduit d’évacuation extérieur de l’air. Respecter les normes en vigueur pour l’évacuation de l’air.
E A MANUAL DE INSTRUCCIONES ADVERTENCIAS Es muy importante conservar este libro de instrucciones junto al aparato para cualquier consulta futura. Si el aparato tuviera que ser vendido o traspasado a otra persona, asegúrese que el libro vaya incluido, de modo que el nuevo usuario pueda ponerse al corriente del funcionamiento de la campana y de las advertencias correspondientes.
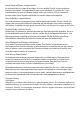
SEGURIDAD ADVERTENCIAS B CARACTERÍSTICAS TÉCNICAS Los datos técnicos del electrodoméstico están contenidos en las placas, situadas en la parte interior de la campana extractora. C INSTALACIÓN (Parte reservada exclusivamente a personas cualificadas). Respetar las prescripciones previstas por la Fig. 1-2 para la instalación. Si las instrucciones de la superficie de cocción de gas especifican una distancia superior, es necesario tenerlo en cuenta.
D CONEXIÓN ELÉCTRICA (Parte reservada exclusivamente a personas cualificadas). ATENCIÓN! Antes de efectuar cualquier operación en el interior de la campana extractora, desenchufe el aparato de la red eléctrica. Asegúrese de no desconectar o cortar los hilos eléctricos en el interior de la campana extractora; si se producen estas circunstancias pongáse en contacto con el centro de asistencia más cercano. Para la conexión eléctrica solicite la intervención de personal cualificado.
F CAMPANA EN VERSIÓN DE RECIRCULACIÓN INTERNA (filtrante) Campana estándar no preparada para el empleo de filtro de carbón. Para convertir la campana aspirante en filtrante, es necesario montar en el cuerpo de la campana el nuevo grupo de motor Slim (código KACL.784) y el kit de estructura de filtro Carbon-Zeo ( código KACL.930), disponibles como artículos opcionales. Para el montaje de la versión filtrante, consulte la fig. F.
dad y se ilumina la tecla T3. Si el motor está detenido, la tecla está desactivada. 4: 3° VELOCIDAD Si el motor tiene una velocidad diferente a la 3°, presionando la tecla se acciona la 3° velocidad y se ilumina la tecla T4. Si el motor está detenido, la tecla está desactivada. 5: 4° VELOCIDAD Si el motor tiene una velocidad diferente a la 4°, presionando la tecla se acciona la 4° velocidad y parpadea la tecla T5. Si el motor está detenido, la tecla está desactivada.
H FILTROS INSTRUCCIONES PARA LA EXTRACCIÓN O SUSTITUCIÓN 1. FILTROS METÁLICOS Abrir el panel fijado al cuerpo de la campana con los imanes (véase Fig. H1). Para quitar el filtro metálico antigrasa (A) usando el asa del filtro. 2. FILTROS DE CARBON - ZEO Para sustituir los 4 filtros carbon-zeo (3 TYPE A + 1 TYPE B) montados en el kit de estructura de filtro KACL.930, consulte la figura H2. Para encargar los nuevos filtros carbon zeo (código del kit, solo filtros KACL.
En el caso de material con tratamiento antihuellas (FASTEEL) la limpieza se debe efectuar sólo con agua y jabón neutro utilizando un paño suave, siendo importantísimo enjuagar y secar bien. No se deben utilizar productos que contengan substancias abrasivas, paños con superficies ásperas o paños que se adquieren en el comercio para la limpieza del acero. La utilización de substancias abrasivas o paños ásperos dañarán irreparablemente el tratamiento superficial del acero.
la posición deseada. Conecte la salida de la campana a la entrada de la UM mediante una tubería idónea y empalme la salida del motor de la UM con el conducto de expulsión exterior del aire. - Frontal o posterior con tubería circular de 150 mm de diámetro (fig. 4c). Quite el tapón roscado TC, monte la brida FC en la campana, verifique que la brisa FM esté fijada a la UM y coloque la UM en la posición deseada.
P A MANUAL DE INSTRUÇÕES ADVERTÊNCIAS É muito importante que este manual de instruções seja conservado com o equipamento para consultas futuras. Se o aparelho tiver que ser vendido ou transferido para uma outra pessoa, assegure-se de que o manual seja fornecido com ele, a fim de que o novo utilizador possa ser informado sobre o funcionamento da coifa e sobre as respetivas advertências.
ímanes. No caso de separação de VS VL do corpo de coifa por causas acidentais, verifique a sua integridade e posicione-o novamente na sua base de encaixe. Caso contrário, chame a assistência técnica. CUIDADO: Este produto deve ser eliminado de acordo com as normas em vigor. SEGURANÇA ADVERTÊNCIAS B CARACTERÍSTICAS TÉCNICAS Os dados técnicos do eletrodoméstico estão apresentados nas placas, posicionadas dentro da coifa.
Respeite as normas vigentes sobre a descarga do ar para o exterior. No caso de utilização contemporânea de outros equipamentos (caldeiras, estufas, lareiras, etc.) alimentadas a gás ou com outros combustíveis, efetue uma adequada ventilação do local no qual ocorre a aspiração do fumos, segundo as normas vigentes. Instruções de montagem: consulte a secç. “O” do presente manual.
aparelhos que usam gás ou outros combustíveis, o local deverá dispor de ventilação suficiente segundo as normas vigentes. Desvio para a Alemanha: Quando a coifa de cozinha e os aparelhos alimentados com energia diferente daquela elétrica estão em funcionamento simultâneo, a pressão negativa no local não deverá superar os 4 Pa (4 x 10⁻⁵ bar). F EXAUSTOR VERSÃO DE RECIRCULAÇÃO INTERNA (filtrante) Exaustor standard que não utiliza filtro de carvão.
de 24 horas), a coifa permanece por 1 hora na 1° velocidade, depois para por 3 horas e ativase novamente por mais uma hora. Estes ciclos são repetidos até o timeout. Com essa função ativada não podem ser selecionadas as outras velocidades. Para remover essa função, mantenha pressionada por pelo menos 3 segundos a tecla T2. 3: 2° VELOCIDADE Quando o motor está numa velocidade diferente da 2°, a pressão da tecla aciona a 2° velocidade, e a tecla T3 acende. Quando o motor está parado, a tecla é desativada.
H FILTROS INSTRUÇÕES PARA A REMOÇÃO OU SUBSTITUIÇÃO 1. FILTROS METÁLICOS Abra o painel fixado ao corpo da coifa com ímanes (consulte fig. H1). Para remover o filtro metálico anti-gordura (A), atue sobre o puxador do filtro. 2. FILTROS CARBON - ZEO Para a substituição dos 4 filtros carbon-zeo (3 TYPE A + 1 TYPE B) montados no kit de estrutura filtro KACL.930 ver figura H2. Para requisitar novos filtros carbon zeo (código do kit de filtros KACL.931) dirigir-se ao distribuidor/revendedor.
somente com água e sabão neutro, utilizando um pano macio, com cuidado para enxaguar e secar bem. Não devem ser utilizados produtos que contenham substâncias abrasivas, panos com superfícies ásperas ou panos normalmente vendidos para a limpeza do aço. A utilização de substâncias abrasivas e panos ásperos provoca danos irreparáveis ao tratamento da superfície do aço. A consequência direta da inobservância destas advertências será a deterioração irreversível da superfície do aço.
- Frontal ou traseira com tubagem circular diâm.150 mm (fig. 4c). Remover a tampa TC, montar a flange FC sobre o exaustor, verificar que a flange FM esteja fixa no UM e posicionar UM na posição desejada. Ligar a saída de ar do exaustor com a entrada de UM através da tubagem e ligar a saída do motor de UM à conduta de descarga externa de ar. Respeitar as normas em vigor para a descarga de ar.
RUS A àçëíêìäñàü èé ùäëèãìÄíÄñàà åÖêõ èêÖÑéëíéêéÜçéëíà é˜Â̸ ‚‡ÊÌÓ, ˜ÚÓ·˚ ‰‡ÌÌÓ êÛÍÓ‚Ó‰ÒÚ‚Ó ÔÓ ˝ÍÒÔÎÛ‡Ú‡ˆËË ı‡ÌËÎÓÒ¸ ‚ÏÂÒÚÂ Ò ‡ÔÔ‡‡ÚÛÓÈ ‰Îfl ‚ÓÁÏÓÊÌÓÈ ÌÂÓ·ıÓ‰ËÏÓÒÚË ÍÓÌÒÛθڇˆËË ‚ ·Û‰Û˘ÂÏ. èË ÔÓ‰‡Ê ÔË·Ó‡ ËÎË Ô‰‡˜Â Â„Ó ‰Û„ÓÏÛ ÎËˆÛ Í ÔË·ÓÛ Ó·flÁ‡ÚÂθÌÓ ‰ÓÎÊÌÓ ÔË·„‡Ú¸Òfl êÛÍÓ‚Ó‰ÒÚ‚Ó, ˜ÚÓ·˚ ÌÓ‚˚È ÔÓθÁÓ‚‡ÚÂθ ·˚Î ‚ ÍÛÒ ÚÓ„Ó, Í‡Í ÔÓθÁÓ‚‡Ú¸Òfl ‚˚ÚflÊÍÓÈ Ë Í‡ÍË ÒÓÓÚ‚ÂÚÒÚ‚Û˛˘Ë ÏÂ˚ Ô‰ÓÒÚÓÓÊÌÓÒÚË ÌÂÓ·ıÓ‰ËÏÓ Òӷβ‰‡Ú¸.
ÅÖáéèÄëçéëíú åÖêõ èêÖÑéëíéêéÜçéëíà ùÎÂÍÚ˘ÂÒ͇fl ÒıÂχ Ò̇·ÊÂ̇ ÍÓÌÚ‡ÍÚÓÏ Á‡ÁÂÏÎÂÌËfl Òӄ·ÒÌÓ ÏÂʉÛ̇ӉÌ˚Ï ÌÓÏ‡Ï ·ÂÁÓÔ‡ÒÌÓÒÚË; ÍÓÏ ÚÓ„Ó, Ó̇ ÒÓÓÚ‚ÂÚÒÚ‚ÛÂÚ Â‚ÓÔÂÈÒÍËÏ ÌÓÏ‡Ï Á‡˘ËÚ˚ ÓÚ ‡‰ËÓÔÓÏÂı. ç ÔÓ‰Íβ˜‡ÈÚ ÔË·Ó Í ÚÛ·‡Ï, ÓÚ‚Ó‰fl˘ËÏ ‰˚Ï ÓÚ Ò„Ó‡ÌËfl ÚÓÔÎË‚‡ (ÍÓÚÎ˚, ͇ÏËÌ˚ Ë Ú.Ô.). ì·Â‰ËÚÂÒ¸ ‚ ÚÓÏ, ˜ÚÓ Ì‡ÔflÊÂÌË ‚ ÒÂÚË ÒÓÓÚ‚ÂÚÒÚ‚ÛÂÚ Û͇Á‡ÌÌÓÏÛ Ì‡ Ú‡·Î˘ÍÂ, ÔËÍÂÔÎÂÌÌÓÈ ‚ÌÛÚË ‚˚ÚflÊÍË. çÂθÁfl „ÓÚÓ‚ËÚ¸ ÔË˘Û Ì‡ ÓÚÍ˚ÚÓÏ Ó„Ì ÔÓ‰ ‚˚ÚflÊÍÓÈ. ëΉËÚ Á‡ ÙËÚ˛Ìˈ‡ÏË: Ô„ÂÚÓ χÒÎÓ ÏÓÊÂÚ Á‡„ÓÂÚ¸Òfl.
D èéÑäãûóÖçàÖ ùãÖäíêéùçÖêÉàà (Ô‡‡„‡Ù ԉ̇Á̇˜Ì ÚÓθÍÓ ‰Îfl Í‚‡ÎËÙˈËÓ‚‡ÌÌ˚ı ÒԈˇÎËÒÚÓ‚, ÔÓ‰Íβ˜‡˛˘Ëı ‚˚ÚflÊÌÓ ÛÒÚÓÈÒÚ‚Ó) ÇçàåÄçàÖ! ÑÓ ‚˚ÔÓÎÌÌËfl β·ÓÈ ÓÔ‡ˆËË ‚ ‚˚ÚflÊÌÓÏ ÛÒÚÓÈÒÚ‚ ÓÚÍβ˜ËÚ ÔË·Ó ÓÚ ˝ÎÍÚ˘ÒÍÓÈ ÒÚË. ì·‰ËÚÒ¸, ˜ÚÓ ‚ÌÛÚË ‚˚ÚflÊÌÓ„Ó ÛÒÚÓÈÒÚ‚Ó Ì ÓÚÒÓ‰ËÌÌ˚ Ë Ì ÔӂʉÌ˚ ˝ÎÍÚ˘ÒÍË ÔÓ‚Ó‰‡; ‚ ÒÎÛ˜‡ ‚ÓÁÌËÍÌÓ‚ÌËfl Ú‡ÍËı ÒËÚÛ‡ˆËÈ Ò‚flÊËÚÒ¸ Ò ·ÎËʇȯËÏ Ò‚ËÒÌ˚Ï ˆÌÚÓÏ. ÑÎfl ‚˚ÔÓÎÌÌËfl ˝ÎÍÚ˘ÒÍËı ÒÓ‰ËÌÌËÈ Ó·‡ÚËÚÒ¸ Í Í‚‡ÎËÙˈËÓ‚‡ÌÌ˚Ï ÒԈˇÎËÒÚ‡Ï.
G êÄÅéíÄ 1: Таймер/Неисправность фильтров Немигающий КРАСНЫЙ световой индикатор означает, что сработала аварийная остановка фильтров масляных веществ (после 30 часов), для выключения данной тревоги и обнуления счетчиков держать нажатой кнопку в течение 3-х секунд. Мигающий КРАСНЫЙ световой индикатор означает, что включена функция таймера. Данная функция включается, если при нажатии кнопки (продолжительном или нет) мотор уже работает на любой скорости.
При включенном световом индикаторе нажатие кнопки 4 не приведет к никаким действиям. Чтобы выключить вытяжку, надо сначала выбрать 1-ую скорость, затем нажать снова на данную кнопку. 5: 4-ая скорость В случае выключенного светового индикатора и уже включенной иной скорости при нажатии кнопки (продолжительном или нет) включится 4-ая скорость, соответствующий световой индикатор и выключится световой индикатор предыдущей рабочей скорости.
H ФИЛЬТРЫ, ИНСТРУКЦИИ ПО УДАЛЕНИЮ ИЛИ ЗАМЕНЕ 1. МЕТАЛЛИЧЕСКИЕ ФИЛЬТРЫ Открыть панель, прикреплённую магнитами к корпусу вытяжки (см.рис. H1). Для снятия металлического фильтра для задерживания частичек жира (A), воздействовать на ручку фильтра. 2. УГОЛЬНЫЕ ФИЛЬТРЫ CARBON – ZEO Для замены 4 угольных фильтров carbon-zeo (3 ТИП A + 1 ТИП B), установленных в комплекте структуры фильтра KACL.930 руководствоваться рисунком H2. Для заказа новых угольных фильтров carbon zeo (код набора только фильтров KACL.
ÖÒÎË ‚˚ÚflÊ͇ ËÏÂÂÚ ÒÔˆˇθÌÓ ÔÓÍ˚ÚË ÔÓÚË‚ ÓÚÔ˜‡ÚÍÓ‚ ԇθˆÂ‚ (Fasteel), ÌÂÓ·ıÓ‰ËÏÓ ÓÒÛ˘ÂÒÚ‚ÎflÚ¸ ˜ËÒÚÍÛ ÚÓθÍÓ ‚Ó‰ÓÈ Ò ÌÂÈڇθÌ˚Ï Ï˚ÎÓÏ ÔË ÔÓÏÓ˘Ë Ïfl„ÍÓÈ Ú͇ÌË Ë Ú˘‡ÚÂθÌÓ ÓÔÓ·ÒÍË‚‡Ú¸ Ë ÒÛ¯ËÚ¸ ÔÓ‚ÂıÌÓÒÚ¸. ç ‰ÓÔÛÒ͇ÂÚÒfl ËÒÔθÁÓ‚‡ÌË Ò‰ÒÚ‚, ÒÓ‰Âʇ˘Ëı ‡·‡ÁË‚Ì˚ ‚¢ÂÒÚ‚‡, „Û·˚ Ú͇ÌË, ‡ Ú‡ÍÊ Ú͇ÌË, Ëϲ˘ËÂÒfl ‚ ÔÓ‰‡Ê ‰Îfl ˜ËÒÚÍË ÒÚ‡ÎË. àÒÔÓθÁÓ‚‡ÌË ‡·‡ÁË‚Ì˚ı ‚¢ÂÒÚ‚ Ë „Û·˚ı Ú͇ÌÂÈ Ô˂‰ÂÚ Í ÌÂÓ·‡ÚËÏÓÏÛ ÔÓ‚ÂʉÂÌ˲ ÔÓÍ˚ÚËfl ÒÚ‡ÎË.
удалить прямоугольную заглушку в соответствии с желаемым выходом и установить прилагающийся фланец для прямоугольной трубы FR (рис. 4b). Проверить, что фланец FM зафиксирован на моторном блоке UM и установить UM в желаемой позиции. Подсоединить выход вытяжки со входом UM посредством подходящего трубопровода и подсоединить выход двигателя UM к трубе вывода воздуха наружу. - Передний или задний круглыми трубами диам.150 мм (рис. 4c).
PL A INSTRUKCJA OBSŁUGI OSTRZEŻENIA Ta instrukcja obsługi musi być przechowywana razem z urządzeniem w celu przyszłego wykorzystywania. Jeżeli urządzenie jest sprzedawane lub przesyłane innym stronom, sprawdzić, czy wraz z nim przekazywana jest ta instrukcja, dla zapewnienia, że nowy użytkownik posiada prawidłowe informacje o działaniu okapu kuchennego i zna ostrzeżenia. Te ostrzeżenia zostały podane dla Waszego bezpieczeństwa oraz ostrzeżenia innych osób.
UWAGA: Niniejszy produkt po zako czeniu jego ycia musi zosta usuni ty , zgodnie z obowi zuj cymi przepisami. OSTRZEŻENIA BEZPIECZEŃSTWA Układ elektryczny i podłączenie uziemienia jest zgodnie z międzynarodowymi normami bezpieczeństwa; ponadto są one zgodne z normą europejską dla zgodności elektromagnetycznej. Nie podłączać urządzenia do przewodów kominowych (od bojlerów, kominków, itp.).
Przestrzegać obowiązujących norm dotyczących odprowadzania powietrza na zewnątrz. W razie jednoczesnego użycia innych urządzeń (kotły, piece, kominki, itd.) zasilanych gazem lub innymi paliwami, należy zastosować odpowiednią wentylację w pomieszczeniu, w którym dochodzi do zasysania (wyciągu) dymu, zgodnie z obowiązującymi normami. Instrukcje montażu: patrz roz. “O” niniejszej instrukcji. D PODŁĄCZENIA ELEKTRYCZNE (Rozdział zarezerwowany dla wykwalifikowanych instalatorów).
oraz zestawem filtra Carbon-Zeo (kod KACL.930) dostępnych, jako opcje. Aby dostosować wersję filtrującą, patrz rys. F. G OBSŁUGA 1: Timer/Reset Filtra/Otwarcie klapy/Zamknięcie klapy Timer: Naciśnięcie tego przycisku przy włączonym silniku aktywuje funkcję automatycznego wyłączenia się silnika po upływie 15 minut. Po 15 minutach pracy nastąpi automatyczne wyłączenie silnika i oświetlenia. Migająca czerwona dioda LED oznacza, że funkcja ta jest aktywna.
trzecią prędkość, co sygnalizowane jest zaświeceniem się przycisku T4. Jeśli silnik jest nieruchomy, przycisk ten jest nieaktywny. 5: Czwarta Prędkość Jeżeli silnik porusza się z prędkością inną niż czwarta, naciśnięcie tego przycisku uruchamia czwartą prędkość, co sygnalizowane jest zaświeceniem się przycisku T5. Jeśli silnik jest nieruchomy, przycisk ten jest nieaktywny.
2. FILTRY CARBON – ZEO Aby wymienić 4 filtry carbon-zeo (3 TYPE A + 1 TYPE B) zamontowane na zestawie konstrukcji filtra KACL.930, patrz rysunek H2. Aby zamówić nowe filtry carbon zeo (kod zestawu tylko dla filtrów KACL.931) zwrócić się do dystrybutora/sprzedawcy. TYLKO NA TERENIE WŁOCH: Odpowiedni formularz zamówieniowy filtra pobrać ze strony: www.falmec.com.
Przechowywać te instrukcje wraz z instrukcjami użytkowania okapu. Producent nie ponosi żadnej odpowiedzialności za wszelkie uszkodzenia spowodowane nie przestrzeganiem powyższych instrukcji. 4. CZYSZCZENIE WNĘTRZA URZĄDZENIA Części elektryczne lub części zespołu silnika wewnątrz okapu kuchennego nie mogą być czyszczone płynami lub rozpuszczalnikami. Nie używać produktów ściernych. Wszystkie powyższe operacje muszą być wykonywane po odłączeniu urządzenia od zasilania sieciowego.
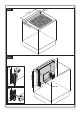
Przestrzegać obowiązujących norm dotyczących odprowadzania powietrza. Wersja recyrkulacji: W tej wersji, opary z gotowania wprowadzane są ponownie do otoczenia po ich uprzednim oczyszczeniu przez filtry węglowo-zeolitowe znajdujące się w zestawie konstrukcji filtrów KACL.930. Ich położenie wskazano w rozdz. F. Na podstawie urządzenia należy przygotować odpowiednią kratkę do ponownego wprowadzenia oczyszczonego powietrza do otoczenia w kuchni.
Note
Note
Decreto Legislativo del 30/06/2003 n. 196 - art. 7 Codice in materia di protezione dei dati personali. 1. L’interessato ha diritto di ottenere la conferma dell’esistenza o meno di dati personali che lo riguardano, anche se non ancora registrati, e la loro comunicazione in forma intelleggibile. 2.
Condizioni di garanzia 1) L’apparecchio è garantito dalla Casa costruttrice Falmec S.p.A (www.falmec.com) per un periodo di 24 mesi dalla data del suo acquisto comprovata da ricevuta fiscale o altro documento reso fiscalmente obbligatorio. 2) La garanzia sarà prestata con la sostituzione o riparazione gratuita delle parti che risultino difettose.
IMPORTANTE! La presente garanzia è valida solo per l’Italia (Guarantee conditions are valid only for Italy). Questo certificato di garanzia non deve essere spedito, ma conservato con la ricevuta fiscale, o altro documento reso fiscalmente obbligatorio, che comprovi la data d’acquisto della cappa.