Italiano English Deutsch Français Español Português LIBRETTO ISTRUZIONI на русском языке BEDIENUNGSSANLEITUNG LIVRET D’INSTRUCTIONS Polska Cod. 110030291 (CIELO) INSTRUCTIONS BOOKLET àçëíêìäñàü èé ùäëèãìÄíÄñàà INSTRUKCJE OBSŁUGI Ed.
1
2
3
4
5
6
7
I A LIBRETTO ISTRUZIONI AVVERTENZE È molto importante che questo libretto istruzioni sia conservato insieme all’apparecchiatura per qualsiasi futura consultazione. Se l’apparecchio dovesse essere venduto o trasferito ad un’altra persona, assicurarsi che il libretto venga fornito assieme, in modo che il nuovo utente possa essere messo al corrente del funzionamento della cappa e delle avvertenze relative.
AVVISO: Il presente prodotto deve essere smaltito al termine della sua vita utile conformemente alle normative in vigore. B CARATTERISTICHE TECNICHE I dati tecnici dell’elettrodomestico sono riportati su delle targhette, posizionate all’interno della cappa. C INSTALLAZIONE (parte riservata solo a persone qualificate per il montaggio della cappa) La distanza, fra piano cottura e parte inferiore della cappa, consigliata per l’installazione è di circa 110 cm.
- il filo giallo-verde deve essere utilizzato per la messa a terra, - il filo blu deve essere utilizzato per il neutro, - il filo marrone deve essere utilizzato per la fase, il cavo non deve entrare in contatto con parti calde aventi temperature superiori a 70°C. - montare sul cavo di alimentazione una spina adatta al carico e collegarla ad una adeguata spina di sicurezza.
Funzionamento del Radiocomando Tasto Luce La pressione del tasto Luce accende/spegne la luce Tasto ‘ - ‘ La pressione del tasto ‘-’ decrementa la velocità del motore. Se si è in 1° velocità, la pressione del tasto ‘-’ spegne il motore Tasto ‘ + ‘ Se il motore è spento, la pressione del tasto ‘+’ attiva il motore alla 1° velocità.
è in funzione, la pressione del tasto ‘+’ incrementa la velocità fino alla massima. Tasto Timer Se il motore è attivo, la pressione del tasto timer attiva/disattiva la funzione timer Cambio Codice (solo in caso di malfunzionamento) Premere il tasto “Luce” insieme al tasto “Timer” del radiocomando fino a che il led blu non inizia a lampeggiare lentamente. Se entro 5 secondi si preme il tasto “-” del radiocomando viene generato e memorizzato il nuovo codice.
lavarli ogni mese in acqua calda e detersivo evitando di piegarli. Attendere che siano ben asciutti prima di rimontarli. Per lo smontaggio e montaggio vedi istruzioni al punto G1. Si raccomanda costante frequenza nell’operazione. 2. FILTRI CARBON ZEO 3. PULIZIA ESTERNA Si raccomanda di pulire le superfici esterne delle cappe almeno ogni 15 giorni per evitare che le sostanze oleose o grasse possano intaccare le superfici in acciaio.
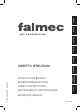
2) Rovesciare la cappa dopo aver posizionato sotto di essa un telo protettivo. Fig. B Rimuovere il supporto cappa “SP” pre-montato sulla cappa come illustrato in figura. Fig. C 1) Fissare il supporto “SP” al soffitto mediante le 6 viti “V3” e i tasselli in dotazione. Prestare attenzione che il cavo di alimentazione “CAI” non rimanga schiacciato. 2) Verificare la tenuta e la solidità dell’installazione. Fig. D 1) Alzare la cappa in prossimità del supporto “SP”.
GB A INSTRUCTIONS BOOKLET WARNINGS 15 English This instruction booklet must be kept together with the appliance for future reference. If the appliance is sold or consigned to other parties, check that the booklet is supplied with it, to ensure that the new user has the correct information on the operation of the range hood and is aware of the warnings. These warnings have been provided for the your safety and the safety of others.
Before performing any cleaning or maintenance operations, disconnect the appliance by unplugging it or using the main switch. The manufacturer disclaims all liability for any damage that may be directly or indirectly caused to people, things and animals due to the failure to follow all the instructions provided in this booklet and above all the warnings relating to the installation, operation and maintenance of the appliance.
For appliances that come supplied with cable and plug please ensure they are plugged into a circuit suitable for this appliance. Please refer to a qualifed person. (See technical specifications in point B). The manufacturer declines all liability if the safety standards are not observed. E INTERIOR RECIRCULATING HOOD VERSION The sky hood is only available in the interior recirculating version with carbon filters. For replacement, please see sect. G1.
select the 4th speed, turn the related LED on, and turn the LED associated to the previously selected speed off. If the LED is off and no speed is active, pressing the key has no effect. When the LED is on, pressing key 5 has no effect. The fourth speed must remain on for a maximum of 7 minutes, after which it must return to the third. To turn off the hood, first select the 1st speed, then press that key again.
G METAL FILTERS AND CARBON FILTERS 1. METAL FILTERS To access the metal filters open the panel P (see fig. G1). To remove the grease-trapping metal filter, use handle “A” (see figure G1 – detail 1-2). 2. CARBON-ZEO FILTERS H LIGHTING ASSEMBLY AND REPLACEMENT The range hood is equipped with high efficiency, low consumption LED spotlights with extremely long duration under normal use conditions. The LED lamp must be replaced only by qualified technicians using only original spare parts.
clean with a soft cloth, rinse and wipe dry thoroughly. Do not use products that contain abrasive substances, rough cloths or cloths specifically designed for cleaning steel. Using abrasive substances or rough cloths will inevitably damage the finish of steel. The steel surface will be irrevocably damaged if the instructions above are not complied with. Keep these instructions together with the instructions for use of your hood.
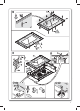
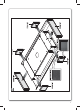
Fasten the “VC” glass sleeve to the hood using 4 “V5” knurled metric pins and connect the keyboard terminal to the hood electronics as shown in the figure. Fig. F Hook them to hood door “P” and side components “EL” as shown in the figure. Fig. G Fasten the hood to components “EL” and carbon filters “FC”, as shown in the figure (pay ATTENTION to the assembly direction of the filters: see figure G2). Fig. H Insert the grease-trapping metal filter kits with zeolite filters as shown in the figure.
Insert the grease-trapping metal filter kits with zeolite filters as shown in the figure. Close D door “P” and switch on the hood power supply complying with the current standards. BEDIENUNGSANLEITUNG A HINWEISE Diese Bedienungsanleitung muss unbedingt zusammen mit dem Gerät aufbewahrt werden, um in Zukunft nachgeschlagen werden zu können. Sollte das Gerät verkauft bzw.
VORSICHT: Dieses Produkt muss am Ende seiner Lebensdauer gemäß den geltenden Vorschriften entsorgt werden. B TECHNISCHE MERKMALE Die technischen Daten des Elektrogeräts sind an den Typenschildern im Innern der Dunstabzugshaube angegeben. C INSTALLATION (Dieser Abschnitt ist Fachpersonal mit der für die Montage der Dunstabzugshaube erforderlichen Qualifikation vorbehalten) Für die Installation wird ein Abstand von ca. 110 cm zwischen dem Kochfeld und dem unteren Teil der Abzugshaube empfohlen.
ausgestattet sein, in diesem Fall ist ein „genormter“ Stecker zu verwenden, wobei folgendes zu beachten ist: - Der gelb/grüne Draht ist für die Erdung zu benutzen; - der blaue Draht ist für den Nullleiter, und - der braune Draht für die Phase bestimmt. Das Kabel darf auf keinen Fall mit heißen Teilen in Berührung kommen (über 70°C). - Am Netzkabel einen der Geräteleistung entsprechenden Stecker anbringen und diesen in eine Sicherheits- Steckdose stecken.
25 Deutsch 3: 2° Geschwindigkeit Falls die LED-Anzeige ausgeschaltet ist und eine andere Geschwindigkeit aktiviert ist, führt die Betätigung der Taste (anhaltend oder nicht) zur Auswahl der zweiten Geschwindigkeit, zur Einschaltung der entsprechenden LED-Anzeige und zum Ausschalten der bei der zuvor ausgewählten Geschwindigkeit zugeordneten LED. Im Falle von LED-Anzeige ausgeschaltet und keine Geschwindigkeit aktiviert, hat die Betätigung der Taste keinerlei Auswirkung.
Funktionsweise der Funksteuerung Taste Luce Der Druck der Taste Luce (Licht) schaltet das Licht ein/aus. Taste ‘ - ‘ Der Druck der Taste ‘-’ vermindert die Motorgeschwindigkeit. Wenn die erste Geschwindigkeit eingestellt ist, wird durch Drücken der Taste ‘-’ der Motor ausgeschaltet. Taste ‘ + ‘ Wenn der Motor ausgeschaltet ist, wird durch Drücken der Taste ‘+’ der Motor mit der ersten Geschwindigkeit aktiviert.
I WARTUNG UND REINIGUNG Nur durch eine konstante Wartung ist ein einwandfreier Betrieb und eine lange Lebensdauer der Dunstabzugshaube gewährleistet. Besondere Aufmerksamkeit ist den Metall-Fettfiltern und den Aktivkohlefiltern zu schenken. Eine häufige Reinigung der Filter und deren Halter gewährleistet, dass sich an der Dunstabzugshaube keine feuergefährlichen Fettansammlungen bilden. 1.
L GARANTIE Was die garantie betrifft, wenden sie sich am austräger. Die Herstellerfirma haftet nicht für mögliche Ungenauigkeiten infolge Druck- oder Schreibfehler in diesem Anleitungsheft. Sie behält sich außerdem das Recht vor, an ihren Produkten sämtliche Änderungen vorzunehmen, die sie auch im Interesse des Benutzers für erforderlich oder nützlich erachtet, ohne die wesentlichen Merkmale in Bezug auf Funktionalität und Sicherheit zu beeinträchtigen.
F A LIVRET D’INSTRUCTIONS AVERTISSEMENTS 29 Français Conserver cette notice avec l’appareil pour pouvoir la consulter en cas de besoin. Si l’appareil est vendu ou cédé à tiers, veiller à ce que la notice soit fournie en même temps pour que le nouvel utilisateur puisse avoir toutes les indications concernant le fonctionnement de la hotte et les avertissements correspondants. La notice a été rédigée pour votre sécurité et celle d’autrui.
- S’assurer que le local est suffisamment aéré s’il faut faire fonctionner la hotte en même temps que certains appareils qui utilisent le gaz ou autre comme combustible. - Ne pas allumer de flammes libres en dessous de la hotte. - Ne pas relier l’appareil aux conduits d’évacuation des fumées dues à la combustion (chaudières, cheminées, etc.). - S’assurer que les normes en vigueur sur l’évacuation de l’air à l’extérieur du local sont respectées avant d’utiliser la hotte.
- le fil jaune-vert doit être utilisé pour la mise à la terre; - le fil bleu doit être utilisé pour le neutre; - le fil marron doit être utilisé pour la phase, le câble ne doit pas être en contact avec les parties chaudes ayant une température supérieure à 70°C; - monter une fiche adaptée à la charge sur le câble d’alimentation et la brancher à une fiche de sécurité appropriée.
Avec cette fonction activée, on ne peut pas sélectionner les autres vitesses. Pour Enlever cette fonction, maintenir la touche 2 appuyée pendant au moins 3 secondes. 3 : 2e Vitesse Dans la situation de LED éteinte et une autre vitesse activée, la pression de la touche (prolongée ou non) implique la sélection de la 2e vitesse, l’allumage de la LED correspondante et l’extinction de la LED associée à la vitesse précédemment sélectionnée.
Si le moteur est éteint, la pression de la touche + active le moteur à la 1e vitesse. Si le moteur fonctionne, la pression de la touche + augmente la vitesse jusqu’à celle maximale. Touche Timer Si le moteur est activé, la pression de la touche timer active/désactive la fonction timer Changement de Code (seulement en cas de dysfonctionnement) Appuyer simultanément sur la touche « Lumière » et sur la touche « Timer » de la radiocommande jusqu’à ce que la LED bleue commence à clignoter lentement.
L’entretien constant garantit un bon fonctionnement et un rendement optimal dans le temps. Il faut faire très attention en particulier aux filtres métalliques anti-graisse et à ceux au charbon actif. Le nettoyage fréquent des filtres et du support correspondant évite à la graisse de s’accumuler sur la hotte, ce qui pourrait provoquer un incendie. 1.
M MONTAGE HOTTE AVERTISSEMENT : Le non-respect de ces instructions concernant l’installation des vis ou des dispositifs de fixation peut entraîner des dangers liés à l’électricité. Fig. A 1) Enlever les bouchons en caoutchouc et accéder aux 4 vis métriques « V2 » pour les desserrer sans les retirer. Ces vis retiennent le support « SP » pré-monté sur la hotte. 2) Retourner la hotte, après avoir positionné en-dessous de celle-ci une toile protectrice. Fig.
E A MANUAL DE INSTRUCCIONES ADVERTENCIAS Es muy importante que conserve este libro de instrucciones del equipo para consultas futuras. Si el equipo debe venderse o cederse a otra persona, compruebe que se adjunte el libro, de manera que el nuevo usuario pueda estar informado sobre el funcionamiento de la campana y sobre las advertencias correspondientes. Estas advertencias se han redactado para su seguridad y la de los demás, le rogamos que lo lea atentamente antes de instalar o de usar el equipo.
- Compruebe que el local tenga una ventilación adecuada si la campana se usa con otros equipos que utilizan combustibles como gas u otro tipo de suministro. - No encienda llamas libres debajo de la campana. - No conecte el equipo a conductos de descarga de humos producidos por combustión (calderas, chimeneas, etc.). - Compruebe que todas las normativas vigentes sobre la descarga del aire en el exterior del local se respeten, antes de usar la campana.
de características técnicas en el punto B) Algunos tipos de equipos pueden incluir cable sin enchufe, en ese caso el enchufe a usar debe ser el de tipo “normalizado” teniendo en cuenta que: - el hilo amarillo-verde debe usarse para la puesta a tierra, - el hilo azul debe usarse para el neutro, - el hilo marrón debe usarse para la fase, el cable no debe entrar a contacto con partes calientes con temperaturas superiores a los 70°C.
39 Español Con el LED encendido, presionando la tecla se apaga el LED y el MOTOR. Con el LED apagado, si se presiona de forma prolongada (al menos 3 s) la tecla, se activa la recirculación. Durante el funcionamiento de la recirculación (de 24 horas de duración), elLED parpadea. Desde que se activa esta función, la campana permanece encendida durante 1 hora a la 1ra velocidad, luego se detiene durante 3 horas y se vuelve a activar durante otra hora. Estos ciclos se repiten hasta el timeout.
Radiomando: Coloque el aparato lejos de fuentes de ondas electromagnéticas que podrían interferir con la electrónica de la campana. Distancia máxima de funcionamiento: 4 metros. Dicha distancia puede ser menor, en función de las interferencias electromagnéticas de otros equipos. Funcionamiento del Radiomando Tecla Luz Presionando la tecla, se enciende/apaga la luz Tecla ‘ - ‘ Presionando la tecla ‘-’ la velocidad del motor disminuye.
titución de la luz debe ser llevada a cabo única y exclusivamente por técnicos cualificados utilizando sólo recambios originales. I MANTENIMIENTO Y LIMPIEZA Un mantenimiento constante asegura un buen funcionamiento y un buen rendimiento a lo largo del tiempo.
L GARANTÍA Su aparato nuevo está bajo garantía. Las condiciones de garantía se indican detalladamente en la última página de la cubierta de este libro. La empresa fabricante no se hace responsable de los posibles datos inexactos que se pueden deber a error de impresión o de transcripción y que se incluyan en este libro.
P MANUAL DE INSTRUÇÕES A ADVERTÊNCIAS 43 Português É muito importante que este manual de instruções seja conservado com o equipamento para consultas futuras. Se o aparelho tiver que ser vendido ou transferido para uma outra pessoa, assegure-se de que o manual seja fornecido com ele, a fim de que o novo utilizador possa ser informado sobre o funcionamento da campânula e sobre as respetivas advertências.
Não conectar o aparelho em condutas de descarga de fumos produzidos pela combustão (caldeiras, lareiras, etc.). Verificar se a tensão de rede corresponde àquela apresentada pela placa colocada dentro da campânula. Não cozinhar com chama “aberta” sob a campânula. Controlas as fritadeiras durante o uso: o óleo sobreaquecido pode inflamar-se.
Assegurar-se de que não sejam desconectados ou cortados fios elétricos na parte interna da campânula; se ocorrer esse tipo de situação, contactar o centro de assistência mais próximo. Para a ligação elétrica, contactar o pessoal qualificado. A conexão deve ser feita em conformidade com as disposições da lei em vigor. Verificar se a válvula limitadora e o sistema elétrico podem suportar a carga do aparelho (ver a placa com as características técnicas no ponto B).
Na situação de LED apagado e outra velocidade ativa, a pressão da tecla implica a seleção da 1° velocidade, o acendimento do respetivo LED e o apagamento do LED associado à velocidade selecionada anteriormente. Com LED acesso, a pressão da tecla implica o desligamento do LED e do MOTOR. Com LED apagado a pressão prolongada (pelo menos 3seg) da tecla implica a ativação da função recirculação. Durante a função recirculação (com a duração de 24 horas), o LED pisca.
desativada durante a pressão. Pressão não prolongada = dedo presente na tecla por menos de 3 segundos, a função é ativada ao ser libertada. Rádio-controlo Posicionar o aparelho longe de fontes de ondas eletromagnéticas que podem causar interferência nos componentes eletrónicos da campânula. Distância máxima de funcionamento 4 metros. Essa distância pode variar negativamente pela ação de interferências eletromagnéticas de outros aparelhos.
H I ILUMINAÇÃO MONTAGEM E SUBSTITUIÇÃO A campânula é provida de iluminação com lâmpadas led de alta eficiência, baixo consumo e duração muito elevada em condições de utilização normal. A substituição da lâmpada deve ser feita apenas por técnicos qualificados utilizando apenas peças sobressalentes originais. I L MANUTENÇÃO E LIMPEZA Uma manutenção constante garante um bom funcionamento e um bom rendimento no decorrer do tempo.
Não usar produtos que contêm abrasivos. Realizar todas essas operações desconectando preventivamente o aparelho da rede elétrica. L GARANTIA O novo aparelho é coberto pela garantia. As condições de garantia estão apresentadas integralmente na última página de capa deste manual. A casa fabricante não se responsabiliza por possíveis imprecisões, que podem ser atribuídas a erros de impressão ou de transcrição, contidas no presente manual.
RUS A àçëíêìäñàü èé ùäëèãìÄíÄñàà åÖêõ èêÖÑéëíéêéÜçéëíà é˜Â̸ ‚‡ÊÌÓ, ˜ÚÓ·˚ ‰‡ÌÌÓ êÛÍÓ‚Ó‰ÒÚ‚Ó ÔÓ ˝ÍÒÔÎÛ‡Ú‡ˆËË ı‡ÌËÎÓÒ¸ ‚ÏÂÒÚÂ Ò ‡ÔÔ‡‡ÚÛÓÈ ‰Îfl ‚ÓÁÏÓÊÌÓÈ ÌÂÓ·ıÓ‰ËÏÓÒÚË ÍÓÌÒÛθڇˆËË ‚ ·Û‰Û˘ÂÏ. èË ÔÓ‰‡Ê ÔË·Ó‡ ËÎË Ô‰‡˜Â Â„Ó ‰Û„ÓÏÛ ÎËˆÛ Í ÔË·ÓÛ Ó·flÁ‡ÚÂθÌÓ ‰ÓÎÊÌÓ ÔË·„‡Ú¸Òfl êÛÍÓ‚Ó‰ÒÚ‚Ó, ˜ÚÓ·˚ ÌÓ‚˚È ÔÓθÁÓ‚‡ÚÂθ ·˚Î ‚ ÍÛÒ ÚÓ„Ó, Í‡Í ÔÓθÁÓ‚‡Ú¸Òfl ‚˚ÚflÊÍÓÈ Ë Í‡ÍË ÒÓÓÚ‚ÂÚÒÚ‚Û˛˘Ë ÏÂ˚ Ô‰ÓÒÚÓÓÊÌÓÒÚË ÌÂÓ·ıÓ‰ËÏÓ Òӷβ‰‡Ú¸.
è‰ Ôӂ‰ÂÌËÂÏ Î˛·˚ı χÌËÔÛÎflˆËÈ ÔÓ ˜ËÒÚÍ ËÎË ÛıÓ‰Û ‚˚Íβ˜ËÚ ÔË·Ó, ‚˚Ú‡˘Ë‚ ‚ËÎÍÛ ËÁ ÓÁÂÚÍË ËÎË Ò ÔÓÏÓ˘¸˛ Ó·˘Â„Ó ‚˚Íβ˜‡ÚÂÎfl. è‰ÔËflÚËÂ-ËÁ„ÓÚÓ‚ËÚÂθ Ì ÌÂÒÂÚ ÓÚ‚ÂÚÒÚ‚ÂÌÌÓÒÚË Á‡ ‚ÓÁÏÓÊÌ˚È ‚‰, Ô˘ËÌÂÌÌ˚È, ÔflÏÓ ËÎË ÍÓÒ‚ÂÌÌÓ, β‰flÏ, Ô‰ÏÂÚ‡Ï ËÎË ‰Óχ¯ÌËÏ ÊË‚ÓÚÌ˚Ï ‚ÒΉÒÚ‚Ë ÌÂÒӷβ‰ÂÌËfl Ô‰ÔËÒ‡ÌËÈ, Û͇Á‡ÌÌ˚ı ‚ êÛÍÓ‚Ó‰ÒÚ‚Â ÔÓ ˝ÍÒÔÎÛ‡Ú‡ˆËË, ÓÒÓ·ÂÌÌÓ ‚ ÚÓÏ, ˜ÚÓ Í‡Ò‡ÂÚÒfl Ô‡‚ËÎ ÛÒÚ‡ÌÓ‚ÍËË Ë ˝ÍÒÔÎÛ‡Ú‡ˆËË ÔË·Ó‡ Ë ÛıÓ‰‡ Á‡ ÌËÏ.
- ÛÒÚ‡ÌÓ‚ËÚ Ì‡ ¯ÌÛ ˝ÎÍÚÓÔËÚ‡ÌËfl ‚ËÎÍÛ, ÔË„Ó‰ÌÛ˛ ‰Îfl ̇„ÛÁÍË, Ë ‚ÒÚ‡‚¸Ú ‚ Á‡˘ËÚÌÛ˛ ‚ËÎÍÛ. èË ÌÓ·ıÓ‰ËÏÓÒÚË ÔflÏÓ„Ó ÔÓ‰Íβ˜ÌËfl Í ÒÚË ÌÓ·ıÓ‰ËÏÓ ‡ÁÏÒÚËÚ¸ ÏÊ‰Û ÔË·ÓÓÏ Ë ÒÚ¸˛ ÏÌÓ„ÓÔÓÎflÌ˚È Ï‡„ÌËÚÓÚÏ˘ÒÍËÈ ÔÍβ˜‡Úθ Ò ÏËÌËχθÌ˚Ï ÓÚÍ˚ÚËÏ ÏÊ‰Û ÍÓÌÚ‡ÍÚ‡ÏË 3 ÏÏ, ‡ÒÒ˜ËÚ‡ÌÌ˚È Ì‡ ̇„ÛÁÍÛ Ë ÓÚ‚˜‡˛˘ËÈ ‰ÈÒÚ‚Û˛˘ËÏ ÌÓχÏ. ÜÎÚÓ-ÁÎÌ˚È ÔÓ‚Ó‰ Á‡ÁÏÎÌËfl Ì ‰ÓÎÊÌ Ô˚‚‡Ú¸Òfl ÔÍβ˜‡ÚÎÏ.
53 на русском языке ветствующего светодиода и выключению светодиода, относящегося к ранее выбранной скорости. При выключенном светодиоде и отсутствии какой-либо скорости, нажатие кнопки не имеет никакого эффекта. При включенном светодиоде нажатие кнопки 3 не имеет никакого эффекта. Для выключения вытяжки необходимо сначала выбрать 1-ю скорость, затем снова нажать эту кнопку.
Кнопка ' + ' Если двигатель выключен, нажатие на кнопку '+' приводит к включению двигателя на первой скорости. Если двигатель уже включен, нажатие на кнопку '+' увеличивает скорость вплоть до максимальной. Кнопка «Timer» При включдвигатель уже включенном двигателе нажатие на кнопку «Timer» активирует/дезактивирует функцию таймера Замена Кода (только в случае неполадки) Держать нажатой кнопку “Luce” одновременно с кнопкой “Timer” на радиопульте до тех пор, пока синий светодиод не начнет медленно мигать.
ТЕХОБСЛУЖИВАНИЕ И ОЧИСТКА I ë‚Ó‚ÏÌÌ˚È ÛıÓ‰ „‡‡ÌÚËÛÚ ıÓÓ¯Û˛ ‡·ÓÚÛ Ë ·Óθ¯ÓÈ ÒÓÍ ÒÎÛÊ·˚. éÒÓ·ÌÌÓ ‚ÌËχÌË ÌÓ·ıÓ‰ËÏÓ Û‰ÎflÚ¸ ÏÚ‡Î΢ÒÍËÏ ÙËÎ¸Ú‡Ï ‰Îfl Á‡ı‚‡Ú‡ Êˇ Ë ÙËÎ¸Ú‡Ï Ò ‡ÍÚË‚ËÓ‚‡ÌÌ˚Ï Û„ÎÏ, ‰ÈÒÚ‚ËÚθÌÓ, ˜‡ÒÚ‡fl Ó˜ËÒÚ͇ ÙËθÚÓ‚ Ë ÏÒÚ Ëı ÍÔÎÌËfl „‡‡ÌÚËÛÚ, ˜ÚÓ ‚ ‚˚ÚflÊÍ Ì ÒӷˇÚÒfl ÊË, ÍÓÚÓ˚È ÓÔ‡ÒÌ ËÁ-Á‡ ΄ÍÓÒÚË ‚ÓÁ„Ó‡ÌËfl. 1.
èÓËÁ‚Ó‰ËÚθ Ì ÓÚ‚˜‡Ú Á‡ ‚ÓÁÏÓÊÌ˚ ÌÚÓ˜ÌÓÒÚË Ë Ó¯Ë·ÍË ‚ ‰‡ÌÌÓÏ ËÁ‰‡ÌËË, ‚ÓÁÌËÍ¯Ë ÔË Ô˜‡ÚË ËÎË ÔÔ˜‡Ú˚‚‡ÌËË. èÓËÁ‚Ó‰ËÚθ ÓÒÚ‡‚ÎflÚ Á‡ ÒÓ·ÓÈ Ô‡‚Ó Ì‡ Ú ÏÓ‰ËÙË͇ˆËË ÒÓ·ÒÚ‚ÌÌÓÈ ÔÓ‰Û͈ËË, ÍÓÚÓ˚ ÒÓ˜ÚÚ ÌÓ·ıÓ‰ËÏ˚ÏË ËÎË ÔÓÎÁÌ˚ÏË, ‡ Ú‡ÍÊ ‚ ËÌÚÒ‡ı ÔÓθÁÓ‚‡ÚÎfl, Ì ‚ÎËfl˛˘Ë ̇ „·‚Ì˚ ÙÛÌ͈ËÓ̇θÌ˚ ı‡‡ÍÚËÒÚËÍË Ë ·ÁÓÔ‡ÒÌÓÒÚ¸. M МОНТАЖ ВЫТЯЖКИ ВНИМАНИЕ: Установка винтов или крепежного устройства не в соответствии с настоящими инструкциями может привести к опасности поражения электрическим током. Рис.
PL A INSTRUKCJA OBSŁUGI OSTRZEŻENIA 57 Polska Ta instrukcja obsługi musi być przechowywana razem z urządzeniem w celu przyszłego wykorzystywania. Jeżeli urządzenie jest sprzedawane lub przesyłane innym stronom, sprawdzić, czy wraz z nim przekazywana jest ta instrukcja, dla zapewnienia, że nowy użytkownik posiada prawidłowe informacje o działaniu okapu kuchennego i zna ostrzeżenia. Te ostrzeżenia zostały podane dla Waszego bezpieczeństwa oraz ostrzeżenia innych osób.
do wyciągania dymów z urządzeń spalających gaz lub inne paliwa. - Przed użytkowaniem urządzenia upewnić się, że są spełniane wszystkie przepisy dotyczące odprowadzania wyciąganego powietrza. - Jeżeli przewód zasilający nieodłączalny ulegnie uszkodzeniu, to powinien on być wymieniony u wytwórcy lub w specjalistycznym zakładzie naprawczym albo przez wykwalifikowaną osobę w celu uniknięcia zagrożenia.Jeżeli czyszczenie nie jest wykonywane zgodnie z instrukcją, istnieje ryzyko pożaru.
czy bezpiecznik i układ elektryczny mogą przenosić obciążenie urządzenia (patrz specyfikacje techniczne w punkcie B). Niektóre rodzaje urządzeń są wyposażone w kabel bez wtyczki; w takim przypadku muszą być stosowane „znormalizowane” wtyczki, z uwzględnieniem, że: - przewód żółto-zielony musi być wykorzystywany do uziemienia; - przewód niebieski musi być używany dla linii zerowej (neutral); - przewód brązowy musi być używany jako fazowy; kabel nie może stykać się z częściami gorącymi (powyżej 70oC).
Przy zgaszonej LED i braku aktywnej prędkości, wciśnięcie przycisku niczego nie zmienia. A Przy zaświeconej LED, wciśnięcie przycisku 3 niczego nie zmienia. Aby wyłączyć okap, należy wybrać 1. prędkość, a następnie ponownie wcisnąć dany przycisk. 4: 3. Prędkość Gdy LED jest zgaszona, a inna prędkość jest aktywna, wciśnięcie przycisku (przedłużone lub normalne) oznacza wybór 3. prędkości, zaświecenie się danej LED i zgaszenie LED przypisanej do uprzednio wybranej prędkości.
miganiami LED. Aby wrócić do kodu default, należy wcisnąć przycisk “-” razem z przyciskiem “+” zdalnego sterowania na dłużej niż 5 sekund. Zapis kodu default sygnalizowany jest 3 krótkimi mignięciami LED. Za każdym razem, gdy tworzony jest nowy kod lub ustawiany jest kod default zdalnego sterowania, należy przeprowadzić również proceduręPodłączenie zdalnego sterowania (Przycisk Światła na panelu przyciskowym) opisaną powyżej. G GFILTRY METALOWE I FILTRY WĘGLOWE 1.
2. FILTRY CARBON ZEO Filtry CARBON.ZEO nie wymagają szczególnej konserwacji. Przy normalnym użytkowaniu, zaleca się regenerować je co 18 miesięcy i zastąpić po 3 latach. Przed rozpoczęciem pracy, należy odłączyć okap od zasilania elektrycznego. Sposób wyjmowania filtrów w paragrafie H2. W celu regeneracji filtra CARBON.ZEO (co 18 miesięcy), należy wprowadzić go do zwykłego piecyka domowego nastawionego na temperaturę 200°C na około 2 godziny.
Rys. B 2) Wyjąć ramę okapu „SP” zamontowaną wcześniej na okapie, jak pokazano na rysunku. Rys. C 1) Przymocować ramę „SP” do sufitu za pomocą 6 śrub „V3” i kołków dołączonych do wyposażenia. Upewnić się, że kabel zasilający „CAI” nie jest przyciśnięty. 2) Sprawdzić szczelność i solidność instalacji. Rys. D 1) Podnieść okap przy ramie „SP”.
Note
Note
Decreto Legislativo del 30/06/2003 n. 196 - art. 7 Codice in materia di protezione dei dati personali. 1. L’interessato ha diritto di ottenere la conferma dell’esistenza o meno di dati personali che lo riguardano, anche se non ancora registrati, e la loro comunicazione in forma intelleggibile. 2.
Condizioni di garanzia 1) L’apparecchio è garantito dalla Casa costruttrice Falmec S.p.A (www.falmec.com) per un periodo di 24 mesi dalla data del suo acquisto comprovata da ricevuta fiscale o altro documento reso fiscalmente obbligatorio. 2) La garanzia sarà prestata con la sostituzione o riparazione gratuita delle parti che risultino difettose.
IMPORTANTE! La presente garanzia è valida solo per l’Italia (Guarantee conditions are valid only for Italy). Questo certificato di garanzia non deve essere spedito, ma conservato con la ricevuta fiscale, o altro documento reso fiscalmente obbligatorio, che comprovi la data d’acquisto della cappa.