
User's Manual
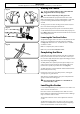
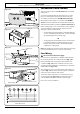
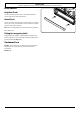
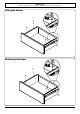
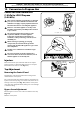
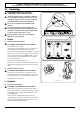
Table Of Contents
- U111301 cover - Falcon
- U111301-01 [AUS]
- 1. Before you start...
- 2. Cooker Overview
- 3. Rotary clock
- 4. Cooking Tips
- 5. Cooking Table
- 6. Cleaning Your Cooker
- 7. Troubleshooting
- 8. Service and Spares
- 9. Installation
- Safety Requirements and Regulations
- Provision of Ventilation
- Location of Cooker
- Conversion
- Positioning the Cooker
- Moving the Cooker
- Completing the Move
- Levelling the Cooker
- Fitting the Stability Bracket and Chain
- Repositioning the Cooker Following Connection
- Conversion to Another Gas
- Gas Connection
- Natural Gas
- Propane
- Pressure Testing
- Electrical Connection
- Connection in New Zealand
- Final Checks
- Customer Care
- Fitting the drawer
- Removing the drawer
- 10. Conversion to Propane Gas
- 11. Servicing
- 12. Circuit Diagram
- 13. Technical Data

INSTALLATION
Check the appliance is electrically safe and gas sound when you have nished.
32
Final Checks
Hotplate Check
Check each burner in turn (refer to the ‘Hotplate Burners’
section at the front of the instructions).
Oven Check
Set the clock as described earlier in the instructions, and then
turn on the ovens. Check that the oven fan starts to turn and
that the ovens start to heat up.
Note: The oven light bulbs are not included in the guarantee.
Turn o the oven.
Fitting the magnetic plinth
Simply x the two magnets, suppled with the plinth, to the
bottom edge of the cooker. Then t the plinth, adjusting it to
your desired height (Fig. 9.19).
Customer Care
Installer: Please complete your details in this guide, inform
the user how to operate the cooker and hand over the
instructions.
Thank you.
Fig. 9.19