
User's Manual
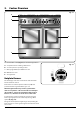
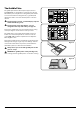
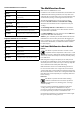
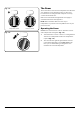
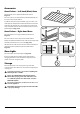
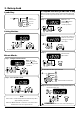
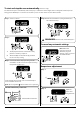
Table Of Contents
- U111301 cover - Falcon
- U111301-01 [AUS]
- 1. Before you start...
- 2. Cooker Overview
- 3. Rotary clock
- 4. Cooking Tips
- 5. Cooking Table
- 6. Cleaning Your Cooker
- 7. Troubleshooting
- 8. Service and Spares
- 9. Installation
- Safety Requirements and Regulations
- Provision of Ventilation
- Location of Cooker
- Conversion
- Positioning the Cooker
- Moving the Cooker
- Completing the Move
- Levelling the Cooker
- Fitting the Stability Bracket and Chain
- Repositioning the Cooker Following Connection
- Conversion to Another Gas
- Gas Connection
- Natural Gas
- Propane
- Pressure Testing
- Electrical Connection
- Connection in New Zealand
- Final Checks
- Customer Care
- Fitting the drawer
- Removing the drawer
- 10. Conversion to Propane Gas
- 11. Servicing
- 12. Circuit Diagram
- 13. Technical Data

12
The Ovens
The clock must be set to the time of day before the left-hand
oven will work. See the following section on ‘The Clock’
for instructions on setting the time of day. The clock only
controls the left-hand oven.
References to ‘left-hand’ and ‘right-hand’ ovens apply as
viewed from the front of the appliance.
NOTE: Please remember that all cookers vary so
temperatures in your new ovens may dier to those in your
previous cooker.
Operating the Ovens
Multifunction ovens have two controls: a function selector
and a temperature setting knob (Fig. 2.15).
1. Turn the function selector control to a cooking function.
Turn the oven temperature knob to the temperature
required (Fig. 2.16).
2. The oven indicator light will glow until the oven has
reached the temperature selected (Fig. 2.15). It will
then cycle on and o during cooking as the oven
maintains the selected temperature.
ArtNo.270-0026
Proplus MF oven controls (2)
ArtNo.270-0028
Proplus MF temp control
indicator light
140
100
180
220
0
Fig. 2.15
Fig. 2.16
Temperature control Function selector