
User's Manual
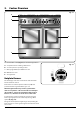
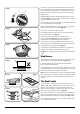
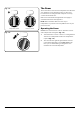
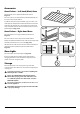
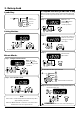
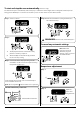
Table Of Contents
- U111301 cover - Falcon
- U111301-01 [AUS]
- 1. Before you start...
- 2. Cooker Overview
- 3. Rotary clock
- 4. Cooking Tips
- 5. Cooking Table
- 6. Cleaning Your Cooker
- 7. Troubleshooting
- 8. Service and Spares
- 9. Installation
- Safety Requirements and Regulations
- Provision of Ventilation
- Location of Cooker
- Conversion
- Positioning the Cooker
- Moving the Cooker
- Completing the Move
- Levelling the Cooker
- Fitting the Stability Bracket and Chain
- Repositioning the Cooker Following Connection
- Conversion to Another Gas
- Gas Connection
- Natural Gas
- Propane
- Pressure Testing
- Electrical Connection
- Connection in New Zealand
- Final Checks
- Customer Care
- Fitting the drawer
- Removing the drawer
- 10. Conversion to Propane Gas
- 11. Servicing
- 12. Circuit Diagram
- 13. Technical Data

7
ArtNo.270-0001
Proplus control to high
The 100 dual fuel cooker (Fig. 2.1) has the following features:
A. 5 hotplate burners including a wok burner
B. A control panel incorporating a timer
C. Main (programmable) multifunction oven
D. Multifunction oven
E. Storage drawer
Hotplate Burners
The drawing by each of the control knobs indicates which
burner that knob controls.
Each burner has a Flame Supervision Device (FSD) that
prevents the ow of gas if the ame goes out.
When the igniter button is pressed in, sparks will be
made at every burner – this is normal. Do not attempt to
disassemble or clean around any burner while another
burner is on, otherwise an electric shock could result.
To light a burner, push in and turn the associated control
knob to the high position as indicated by the large ame
symbol (
), (Fig. 2.2).
The igniter should spark and light the gas. Keep holding the
knob pressed in to let the gas through to the burner for about
ten seconds.
ArtNo.270-0029 - Prof+ 90SC annotated
Professional
+ 100 FX
A
B
C
D
E
2. Cooker Overview
Fig. 2.1
Fig. 2.2