
Installation and Operation Guide


8
The Ovens
The clock must be set to the time of day before the left-
hand oven will work. See the following section on ‘The
Clock’ for instructions on setting the time of day. The
clock only controls the left-hand oven.
References to ‘left-hand’ and ‘right-hand’ ovens apply as viewed
from the front of the appliance.
Note: Please remember that all cookers vary so temperatures
in your new ovens may dier to those in your previous
cooker.
Operating the Ovens
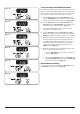
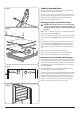
1. Turn the oven knob to the desired temperature (Fig.
2.15).
2. The oven indicator light will glow until the oven has
reached the temperature selected (Fig. 2.15). It will then
cycle on and o during cooking.
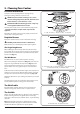
The Clock
You can use the clock to turn the left-hand oven on and o.
The clock must be set to the time of day before the oven
will work.
Setting the Clock
The 2-button LCD clock can only display a 24 hour clock. The
Multifunction Oven on the left will not operate unless the
clock has been set.
1. Once the cooker is connected and switched on, the
display will start to ash.
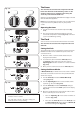
2. To set the time, turn and hold the Timer (A) knob to
the Clock (C) setting and at the same time turn the
Adjusting (B) knob either clockwise or counter-clockwise
(Fig. 2.16).
3. Once you have set the time release the Timer (A) knob.
Setting the Minute Minder
A Minute Minder (E) is a feature that can be set for a number
of minutes and sounds an alarm once the specied amount
of time has elapsed.
1. Turn the Timer (A) knob to the Minute Minder (E)
setting (Fig. 2.17).
2. Turn the Adjusting (B) knob to set the amount of time
required. e.g. 20 seconds (Fig. 2.18).
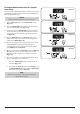
3. Turn the Timer (A) knob to the Manual (D) setting to
see the current time and the ‘Bell’ symbol on the display
(Fig. 2.19).
4. Once the specied time has elapsed it will emit an alarm.
There are two ways to cancel the alarm:
I. Turn the Adjusting (B) knob counter-clockwise or
clockwise (Fig. 2.20).
II. Turn either the Timer (A) knob to the Clock (C) or to
the Minute Minder (E) setting. Return to Manual (D)
for normal cooking mode (Fig. 2.20).
E
AB
ArtNo.300-000 2
minute min er setting
AB
C D
E
AB
ArtNo.300-000 2
minute min er setting 2
D
E
C
AB
ArtNo.301-0007 2
Stopping the o en 1
D
AB
E
C
ArtNo.270-002
Proplus o en controls 2
Fig. 2.15
Fig. 2.16
Fig. 2.17
Fig. 2.18
Fig. 2.19
Fig. 2.20
x The ‘cook period’, which is the length of time you
want the oven to cook for.
x The ‘stop time’, which is the time of day you
want the oven to stop cooking.