
User Manual
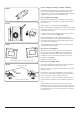

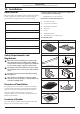
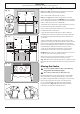
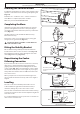
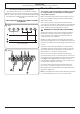
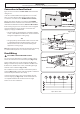
Table Of Contents
- 1. Before You Start...
- 2. Cooker Overview
- The Hob
- Pan Detector,
- Residual Heat Indicator, H
- Child Lock, 
- Low Temperature Setting, L1/L2/L3
- Power Boost Setting, P
- Power Sharing Zones (Fig. 2.8)
- The Bridging-Zone Function
- Overheat Function
- The Glide-out Grill™ (Fig. 2.14)
- The Ovens
- The Multifunction Oven
- Multifunction Oven Functions
- The Fan Oven
- The Slow Cook Oven
- Operating the Ovens
- Oven Lights
- Accessories
- 3. Using the Glide-out Grill™
- 4. 3 Button clock
- 5. Cooking Tips
- 6. Cooking Table
- 7. Cleaning Your Cooker
- 8. Troubleshooting
- 9. Service and Spares
- 10. Installation
- Dear Installer
- Safety Requirements and Regulations
- Provision of Ventilation
- Location of Cooker
- Positioning the Cooker
- Moving the Cooker
- Lowering the Two Rear Rollers
- Completing the Move
- Fitting the Stability Bracket
- Repositioning the Cooker Following Connection
- Levelling
- Electrical Connection
- Connection in New Zealand
- Fixed Wiring
- Final Fitting and Checks
- Customer Care
- 11. Servicing
- 12. Circuit Diagrams
- 13. Technical Data

INSTALLATION
Check the appliance is electrically safe when you have nished.
31
Dear Installer
Before you start your installation, please complete the details
below, so that, if your customer has a problem relating to
your installation, they will be able to contact you easily.
ArtNo.050-0011 - Installer information table
Installer’s Name
Appliance Serial Number
Installer’s Telephone Number
Installer’s Company
Safety Requirements and
Regulations
n
This cooker must be installed in accordance with
the relevant instructions in this booklet, with the
relevant national and local regulations, and with the
local electricity supply companies’ requirements.
n
The appliance must be installed in accordance with
the regulations in force and only in a well ventilated
space.
n
Read these instructions before installing or using
the appliance.
n
This appliance is designed for domestic cooking
only. Use for any other purpose could invalidate any
warranty or liability claim.
Provision of Ventilation
This appliance is not connected to a combustion products
evacuation device. Therefore, particular attention must be
given to the relevant requirements regarding ventilation.
All rooms require a window that can be opened, or
equivalent, while some rooms require a permanent vent in
addition to the window.
Location of Cooker
The cooker may be installed in a kitchen/kitchen diner but
NOT in a room containing a bath or shower.
You will need the following equipment to complete the
cooker installation satisfactorily:
• Multimeter (for electrical checks).
You will also need the following tools:
1. Steel tape measure
2. Cross-head screwdriver
3. Flat-bladed screwdriver
4. Spirit level
5. Pencil
6. Adjustable spanner
7. 13 mm spanner or socket wrench
Checking the parts:
Grill pan and trivet 4 Flat shelves with runners
Plinth
Stability location bracket
Stability bracket Conduit box
Induction Griddle plate Handyrack (optional)
Roasting tin (Optional)
ArtNo.324-0004 Roasting tin
10. Installation