
User Manual

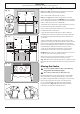
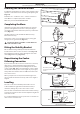
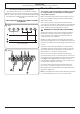
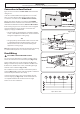
Table Of Contents
- 1. Before You Start...
- 2. Cooker Overview
- The Hob
- Pan Detector,
- Residual Heat Indicator, H
- Child Lock, 
- Low Temperature Setting, L1/L2/L3
- Power Boost Setting, P
- Power Sharing Zones (Fig. 2.8)
- The Bridging-Zone Function
- Overheat Function
- The Glide-out Grill™ (Fig. 2.14)
- The Ovens
- The Multifunction Oven
- Multifunction Oven Functions
- The Fan Oven
- The Slow Cook Oven
- Operating the Ovens
- Oven Lights
- Accessories
- 3. Using the Glide-out Grill™
- 4. 3 Button clock
- 5. Cooking Tips
- 6. Cooking Table
- 7. Cleaning Your Cooker
- 8. Troubleshooting
- 9. Service and Spares
- 10. Installation
- Dear Installer
- Safety Requirements and Regulations
- Provision of Ventilation
- Location of Cooker
- Positioning the Cooker
- Moving the Cooker
- Lowering the Two Rear Rollers
- Completing the Move
- Fitting the Stability Bracket
- Repositioning the Cooker Following Connection
- Levelling
- Electrical Connection
- Connection in New Zealand
- Fixed Wiring
- Final Fitting and Checks
- Customer Care
- 11. Servicing
- 12. Circuit Diagrams
- 13. Technical Data

29
Power failure
In the event of a failure in the electrical supply, remember to
reset the clock so that the timed oven continues to operate.
The timed oven is not coming on when turned on
manually
Is the power on? Is the clock illuminated? If not, there may be
something wrong with the power supply. Is the cooker supply
on at the isolator switch?
Has the time of day been set?
The timed oven is not coming on when automatic cooking
Has the oven knob been left in the OFF position by mistake?
Oven temperature getting hotter as the cooker gets older
If turning the temperature down using the oven control knob
has not worked, or has only worked for a short time, then you
may need a new thermostat. This should be tted by a service
person.