
User Manual

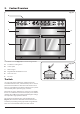
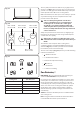
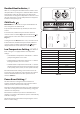
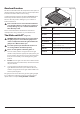
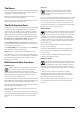
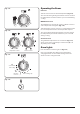
Table Of Contents
- 1. Before You Start...
- 2. Cooker Overview
- The Hob
- Pan Detector,
- Residual Heat Indicator, H
- Child Lock, 
- Low Temperature Setting, L1/L2/L3
- Power Boost Setting, P
- Power Sharing Zones (Fig. 2.8)
- The Bridging-Zone Function
- Overheat Function
- The Glide-out Grill™ (Fig. 2.14)
- The Ovens
- The Multifunction Oven
- Multifunction Oven Functions
- The Fan Oven
- The Slow Cook Oven
- Operating the Ovens
- Oven Lights
- Accessories
- 3. Using the Glide-out Grill™
- 4. 3 Button clock
- 5. Cooking Tips
- 6. Cooking Table
- 7. Cleaning Your Cooker
- 8. Troubleshooting
- 9. Service and Spares
- 10. Installation
- Dear Installer
- Safety Requirements and Regulations
- Provision of Ventilation
- Location of Cooker
- Positioning the Cooker
- Moving the Cooker
- Lowering the Two Rear Rollers
- Completing the Move
- Fitting the Stability Bracket
- Repositioning the Cooker Following Connection
- Levelling
- Electrical Connection
- Connection in New Zealand
- Fixed Wiring
- Final Fitting and Checks
- Customer Care
- 11. Servicing
- 12. Circuit Diagrams
- 13. Technical Data

10
Max: 1.85 kW
Boost: 2.5 kW
Max: 1.85 kW
Boost: 3.2 kW
Max: 1.85 kW
Boost: 2.5 kW
Max: 1.85 kW
Boost: 2.5 kW
Max: 1.15 kW
Boost: 2.0 kW
Zone 2
Zone 1
Zone 3
Zone 4
Zone 5
Table 2.1
Cooking Zone
Minimum Pan Diameter
(Pan Base) mm
Front left 180
Rear left 180
Centre 210
Rear right 180
Front right 140
The very best pans have bases that are very slightly curved
up when cold (Fig. 2.3). If you hold a ruler across the bottom
you will see a small gap in the middle. When they heat up the
metal expands and lies at on the cooking surface.
Make sure that the base of the pan is clean and dry to prevent
any residue burning onto the hob panel. This also helps
prevent scratches and deposits.
n
Take care when placing hot lids onto the hob
surface. Lids that have been covering boiling or
steaming foods can ‘stick’ to the ceramic glass.
Should this occur, DO NOT attempt to lift the lid
o the hotplate: this may damage the hob surface.
Instead, carefully slide the lid to the edge of the hob
surface and remove.
Always use pans that are the same size as (or slightly larger
than) the areas marked on the hob. Using a lid will help the
contents boil more quickly.
n
Always take care before touching the surface, even
when the hob is turned o. It may be hotter than you
think!
The induction hob comprises of ve cooking zones
containing induction elements with dierent ratings and
diameters (Fig. 2.4) each with a pan detector and residual
heat indicator, and a hob control display.
The hob control display (Fig. 2.5) informs you of the following
induction hob functions:
• Dualzone indicator
• H Residual heat indicator
• L1/L2/L3 Low temperature setting
• Child lock
• Pan detector
• P Power boost setting
Pan Detector,
IMPORTANT: After use, switch o the hob element by its
control and DO NOT RELY on the pan detector.
If a cooking area is switched on and there is no pan in place
or if the pan is too small for the cooking area, then no heat
will be generated. The symbol [ ] will appear on the hob
control display; this is the “pan-missing symbol”. Place a pan
of the correct size on the cooking area and the [ ] symbol
will disappear and cooking can begin. After 10 minutes
without detecting a pan the cooking zone will switch o
automatically.
Table 2.1 shows the minimum pan sizes recommended for
each cooking zone.
Note: Using pans with a base diameter smaller than those
recommended will result in a power reduction.
Fig. 2.3
Fig. 2.4
Fig. 2.5