
User's Manual
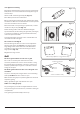
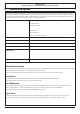
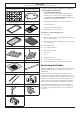
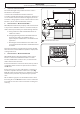
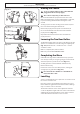
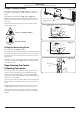
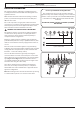
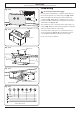
Table Of Contents
- 1. Before You Start...
- 2. Cooker Overview
- 3. Using the Glide-out Grill™
- 4. 3 button clock
- 5. Cooking Tips
- 6. Cooking Table
- 7. Cleaning Your Cooker
- 8. Troubleshooting
- 9. Service and Spares
- 10. Installation
- Safety Requirements and Regulations
- Provision of Ventilation
- Location of Cooker
- Conversion
- Positioning the Cooker
- Moving the Cooker
- Lowering the Two Rear Rollers
- Completing the Move
- Levelling
- Repositioning the Cooker Following Connection
- Gas Connection
- Natural Gas
- Propane
- Pressure Testing
- Electrical Connection
- Fixed Wiring
- Final Fittings and Checks
- Customer Care
- 11. Conversion to LP Gas
- 12. Servicing
- 13. Circuit Diagram

INSTALLATION
Check the appliance is gas sound when you have nished.
30
You will need the following equipment to complete the
cooker installation satisfactorily:
• * Restraining chain and hook:
If the cooker is to be supplied with gas through a
flexible hose, a restraining chain and hook MUST be
fitted. These are not supplied with the cooker but are
available at most builders’ merchants.
• Flexible gas hose: Must be in accordance with the
• relevant standards.
• Gas pressure tester/manometer.
• Multimeter: For electrical checks.
You will also need the following tools:
1. Electric drill
2. Masonry drill bit (only required if tting the cooker on a
stone or concrete oor)
3. Wall plugs (only required if tting the cooker on a stone
or concrete oor)
4. Steel tape measure
5. Cross head screwdriver
6. Flat head screwdriver
7. Spirit level
8. Pencil
9. Adjustable spanner
10. 13 mm spanner or socket wrench
11. Screws for tting the restraining chain and bracket
Positioning the Cooker
The diagram (Fig. 10.1) shows the minimum recommended
distance from the cooker to nearby surfaces as given in
AS/NZS5601.
Where the appliance is installed next to cabinetry, the
cabinet material must be capable of withstanding 70°C. If
this appliance is installed near vinyl wrapped surfaces, use an
installation kit available from the vinyl-wrap supplier. Falcon
cannot accept any responsibility for damage caused due to
installation into cabinets with low temperature tolerances.
*Any splashback must be tted in accordance with the
manufacturers instructions. Allowance should be made for
the additional height of the ue trim, which is tted to the
cooker hob.
3 pan supports Wok cradle (Supplied)
ArtNo.110-0002 110 pan supports
ArtNo.000-0009 Wok ring, cast
Griddle plate (Supplied) Griddle Plate (optional)
Teppanyaki (optional)
Grill pan and trivet
ArtNo.311-0043 - Griddle 09
4 at shelves Handyrack (optional)
ArtNo.324-0003 Handyrack
Roasting tin (optional) Plinth
ArtNo.324-0004 Roasting tin
1x set of Telescopic runners Stability location bracket
Restraining chain & hook * Stability bracket
ArtNo.020-0021 - Restraining
chain & hook
Conduit box