
User's Manual
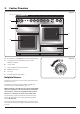
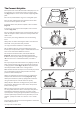
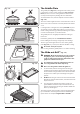
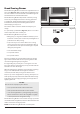
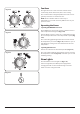
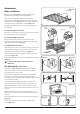
Table Of Contents
- 1. Before You Start...
- 2. Cooker Overview
- 3. Using the Glide-out Grill™
- 4. 3 button clock
- 5. Cooking Tips
- 6. Cooking Table
- 7. Cleaning Your Cooker
- 8. Troubleshooting
- 9. Service and Spares
- 10. Installation
- Safety Requirements and Regulations
- Provision of Ventilation
- Location of Cooker
- Conversion
- Positioning the Cooker
- Moving the Cooker
- Lowering the Two Rear Rollers
- Completing the Move
- Levelling
- Repositioning the Cooker Following Connection
- Gas Connection
- Natural Gas
- Propane
- Pressure Testing
- Electrical Connection
- Fixed Wiring
- Final Fittings and Checks
- Customer Care
- 11. Conversion to LP Gas
- 12. Servicing
- 13. Circuit Diagram

14
ArtNo.320-0017
Main oven light
ArtNo.270-0005 Proplus
electric oven control
Function control Temperature control
ArtNo.270-0006 Proplus
oven control light
Fig. 2.24
Fig. 2.25
Fig. 2.26
Fig. 2.27
Fan Oven
The right-hand oven is a fan oven that circulates hot air
continuously, which means faster, more even cooking.
The recommended cooking temperatures for a fan oven are
generally lower than a conventional oven.
NOTE: Please remember that all cookers vary so
temperatures in your new ovens may dier to those in your
previous cooker.
Operating the Ovens
Operating the Multifunction Oven
The multifunction oven has two controls: a function selector
and a temperature setting knob (Fig. 2.24).
Turn the function selector control to a cooking function. Turn
the oven temperature knob to the temperature required (Fig.
2.25).
The oven heating light will glow until the oven has reached
the temperature you selected (Fig. 2.26). It will then cycle on
and o during cooking as the oven maintains the selected
temperature.
Operating the Fan Oven
Turn the oven knob to the desired temperature (Fig. 2.25).
The oven indicator light will glow until the oven has reached
the temperature selected (Fig. 2.26). It will then cycle on and
o during cooking.
Oven Lights
Press the button to turn the lights on (Fig. 2.27).
If the oven light fails, turn o the power supply before
changing the bulb. See the ‘Troubleshooting’ section for
details on how to change the bulb.