
User's Manual
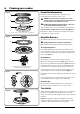
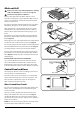
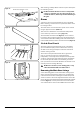
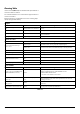
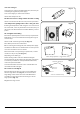
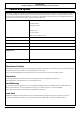

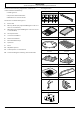
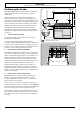
Table Of Contents
- U111305 cover [Aus]
- U111305-01 [AUS]
- 1. Before You Start...
- 2. Cooker Overview
- 3. 3 button clock
- 4. Cooking Tips
- 5. Cooking Table
- 6. Cleaning your cooker
- 7. Troubleshooting
- 8. Service and Spares
- 9. Installation
- Safety Requirements and Regulations
- Provision of Ventilation
- Location of Cooker
- Conversion
- Positioning the Cooker
- Moving the Cooker
- Lowering the Two Rear Rollers
- Completing the Move
- Fitting the Stability Bracket and Chain
- Fitting the Oven Burner Trim
- Gas Connection
- Natural Gas
- Propane
- Pressure Testing
- Electrical Connection
- Earth Continuity Check
- Polarity Check
- Final Checks
- Final Fitting
- Customer Care
- 10. Conversion to LP Gas
- 11. Servicing
- 12. Circuit Diagram
- 13. Technical Data

INSTALLATION
Check the appliance is gas sound when you have nished.
26
Checking the Parts:
Pan supports Plinth
ArtNo.110-0002 110 pan supports
Griddle plate Teppanyaki (Optional extra)
ArtNo.311-0043 - Griddle 09
Wok cradle (Optional extra) Grill pan & trivet
ArtNo.000-0009 Wok ring, cast
Flat shelves Handyrack
Roasting Tin Splashback
ArtNo.324-0004 Roasting tin
ArtNo.421-0002 - Splashback
Restraining chain & hook Stability bracket
ArtNo.020-0021 - Restraining
chain & hook
Stability Location Bracket
You will need the following equipment to complete the
cooker installation satisfactorily:
• Flexible gas hose.
• Gas pressure tester/manometer.
• Multimeter: For electrical checks.
You will also need the following tools:
1. Electric drill
2. Masonry drill bit (only required if tting the cooker on a
stone or concrete oor)
3. Wall plugs (only required if tting the cooker on a stone
or concrete oor)
4. Steel tape measure
5. Cross head screwdriver
6. Flat head screwdriver
7. 4 mm & 3 mm Allen keys
8. Spirit level
9. Pencil
10. Adjustable spanner
11. 13 mm spanner or socket wrench
12. Screws for tting the restraining chain and bracket