
User's Manual


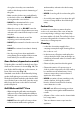
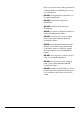

Table Of Contents
- U111305 cover [Aus]
- U111305-01 [AUS]
- 1. Before You Start...
- 2. Cooker Overview
- 3. 3 button clock
- 4. Cooking Tips
- 5. Cooking Table
- 6. Cleaning your cooker
- 7. Troubleshooting
- 8. Service and Spares
- 9. Installation
- Safety Requirements and Regulations
- Provision of Ventilation
- Location of Cooker
- Conversion
- Positioning the Cooker
- Moving the Cooker
- Lowering the Two Rear Rollers
- Completing the Move
- Fitting the Stability Bracket and Chain
- Fitting the Oven Burner Trim
- Gas Connection
- Natural Gas
- Propane
- Pressure Testing
- Electrical Connection
- Earth Continuity Check
- Polarity Check
- Final Checks
- Final Fitting
- Customer Care
- 10. Conversion to LP Gas
- 11. Servicing
- 12. Circuit Diagram
- 13. Technical Data

7
M
A
B
C
D
E
F
The 110 gas cooker (Fig. 2.1) has the following features:
A. 6 hotplate burners including a wok burner
B. A control panel
C. A grill
D. Left-hand oven
E. Right-hand oven
F. A storage drawer
Hotplate Burners
The drawing by each of the central knobs indicates which
burner that knob controls.
Each burner has a Flame Supervision Device (FSD) that
prevents the ow of gas if the ame goes out.
When the igniter button is pressed in, sparks will be
made at every burner – this is normal. Do not attempt to
disassemble or clean around any burner while another
burner is on, otherwise an electric shock could result.
To light a burner, press the igniter button, and push in and
turn the associated control knob to the high position as
indicated by the large ame symbol (
), (Fig. 2.2).
Fig. 2.1
Fig. 2.2
2. Cooker Overview