
User's Manual
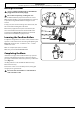
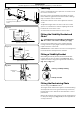
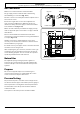
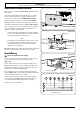

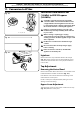
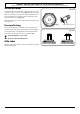
Table Of Contents
- U111290 cover - Falcon
- U111290-01 [AUS]
- 1. Before You Start...
- 2. Cooker Overview
- 3. Rotary clock
- 4. 3 button clock
- 5. Cooking Tips
- 6. Cooking Table
- 7. Cleaning your cooker
- 8. Troubleshooting
- 9. Service and Spares
- 10. Installation
- Provision of Ventilation
- Location of Cooker
- Conversion
- Positioning the Cooker
- Moving the Cooker
- Lowering the Two Rear Rollers
- Completing the Move
- Levelling
- Fitting the Stability Bracket and Chain
- Fitting the Stability Bracket
- Fitting the Restraining Chain
- Gas Connection
- Pressure Testing
- Electrical Connection
- Connection in New Zealand
- Fixed Wiring
- Final Checks
- Final Fitting
- Customer Care
- 11. Conversion to LP Gas
- 12. Servicing
- 13. Circuit Diagram
- 14. Technical Data

INSTALLATION
Check the appliance is electrically safe and gas sound when you have nished.
31
ArtNo.070-0014 - Stability bracket - Wall fitting
Cooker
Stability bracket
Floor
Stability
location
bracket
Typical oor mounting
ArtNo.070-0014 - Stability bracket - Wall fitting
Cooker
Stability
bracket
Floor
Stability
location
bracket
Wall
Typical wall mounting
Alternative positions
for stability location
bracket
ArtNo.011-0007 - Restraining chain (AUS)
Restraining
chain
Levelling
You are recommended to use a spirit level on a shelf in one of
the ovens to check for level.
Place the cooker in its intended position taking care not to
twist it within the gap between the kitchen units as damage
may occur to the cooker or the units.
The front feet and rear rollers can be adjusted to level the
cooker.
To adjust the height of the rear of the cooker use a 13 mm
spanner or socket wrench to turn the adjusting nuts at the
front bottom corners of the cooker.
To set the front, turn the feet bases to raise or lower.
Fitting the Stability Bracket and
Chain
n
A stability bracket and chain MUST be tted when
the cooker is connected to a exible gas supply.
Unless properly installed, the cooker could be tipped by
leaning on the door. Injury might result from spilled hot
liquids or from the cooker itself.
IMPORTANT: The cooker must be set to the correct height and
levelled before the stability bracket is installed.
Fitting a Stability Bracket
When tting the stability bracket; rst attach the bracket
location device to the rear of the cooker (Fig. 10.7). Then
adjust the bracket to engage through the slot of the device
(Fig. 10.8 and Fig. 10.9).
Fitting the Restraining Chain
The restraining chain MUST be tted.
The length of chain between the appliance and the wall xing
should prevent strain on the gas and electricity connections,
but still allow access to unhook the chain when the cooker is
pull forward.
Measure the length of chain required. Use the clamp supplied
to clamp onto the gas pipe (Fig. 10.10). Fix the supplied hook
securely to the wall.
Fig. 10.7
Fig. 10.8
Fig. 10.9
Fig. 10.10
Caution, possibility of tilting
Anti-tip restraints