
Operation Manual


23
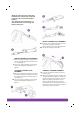
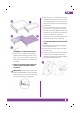
Attach the cleaning tool by inserting the
hose stem into the handle of the cleaning
tool. Press in and turn clockwise at
the same time to secure and press
in and turn counter clockwise to
release. Check for proper connection
by turning the handle counter-clockwise
a few turns. The handle should remain
connected. (Note for reference: This
connection method is the same design
used with most over the counter
prescription bottles). The design of this
connection is to prevent the hose from
twisting and kinking during use.
4.
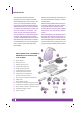
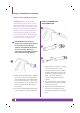
WEDGE CLEANING TOOL
ASSEMBLY
Slide the wedge shaped cleaning
pocket over the wedge cleaning tool
frame until it is completely on.
Secure the cleaning pocket onto the
frame. Close the cinch by pulling on
the elastic band and sliding the locking
bean to tighten.
5.
6.
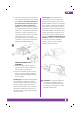
Cleaning Tip: The wedge cleaning pocket
was designed for cleaning a variety of
surfaces and is exceptional on those that
are large and flat, both horizontal and
vertical. Broad cleaning sides and super
absorbent microfibre fabrics loosen, lift,
and lock in dirt and grime while sanitizing
at the same time.
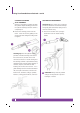
Cleaning Tip: The wedge tip and
squared edges reach into tight areas
often missed or difficult to reach with
traditional cleaning methods. The Wedge
sides concave to wrap around sink and
faucet fixtures, door knobs, and other
small curved surfaces leaving them clean
all around. Multiple sides provide more
surface cleaning area and allow one to
clean with one side and finish with the
other for a “NOW YOU KNOW THAT’S
CLEAN” performance. Surface examples
for use are countertops, tabletops,
cabinets, walls, floor spot cleaning,
bathroom fixtures and more.
CAUTION: It is recommended that
you allow the cleaning pockets to
cool off before removing them from
the wedge or cylinder tools to avoid
possible scalding injury.