Operator Manual Pallet Weigh Plus 4100 SERIES PALLET JACK SCALE © Copyright 2012-2013 Fairbanks Scales, Inc.
Amendment Record PALLET WEIGH DOCUMENT 51287 Manufactured by Fairbanks Scales Inc. 821 Locust Kansas City, Missouri 64106 10/13 Created 05/2012 Revision 1 05/2012 Released Manual Revision 2 10/2013 Updated specifications and Error codes. 3 51287 Rev.
Disclaimer Every effort has been made to provide complete and accurate information in this manual. However, although this manual may include a specifically identified warranty notice for the product, Fairbanks Scales makes no representations or warranties with respect to the contents of this manual, and reserves the right to make changes to this manual without notice when and as improvements are made. © Copyright 2012-2013 This document contains proprietary information protected by copyright.
Table of Contents SECTION 1: GENERAL INFORMATION .................................................................. 6 1.1. Description ................................................................................................................. 6 1.2. Technical Specifications............................................................................................. 6 SECTION 2: GENERAL POLICIES ............................................................................ 8 2.1.
Section 1: General Information 1.1. DESCRIPTION The Pallet Weigh Plus™ Pallet Jack Scale is a NTEP scale designed for determining pallet shipping weights, checking pallet weights on incoming goods, and helps prevent overloading of trailers. Some of the primary features include the following: • It includes an easy to read LCD display • • • • • • • A capacity of 5000 pounds. NTEP approved. 0.1% accuracy of applied weight Battery operation (12Vdc battery pack).
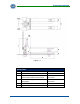
Section 1: General Information Figure 1-1 Dimensions 10/13 A Fork Length 47.5 inches B Fork Width 6.7 inches C Minimum Fork Height Minimum space between forks and floor 3.25 inches 0.87 inches D Maximum Fork Height Lifting Height 8 inches 4.75 inches E Width over Forks 27 inches F Height to Top of Indicator 30 inches 7 51287 Rev.
Section 2: General Policies 2.1. CUSTOMER RESPONSIBILITY It is the customer/operator's responsibility to ensure the equipment provided by Fairbanks is operated within the parameters of the equipment's specifications and protected from accidental or malicious damage.
Section 2: General Policies 2.1.1. Unpacking Follow these guidelines when unpacking all equipment: • Check in all components and accessories according to the customer's order. • Remove all components from their packing material, checking against the invoice that they are accounted for and not damaged. • Advise the shipper immediately, if damage has occurred. • Order any parts necessary to replace those which have been damaged. • Keep the shipping container and packing material for future use.
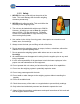
Section 2: General Policies 2.1.3. Safety 1. NEVER lift a heavy load with just the points of the forks. This could damage the electronic weighing elements permanently. 2. NEVER weigh without a pallet. This could affect the accuracy of the weighing result. 3. The unit may be loaded with weights up to 5000 lb. However, we advise you not to move any weights above 1650 lb. (750 kg) with the unit. Fairbanks Scales is not responsible for injury that may result when moving heavy loads. 4.
Section 2: General Policies 18. Never lower loads if you are unsure you can place the goods on a stable surface. Personal injury may result from placement on an unstable environment. 19. Always remain with the scale during dosing applications. Incorrect lifting of the pallet can cause overflowing. 20. Fairbanks Scales is not responsible for errors that occur due to incorrect weighing or inaccurate scales. 2.2.
Section 3: Installation 3.1. SYSTEM SET UP Installation of pump handle Make sure the lever is pushed down to the “pump” position. Thread the chain through the hole in the triangle and through the hole in the axle. Place the handle bar onto the triangle and insert the bolts. Push the silver part “A” on the outside of the pump downwards. Tighten the bolts firmly. At the same time; insert the chain into the open side of the slot “B” on the inside of the pump. 10/13 12 51287 Rev.
Section 3: Installation 3.2. INSTALLING THE BATTERIES The power supply to the system utilizes a 12 Vdc battery pack. In the original packing, the battery and charger are in separate boxes. It is recommended to place the battery on the charger before use. The battery will last for approximately 35 hours before a recharge is required. When the voltage level of the batteries is running low, the display will show LobA and or extremely low, the weighing system will shut down. .
Section 4: Operation 4.1. PROPER OPERATION The following describes the proper manner of operating the Pallet Weigh pallet jack scale. For accurate weights, do not weigh on a grade greater than 2 degrees. Use the pallet jack scale on a smooth surface. Irregular surfaces may cause damage the scale and inaccurate weights. Do not load the scale greater than the rated capacity otherwise the scale can be damaged.
Section 4: Operation 4.3. FRONT KEYS AND INDICATIONS Key Function On/ Off Power Switch. This also serves as an escape switch during data entry or programming. This key also functions as a Units key if pressed for two (2) seconds). Sample Piece Weight Switch. This key permits entry of piece weights and functions as a scroll left key. Print Switch. This key functions as a print weight and add to total as well as check subtotal and print total. This key also functions as a Scroll Up key. Tare Switch.
Section 4: Operation Indication Function C2 ▼ Displayed weight is in range 2. C3 ▼ Displayed weight is in range 3. SP1 ▼ Feature not available. SP2 ▼ Feature not available. 4.4. OPERATING THE SCALE 4.4.1. Power-Up the Scale 1. Press the key for two (2) seconds. 2. Allow 3 to 5 minutes until the electronics and load cells have reached operational temperature. Inaccurate weights of up to 0.3% may occur if this initial warm-up time is not observed. 4.4.2. Zeroing the Scale 1.
Section 4: Operation 4.4.4. Manual Tare Entry A tare weight can be entered at any moment, either in a loaded or unloaded condition. For a higher accuracy, a tare weight can be entered with a smaller graduation step, independent of the applied load and the active graduation of the indicator. Note: The scale must be at a zero condition to enter a manual tare. 1. Pressing the key for three (3) seconds. 2. The display shows the current tare value. 3.
Section 4: Operation 16. When the system is unloaded, the display indicates the negative value of the tare. 17. The entered value remains active until a new tare weight is entered (display shows the new net weight). 18. Press the key to return to gross weighing mode. Note: The scale must be at a zero condition to enter a manual tare. 4.4.5. Automatic Tare Entry The indicator offers the possibility to reset tare weights to zero automatically. 1. Lift load. 2. Press the 3. 4. 5. 6. 7. key.
Section 4: Operation 4. To accept the old value press the key 5. The ID code is activated and the display returns to the weighing mode. OR 6. Press the key for 3 seconds. 7. Press the key to go up a value or press the until the required value is reached. key to go down a value key to change to the next digit. 8. Press the 9. Repeat this procedure until the required ID code is displayed. 10. To accept the new ID code press the key 11.
Section 4: Operation 2. The display shows “add10”. The lb indication turns off and the pcs indication is indicated. 3. Take or place 10 pieces from/on the weighing system and press the key. 4. The sampling is done and the display will show the total number of pieces on the weighing system. OR 5. Press the key or the key to change the number of pieces to add. 6. The display will show the new value to add (for example “add50”). 7.
Section 4: Operation 7. Press the key to go up a value or press the until the required value is reached. key to go down a value 8. Press the key to change to the next digit. 9. Repeat this procedure until the required piece weight is displayed. 10. To accept the new value press key. 11. The display shows the number of pieces currently on the weighing system. You may make a printout and add up the weights. A special printout will be made which includes the piece weight sampled and the number of pieces.
Section 4: Operation 10. If the key is pressed during this period, the total is reset but not printed out. 11. If no key is pressed during this period, the subtotal stays in memory and the system returns to the weighing mode after 60 seconds. 4.4.10. CHANGE UNITS The system is set to start up in lb. or in kg. However you may, at any time in the weighing mode, change to the secondary unit (lb/kg or kg/lb). 1. Press the key for 1 second. 2.
Section 4: Operation 5. Press the key to go up a value or press the until the required value is reached. key to go down a value 6. Press the key to change to the next digit and use the change the value until the required value is reached. or keys to 7. To accept the new value press the key 8. The display will show “m_00” or the previous minute time setting. 9. The right digit flashing. 10. Repeat the above procedure to accept or change the minute setting. 11.
Section 5: Printer 5.1. INTRODUCTION If the weighing system has been equipped with a printer, obtained, and entered weighing data may be printed. Date and time are only printed out with the option board installed. 5.2. PRINT EXAMPLES In the printout, a gross weight is indicated with the letters B/G and a net weight with the letter N. A manually entered tare weight will also be printed and is indicated with the letters PT. The total weight is shown with the letters TOT. 10/13 24 51287 Rev.
Section 5: Printers 5.3. CHANGING PRINTER PAPER 10/13 25 51287 Rev.
Section 6: Service and Maintenance 6.1. CLEANING • Wipe the scale assembly with a damp cloth using water only. ─ Do not spray cleaners onto scale indicator. ─ Do not wash-down with a pressure cleaner or water hose. ─ Do not allow water or liquids to drip onto scale indicator. 6.2. ERROR MESSAGES Error Description Solution ERR 1 Weight exceeds scale capacity Remove weight from scale. ERR 2 Scale is Overloaded. Remove weight from scale. If no weight is on scale.
Section 5: Printers 6.3. TROUBLESHOOTING, continued Accuracy No repeatability Mechanical interference between lower and upper fork construction. Contact a Fairbanks service representative. One or more bad load cells Instability Weight is unstable Humidity Contact a Fairbanks service representative. Mechanical bind. 10/13 27 51287 Rev.
Pallet Weigh Plus Manufactured by Fairbanks Scales, Inc. 821 Locust Street Kansas City, MO 64106 www.fairbanks.