Installation / Warranty Citterio 39143XX1 90614701 5/2005 Citterio 39147XX1
Axor Citterio Wall Mount Lav Mixer with Cross Handles 39143XX1 Axor Citterio Wall Mount Lav Mixer with Lever Handles 39147XX1 39143XX1 39147XX1 Technical Data Flow rate @ 45 psi Maximum water pressure Recommended water pressure: Recommended hot water temp.: 2.2 gpm 145 psi 14.5 - 75 psi 120oF - 140oF* *Some municipalities limit the maximum water temperature from the water heater to 120o or below. Please know and follow all applicable local codes when setting the temperature on the water heater.
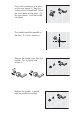
· Pull the inserts from the plaster shields on the hot and cold roughin valves. · Trim the plaster shields on the hot, cold, and spout to 1/16” from the finished wall. · Lever handle model only: Use a 17 mm deep socket wrench to remove the cartridges from the rough-in. Install the new ¼ turn ceramic cartridges included with the trim kit. The new hot cartridge is marked with notches on the wrench flats. · All models: Install the white plastic threaded sleeve to the hot and cold sides of the valve.
· Use a ruler to measure to a point on the inner sleeve ½” from the surface of the finished wall. Mark the inner sleeve at that point. Cut the inner sleeve. Push the handle into place. · The handle should be parallel to the floor. If it is not, remove it. · Remove the handle insert from the handle. Turn it slightly and reinsert it. · Replace the handle. It should now be parallel to the floor.
· Remove the handle. Push the escutcheon over the outer sleeve. Place the handle over the valve. Turn the handle base clockwise, so that it threads onto the outer sleeve. Install the spout. · Use a ruler to measure from the metal part of the spout port to the outside edge of the plaster shield. Record the measurement (“x”). Add 1 7/8”. Record this measurement. Measure the spout connector from the outlet end to a pout X + 1 7/8”. Mark the spout connector at this point. Cut it.
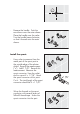
· Measure the spout connector. It should extend from the plaster shield 1 3/8”. · Place the spout escutcheon over the spout connector. Press the spout over the spout connector. The pin on the back of the spout should align with the detent on the spout escutcheon. Tighten the set screw on the bottom of the spout. User Instructions – Lever handle version · Turn the handle downwards (clockwise for cold, counterclockwise for hot) to turn the water on. Turn the handle upwards to turn the water off.
Cleaning Recommendation for Hansgrohe Products Modern faucetry and shower products utilize a combination of materials to comply with the needs of the market with regard to design and functionality. To avoid damage, it is necessary to use some caution when cleaning. Damage caused by improper treatment is not covered under the Hansgrohe warranty. Cleaning Materials for Faucets and Showers • • • • To remove lime scale, use only products made specifically for that purpose.
THIS WARRANTY DOES NOT COVER, AND HANSGROHE WILL NOT PAY FOR: A. Conditions, malfunctions or damage not resulting from defects in material or workmanship. B. Conditions, malfunctions or damage resulting from (1) improper installation, improper maintenance, misuse, abuse, negligence, accident or alteration, or (2) the use of abrasive or caustic cleaning agents or “no rinse” cleaning products, or the use of the product in any manner contrary to the product instructions. C.