Installation Instructions / Warranty Axor Citterio 39115XX1
Axor Citterio Wall-Mount Lavatory Trim 39115XX1 �� �� �� ��� �������� ��� ��� ��� Technical Data Max. water pressure 145 psi Recommended pressure 14.5 - 72 psi Recommended hot water temp 120°F - 140°F* Flow rate 1.5 gpm The hot and cold supplies must be of equal pressure for proper operation of the faucet. *Know and follow all applicable local codes when setting the temperature of the water heater.
Installation Instructions Turn off the water at the supply before beginning the installation. Remove the caps from the plaster shields. Cut the plaster shields 1 mm (1/16”) from the surface of the finished wall. Seal around the plaster shields with waterproof sealant. Use a 27 mm deep socket wrench to remove the flush insert. Use a 17 mm deep socket wrench to remove the plug from the spout port. Install the cartridge and anti twist device to the cartridge housing.
Install the springs and cup washers in the valve body. Install the cartridge assembly. Install the handle. Tighten the set screw using the enclosed 2 mm allen wrench. Measure the distance from the surface of the finished wall to the end of the handle.
If the distance is 3 9/16” – 3 15/16”, select the two “A” sleeves (1-1/4” long). If the distance is 4” – 4 1/4”, select the two “B” sleeves (7/8” long) If the distance is 4 1/4” - 4 7/16”, select the two “C” sleeves (1/2” long) Screw the escutcheon retainers to the ends of the two sleeves.
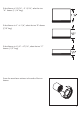
Measure the distance from the outside surface of the finished wall to the spout port (“X”). Add 2” to X. Measure the spout connector. Using proper tools and safety practices, cut the spout connector so that it is X + 2” long. x + 2” Wrap the threads on the spout connector with several layers of a Teflon tape. Screw the spout connector into the rough. Place the face plate against the wall. Screw the sleeve/escutcheon retainer assemblies through the plate and into the rough.
Use the service key to tighten the escutcheon retainers against the plate. Lightly coat the threads on the flanges with the included lubricant. Screw the flanges onto the retainers. Push the cap over the handle assembly. Push the spout over the connector and tighten the set screw.
User Instructions Lift the handle to turn the faucet on. Pivot the handle to the left for warmer water, to the right for cooler water. Push the handle down to turn the water off.
Replacement Parts 11 9 6 5 12 3 2 1 13 4 10 14* 8 7 1 2 3 4 5 6 7 8 9 10 11 12 flange handle flange for handle flange for spout face plate cartridge aerator spout anti-twist device spout connector fixing set nut 96908XX0 39092XX0 96912XX0 97695XX0 96914XX0 96339000 13185XX0 97239XX0 97280000 97228000 97971000 97601000 13 14 set screw extension kit 97767000 38982000* *optional - not included XX = color 00 = chrome 82 = brushed nickel
Cleaning Recommendation for Hansgrohe Products Modern lavatory faucets, kitchen faucets, and showers consist of very different materials to comply with the needs of the market with regard to design and functionality. To avoid damage and returns, it is necessary to consider certain criteria when cleaning.
this warranty extends for as long as you own the product and the home in which the product is originally installed. If you purchased the product for use primarily for any other purpose, including, without limitation, a commercial purpose, this warranty extends only (i) for 1 year, with respect to Hansgrohe and Commercial products, and (ii) for 5 years, with respect to AXOR products. THIS WARRANTY DOES NOT COVER, AND HANSGROHE WILL NOT PAY FOR: A.
www.hansgrohe-USA.com US - Installation Instructions • Part No. 90575803 • Revised 12/2008 Hansgrohe, Inc. • 1490 Bluegrass Lakes Parkway • Alpharetta, GA 30004 Tel.