Installation Instructions / Warranty Uno 38117XX1 Uno 38118XX1
Wall Mounted Single-Handle Lav Set with Base Plate Wall Mounted Single-Handle Lav Set 38117XX1 38117XX1 38118XX1 38118XX1 Technical Data Max. flow rate: 2.2 gpm Max. water pressure: 147 psi Recommended pressure: 14.7 - 72 psi Test pressure: 232 psi Max. hot water temperature: 176° F* Recommended hot water temp.: 120° F - 140° F* Requires rough 38111181 (not included) For best results, Hansgrohe recommends installation by a licensed, professional plumber.
Installation with 38111181 rough manufactured before 03/2004 Turn the water off at the supply before beginning this installation. 2. Remove the covers from the plaster shields (1). Trim the plaster shields so that they extend 1/16” outside the surface of the finished wall (2). Seal the wall around the plaster shield with waterproof sealant. 1. Use a 17 mm socket wrench to remove the spout plug. Use a 27 mm socket wrench to remove the cartridge assembly. Remove and discard the cup washers and springs.
Install the new cup washers and springs in the rough. Install the cartridge assembly. Installation with 38111181 rough manufactured after 04/2004 Turn the water off at the supply before beginning this installation. Remove the covers from the plaster shields. 2. Trim the plaster shields so that they extend 1/16” outside the surface of the finished wall. Seal the wall around the plaster shield with waterproof sealant. 1. Use a 17 mm socket wrench to remove the spout plug.
Install the cartridge and anti-twist device in the housing. Install the cup washers and springs in the rough. Install the cartridge assembly. Installation with all models: Push the handle over the cartridge stem. Tighten the handle screw with a 2 mm Allen wrench. If you are installing 38117XX1, turn to page 6. If you are installing 38118XX1, turn to page 9.
Model 38117XX1 only: Measure the distance between the wall surface and the end of the handle (x). If x is between 3 7/8” - 4 3/8”, select the two “B” sleeves (7/8”). A 1 1/4” If x is between 3 1/4” and 3 7/8”, select the two “A” sleeves (1 1/4”). B 7/8” x 1/2” If x is greater than 4 3/8”, select the two “C” sleeves (1/2”).
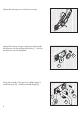
Connect the fixation nuts to the sleeves. Measure the distance from the rough to the outside surface of the finished wall (X) (1). 1. Add 1” to X. Cut the threaded end of the spout so that it is X + 1” long (2). 2. X + 1” Push the baseplate against the wall (1). Thread the sleeves into the rough (2). 1. 2.
Tighten the retaining nuts with the service key. Lightly lubricate the o-rings on the spout and handle escutcheons with the enclosed lubricant (1). Push the escutcheons onto the baseplate. 2. 1. Wrap the threads on the spout with Teflon tape (1). Install the spout (2). Install the handle flange (3). 3. 1. 2.
Model 38118XX1 only: Measure the distance between the wall surface and the end of the handle (x). A 1 1/4” If x is between 3 1/4” and 3 7/8”, select the “A” sleeve (1 1/4”). B 7/8” x If x is between 3 7/8” - 4 3/8”, select the “B” sleeve (7/8”). 1/2” If x is greater than 4 3/8”, select the “C” sleeve (1/2”).
Push the sealing ring into the handle escutcheon (1). Install the handle escutcheon onto the sleeve (2). 1. 2. Push the sleeve / handle escutcheon assembly into place over the handle (1). Tighten it by rotating it clockwise (2). 1. 2. Push the flange over the handle.
Measure the distance from the rough to the outside surface of the finished wall (X) (1). Add 1” to X. Cut the threaded end of the spout so that it is X + 1” long (2). 1. 2. Install the spout escutcheon on the spout. Push the sealing ring into the spout escutcheon. Wrap the threads on the spout with Teflon tape (1). Install the spout (2). 2. 1.
User Instructions on Pivot the handle up to turn the water on, down to turn it off. Pivot the handle to the left for warmer water, to the right for cooler water.
38118XX1 6 8 10 1 2 9 11 7 Replacement Parts 1 2 3 4 5 6 7 8 9 10 11 flange 96908XX0 handle 10092XX0 escutcheon for handle 96912XX0 escutcheon for spout 96913XX0 baseplate 96914XX0 cartridge cpl. 96339000 aerator cpl.
Cleaning Recommendation for Hansgrohe Products Modern lavatory faucets, kitchen faucets, and showers consist of very different materials to comply with the needs of the market with regard to design and functionality. To avoid damage and returns, it is necessary to consider certain criteria when cleaning.
including, without limitation, a commercial purpose, this warranty extends only (i) for 1 year, with respect to Hansgrohe and Commercial products, and (ii) for 5 years, with respect to AXOR products. THIS WARRANTY DOES NOT COVER, AND HANSGROHE WILL NOT PAY FOR: A. Conditions, malfunctions or damage not resulting from defects in material or workmanship. B.
www.hansgrohe-USA.com US - Installation Instructions • Part No. 90500703 • Revised 07/2007 Hansgrohe, Inc. • 1490 Bluegrass Lakes Parkway • Alpharetta, GA 30004 Tel.