Installation Instructions / Warranty Axor Citterio M 34010XX1 34016XX1 34017XX1 Axor Citterio M 34120XX1 34127XX1 Axor Citterio M 34210XX1
Axor Citterio M Lav Mixer 34010XX1 Small Lav Mixer 34016XX1 Lav Mixer less Drain 34017XX1 Tall Lav Mixer 34120XX1 Tall Lav Mixer less Drain 34127XX1 Bidet Mixer 34210XX1 34010XX1 34017XX1 34016XX1 34210XX1
4120XX1 34127XX1 Technical Information Installation Considerations Recommended water pressure 14.7 - 72.5 psi Max. water pressure 145 psi Recommended hot water temp. 120� - 140� F* Max. hot water temp 165�F* Hole size in mounting surface 1 3/8" Max. mounting surface depth 1 5/8" Flow rate – lavatory 1.5 gpm Flow rate – bidet 2.2 gpm Cartridge with high temperature limit stop 3/8" supply hoses • For best results, Hansgrohe recommends that this unit be installed by a licensed, professional plumber.
Installation Install the drain pull rod*. *Drain and pull rod not included with models 34017XX1 or 34027XX1. Position the faucet and sealing gasket on the mounting surface. Install the fiber washer, friction washer, and mounting nut. Tighten the mounting nut by hand. Tighten the tensioning screws.
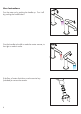
Connect the hot and cold supply hoses to the stops. Use two wrenches, as shown, to prevent the hoses from twisting. Set the high temperature limit stop, if desired. Install the pop-up drain. Set the High Temperature Limit Stop (optional) Use a 3 mm Allen wrench to push the screw cover through the handle. Use the Allen wrench to loosen the handle screw 2 complete revolutions. 3 mm 2x Remove the handle. Retrieve the screw cover. Remove the flange. Remove the high temperature limit stop.
Note: the temperatures given in the diagram assume a water heater temperature of 140° F, a cold water temperature of 50° F and a water pressure of 45 PSI. Replace the flange. Replace the handle. Tighten the handle screw. Replace the screw cover.
Install the pop-up drain* Remove the plunger assembly. Unscrew the drain outlet flange from the tee. Unscrew the tailpiece from the tee. Wrap the threads with Teflon tape and replace. Install the white, flexible sealing gasket to the flange. Place it in the sink outlet. Install the black mack gasket, white friction ring and retainer nut on the flange. Do not tighten the nut against the bottom of the sink at this time. Thread the tee and tailpiece to the flange. The pivot must face the faucet.
User Instructions Turn the water on by pushing the handle up. Turn it off by pushing the handle down. Pivot the handle to the left to make the water warmer, to the right to make it cooler. If the flow of water diminishes, use the service key (included) to remove the aerator.
Flush the aerator with clear water, then replace it on the faucet.
Replacement Parts 1.1 1 1.
Cleaning Recommendation for Hansgrohe Products Modern lavatory faucets, kitchen faucets, and showers consist of very different materials to comply with the needs of the market with regard to design and functionality. To avoid damage and returns, it is necessary to consider certain criteria when cleaning.
the product for use primarily for any other purpose, including, without limitation, a commercial purpose, this warranty extends only (i) for 1 year, with respect to Hansgrohe and Commercial products, and (ii) for 5 years, with respect to AXOR products. THIS WARRANTY DOES NOT COVER, AND HANSGROHE WILL NOT PAY FOR: A. Conditions, malfunctions or damage not resulting from defects in material or workmanship. B.