Installation Instructions / Warranty Raindance Royale Air 9.05801.
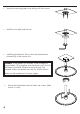
Suggested Layouts 28420XX1 27410XX1 gpm 27418XX1 Installation Considerations: The 27418XX1 shower arm requires a 1/2" male threaded nipple, extending 5/8" outside the finished surface of the ceiling. Two-feature installation with Ecostat thermostatic mixer and Trio diverter. area for required wall reinforcement The 27410XX1 shower arm requires 1/2" male threaded nipple, extending 5/8" outside the surface of the finished wall. The wall must be reinforced at the mounting point.
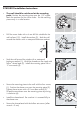
27418XX1 Installation Instructions: • Install a 1/2" male threaded nipple, extending 5/8" outside the surface of the finished ceiling. • Using the mounting plate as a template, mark the positions for four screw holes. Put the mounting plate away in a safe place. • Drill the holes with a 6mm bit suitable for the ceiling surface. • Install the anchors. Seal around the nipple and the elbows with a waterproof bathroom sealant suitable for the ceiling surface. • Install the mounting plate.
• Secure the mounting plate to the ceiling with four screws. • Install the trim plate and the arm. • Install the showerhead. Be sure that the showerhead is screwed fully to the shower arm. Caution: If the shower is in function, it has a weight of approximately 10 kg together with the shower arm. So only use fastening material suitable for the brickwork! The enclosed screws and dowels are only for solid brickwork. Make sure the headshower has been tighten.
27410XX1 Installation Instructions • The wall should be reinforced at the mounting point. Position the mounting piece over the 1/2" nipple. Mark the positions for four screw holes. Put the mounting piece away in a safe location. • Drill the screw holes with a 6 mm drill bit suitable for the wall surface (1,2). Install the anchors (3). Seal the wall around the anchors with a waterproof bathroom sealant. • Seal the wall around the nipple with a waterproof bathroom sealant (1).
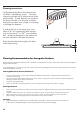
Cleaning Instructions: The Raindance Royale Air showerhead uses the Rubit!TM self-cleaning system. The spray channels are lined with a substance that resists scale buildup. If scale deposits are noticed in the spray channels, turn the water on lightly and rub across them with a finger or a sponge to dislodge the deposits. If scale builds up on the spray face, pour about 3/4" of a commercial scale remover, such as Lime-AwayTM or CLRTM into a shallow dish.
Limited Lifetime Consumer Warranty This product has been manufactured and tested to the highest quality standards by Hansgrohe, Inc. (“Hansgrohe”). This warranty is limited to Hansgrohe products which are purchased by a consumer in the United States after March 1, 1996, and installed in either the United States or Canada. WHO IS COVERED BY THE WARRANTY This warranty extends to the original consumer purchaser only. WHAT IS COVERED BY THE WARRANTY This warranty covers only your Hansgrohe manufactured product.
EXCLUSIONS AND LIMITATIONS REPAIR OR REPLACEMENT (OR, IN LIMITED CIRCUMSTANCES, REFUND OF THE PURCHASE PRICE) AS PROVIDED UNDER THIS WARRANTY IS THE EXCLUSIVE REMEDY OF THE PURCHASER. HANSGROHE NEITHER ASSUMES NOR AUTHORIZES ANY PERSON TO CREATE FOR IT ANY OBLIGATION OR LIABILITY IN CONNECTION WITH THIS PRODUCT.