
Owner`s manual


40
015885 rev 10-00
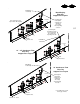
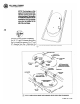
STEP 25
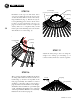
Install the grain bands according to the appropriate
layout on page 31. Attach the perforated band at
the inner ring to the roof using the (6) clips
provided. Holes will need to be field drilled for
these clips. At this time also fasten the plenum
flashing to the sidewall by using flange nuts over
the bin bolts. Place the flashing sealer pieces over
the plenum sheet ribs and fasten them to the
flashing with #12 sheet metal screws (fig. c).
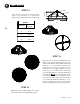
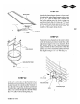
STEP 24
Fix the center chain disk at an elevation 12”
beneath the center collar (fig. b). Install “S” hooks
in each edge hole of the disk. Take the twin loop
chain and cut it into equal lengths based on the
chain length chart. Install two lengths of chain
180
O
apart, from the “S” hooks in the center disk
to the outer dump chutes. Adjust the chains until
the dump chutes are level (fig. b). Continue
around the bin installing chain pairs in a similar
manner so that the center disk remains level. On
the 30’ batch unit connect the shorter chain length
from the center chain disk to the upper dump
chute. Use the same “S” hook in the center chain
disk as was used for the lower dump chute.
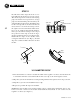
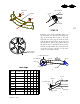
STEP 23
Attach the 3/8” x 1 1/4” eye bolt to the center
of the chain disk (fig. a). Pass the 1/4” cable
through the eye bolt and secure it with two
cable clamps. Thread the free cable end
through the center pulley, the bin sidewall
and outer pulley. This end will attatch to the
winch or hydraulic cylinder.
dryer pieces length
18' batch/cont. flow 18 80"
21' batch/cont. flow 21 102"
24' batch/cont. flow 24 122"
27' batch/cont. flow 27 142"
30' batch
30
10
164"
108"
30' continuous flow 30 164"
a
12”
b
chain length chart
c
#12 self drillers
eye bolt
cable clamp
chain disk
flange nuts
plenum flashing
plenum flashing sealer