
Owner`s manual


28
015885 rev 10-00
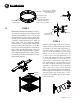
3' 9"
3'-9"
1'-9"
2'-3 11/32"
STEP 7
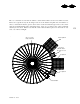
Referring to Fig. a, install the plenum sheet
support angle in the second hole up from the eave
end by placing a 5/16” x 2 3/4” bolt with it’s
shank pointed upwards thru the top flange of the
rafter, and both holes of the plenum sheet support,
followed by a 5/16” nut. Tighten these nuts at
this time. Next, bolt the plenum rafter braces into
place below the plenum rafters at this time using
a 5/16” x 1” bin bolt with its shank pointed
upwards (fig. b) Then, install an inverted 5/16” x
2 3/4” bin bolt thru each rafter at the upper grain
band support post location and at each other purlin
hole that receives a grain band support post
location and at each other purlin hole that receives
a grain band support post (fig. j on page 29).
Finger tighten these bolts at this time.
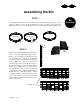
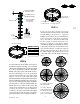
STEP 8
Preassemble the flashing and dump hopper
to the plenum sheet before placing the
plenum sheets. Bolt the sidewall flashing
together with the plenum sheet and dump
hopper with 1/4” x 3/4” bolts and flange nuts
(fig. e and fig. f). Note: the dump hopper
fastens below the plenum sheet. If you are
building a 30’ batch dryer you should also
install the upper dump hopper necks at this
time using 1/4 x 3/4” bolts (fig. d).
c
a
f
a bolt is placed here
on the 30’ unit only
plenum sheet
support location
e
d
b
plenum rafter brace
plenum
rafter brace
plenum
sheet support