
Owner`s manual


26
015885 rev 10-00
a
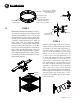
STEP 3
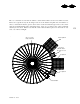
Build the first full width sidewall ring from the top
on the ring just completed. The vertical sheet seam
of this ring should fall at the center of the sheets in
the ring beneath (a 6 space / 6 space pattern) (fig.
a). This pattern is maintained throughout the bin
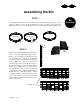
construction. Again place the 5/16” x 1” Bin bolts
in the “valley” holes only to allow later stiffener
placement. The top bolt should be installed with
the head on the inside. Install 5/16” x 2 3/4” Bin
bolts (fig. b) in the horizontal sheet seam between
the two rings and fully tighten using a deep well
impact socket. These nuts prevent the corrugation
from collapsing when the tension angle segments
are added. Leave one horizontal seam bolt out where
the sign will be fastened.
first full width sidewall
ring from the top
b
vertical sheet seem
sheet beneath
note: this drawing may not
be indicative of the actual
number of sheets in your bin.
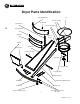
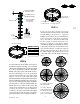
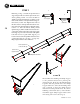
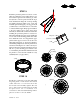
STEP 4
Install the tension angle segments over the bolt
shank protrusion on the horizontal sheet seam in
the “middle” hole of the angle segment (fig. c).
Orient the angle so that the “bottom” holes
fall on a vertical sidewall sheet seam. Start
nutting on one end of the angle and work
your way to the other end tightening as you
go using 5/16” flange nuts. It may be helpful
to use a small hammer between the tension
angle and the sidewall sheet to align the long
bolt shank with the corresponding hole in
the angle. Install the remaining tension angle
segments in a like manner. At the holes in the
ends of the tension angles, where they will
splice together, drill through the sidewall sheet.
Bolt through the sidewall sheet, tension angle
and splice plates ( fig. d) using 5/16” x 1 1/4”
bin bolts. Also install the upper and lower splice
plates at this time.
d
bolted at vertical
sheet seems only.
j
i
these sheets are specially
punched with tension angle
holes at the bottom
neoprene washer
field drill
typical
c
flange nuts