
Owner`s manual


37
015886 5-02
20
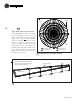
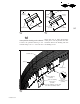
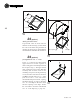
install all the eave clips
Follow these steps and attach the eave
clips in a counter clockwise direction
around the bin. 1) Fasten the first eave
clip starting with the first square hole
in the clip as shown in figures c and d.
2) Skip nine (9) holes and fasten the
second clip starting with the first square
hole in the clip, as shown in figure a.
Repeat step 2 until all clips are in place.
Build the Roof
19
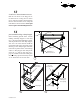
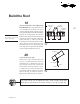
choose roof position / eave clip position
Roof Position: Eave clips allow the roof
to be installed in an elevated or closed
position. Decide which position best fits
your grain handling needs. When installing
clips for the closed position, the obround
holes are used; and for roofs in the elevated
position, the square, hex and round holes
will be used (fig. c). Three (3) bolts will
be used per eave clip at the positions in the
clip as shown. See the directions in the
following step for eave clip spacing. All
eave clips are to be placed on the outside
of the corrugated wall sheets (fig. d).
NOTE:
If Vac-U-Vents
are used, do not use the
upper roof position.
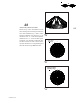
The same results can be obtained using a strap or angle gauge with
5/16” pins or 3/8” holes at 31 15/16” centers ( see fig. a, page 38).
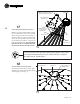
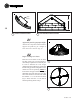
hex hole,
2nd bolt
square hole,
1st bolt
round hole,
3rd bolt
EAVE CLIP BOLT POSITIONS
c
3 1/8” 3 1/8”
roof sheet
eave clip
outside
inside
EAVE CLIP POSITION
d