
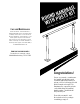
Installation Guide
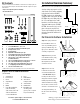

(will require 5/16" wood bit)
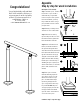
Step 1 Start with 1 post - A backer
board such as a piece of 2x6 or
2x10 under the post placement
location is required. Once position
has been determined, square up
the post with the surface. Using a
pencil, mark the location of all the
post plate holes.
Step 2 Remove post from position
and drill a ¼" hole in all 4 marks.
Step 3 After holes are drilled,
reposition the post and use a 7/16"
hex head bit and the (4) threaded
bolts with washers and T-nuts.
Step 4 Install a flat washer on to
the bolt, insert bolt and washer
into post hole through the wood
deck and backer board, then thread
the T nut from the underside ensur-
ing the T nut teeth are facing up
and grab on to the backer board.
Tighten all 4 bolts while checking
that the post is level vertically. If
shimming the post is required, use
stainless flat washers, or stackable
plastic shims
(available on our
website)
.
Step 5 Once post is fastened,
install the matching vinyl bolts
caps. Glue or silicone is recom-
mended to lock the bolt cap in
place. A rubber mallet may be
required to gently tap the bolt
caps on. Repeat the above steps
for post #2 ENSURING the posts
are aligned properly to ensure the
round pipe handrail will mount
up in the cradles. Slide down base
covers over vertical posts.
Congratulations!
You are finished with your Round Hand
Rail Post Kit installation. We hope you
enjoy many years from this top quality
product. If you have any questions or
would like tips, contact us
at 573.365.7040,
or visit www.maddenmetals.com
Appendix:
Step by step for wood installation
Continue to Step 7 on previous page
1
2
3
5
4
+