
Installation Guide

Step 9 - Install the 2 pipe end
plugs – ensure you insert them
evenly by gently tapping the
end with a rubber mallet and
protective barrier such as a
piece of cardboard. It’s impor-
tant to ensure the end plugs are
installed evenly. You may need
to shave some paint off the legs
of the end plug to ensure a good
fit – use a metal file. You can
set the pipe on end; ensure you
protect your deck surface and
the paint of the end plug before
tapping the end plug into place.
Once the end plugs are inserted,
they are difficult to remove.
Step 10 – Set round pipe
handrail in the cradle locations.
Keeping a hold of the pipe, posi-
tion into place. Using a marker
or pencil, mark the hole on one
cradle to the handrail. Remove
the pipe from the cradle and
predrill the pipe with a 3/16"
pilot hole. Using your drill and
Torx head bit, install the (1) 3/4"
self-drilling Torx head fastener
into the pipe. Next move to the
other post and drill a pilot hole
in the pipe, install a 3/4" self-
drilling Torx head fastener into
the pilot hole.
Repeat for the
remaining 6 locations.
Step 11 – Fasten the cradle
bracket to the post. Locate the
4 divots on the cradle. Pre-drill
the divots with an 1/8" metal
drill bit and fasten the cradle
to the round pipe post using
the 1/8" spring pins.
Optional-1"self tapping hex
screws may be used.
Step 4 Once all holes have been
drilled and all 4 wedge bolts are
inserted halfway, finish tighten-
ing each wedge bolt ensuring
each wedge bolt seats to the
plate – DO NOT OVER TIGHTEN.
Step 5 Repeat the above steps
for post #2 ENSURING the
posts are aligned properly to
ensure the round pipe handrail
will mount up in the cradles
appropriately. Ensure each
post is plumb and aligned. If
leveling the post is required, use
stainless flat washers, or plastic
shims (available on our website
in our online store under the
posts kits and components).
Step 6 Place base covers over
vertical pipe and lower down
into position at base plate. Base
cover DOES NOT get fastened in.
Step 7 – Set Cradle Brackets on
top of the round post.
DO NOT FASTEN.
Step 8 – Position your hand-
rail on to the posts and cradle
brackets. Check the handrail
length on the posts ensuring the
handrail does not need to be cut
down. If the handrail requires
cutting, please do that now
using a power miter saw and 60
tooth or better non-ferrous metal
blade. Ensure the saw blade
is plumb vertically. Ensure the
handrail pipe extends a mini-
mum of 1 inch past the cradle
bracket plate.
4
5
Concrete Surface Installation (con't)
6
7
8
9
10
11
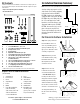
4 spring pins
3/16" Bit
use larger size drill
bit if necessary