
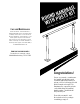
Installation Guide
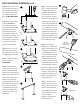

Kit Contents
Check the contents of the box with these instructions to verify all parts are
present. This will allow you to become familiar with the components of your
new handrail.
• Inspect all component parts for familiarity
• Recommended tools
Parts: Qty KIT CONTENTS
A. 1 1.9" Round Handrail: 3', 4', 6', or 8'
B. 2 34" round posts with 5"x5" welded base plate
C. 2 Round post base covers
D. 2 Round end plugs
E. 2 Adjustable cradle bracket post caps
F. 1 3/16" drill bit to pilot holes into round handrail
G. 1 1/8" drill bit to pilot spring pin holes into posts
H. 1 T25 torx bit to screw countersunk fasteners
to handrail Fasteners
I. 4 1/4" x 3" Dewalt Wedge Bolts to fasten posts to concrete
J. 8 1/4" color matched bolt caps for wedge bolts
K. 8 1/8" spring pins to attach adjustable caps to posts
L. 5 1" Self tapping hex head fasteners (optional use)
M. 5 3/4" Torx countersunk screws
* 8' Kit includes (3) posts, post cap brackets, base covers, and fastener packs
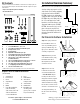
Required Tools for Handrail Installation
(not included)
For install or product support, call 573.365.7040,
or visit www.maddenmetals.com
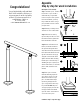
Installation Overview Summary
Note: Check local code requirements prior to installation
Start by setting up your posts on the
stair treads or level surface walkway
in the desired locations (DO NOT
FASTEN). Gently set the adjustable
cradle brackets on the posts (DO NOT
FASTEN to the posts). Next gently set
the 1.9" round pipe on the cradle
brackets to check the distance and
alignment between posts. (DO NOT
FASTEN - be sure not to let go of the
pipe as the posts may fall over).
You are only checking to be sure the
desired set up will be sufficient for
your build.
Step 1 Once post position has
been determined on the con-
crete step or walkway, square
up the post with the edge. Us-
ing a pencil - mark the location
of all the post plate holes.
Step 2 Remove the post and
in one marked location, using
the hammer drill and ¼"
masonry drill bit, drill down
4" into the concrete.
Step 3 Use the can of air
to blow out and clean ALL
concrete dust from the hole
– VERY IMPORTANT. Reposi-
tion the post and insert one
wedge bolt in the hole, tighten
halfway. Repeat the drilling
and the installation of a wedge
bolt one hole at a time. Ensure
each hole is cleaned and insert
one wedge bolt halfway – do
this for each of the remaining
3 holes.
For Concrete Surface Installation
1
2
3
4" deep
Wood Concrete
1 - Safety Glasses
2 - Ear Protection
3 - Gloves
4 - Tape Measure
5 - Pencil
6 - Marker
7 - ¼ in. Masonry Drill Bit,
5/16" wood drill bit,
7/16" drill bit, 5/16" and
7/16" Hex Head Driver
or Socket with Wrench
8 - Level
9 - Rubber Mallet
10 - Small Can of
Compressed Air
11 - Standard Drill
12 - Hammer Drill
13 - Power Miter Saw
(If cutting down
pipe or posts is required
for your installation)
A
I
F G H
D
K
L
J
E
C B
M
Min 3"
to edge
Min 1.75"
to edge
**Enlarge post plate fastener holes to 7/16"
when using provided concrete fasteners**