
Installation Guide


– 7 –
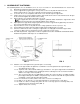
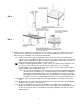
FIG. 8
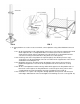
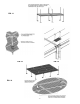
FIG. 9
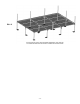
1.13 Platforms can be combined, in any direction, to create a deck as long as the adjacent sides are the
same length. The initial steps are similar to Sec. 1.12, using two platforms to create a turn-back.
Refer to the project drawings for specific deck configuration.
1.13.1 On the first platform, install a dual platform connector on each of the two legs that will be
adjacent to the second platform. Make sure that the pocket of the connector is oriented to the
outside of the first platform in the direction of the second platform and that the setscrews are
facing in a direction where they will be accessible (FIG. 8).
Usually the uppermost platforms will be used to create a deck but this may not always be the
case. Since the first platform is the one that sets the height for the rest, it is strongly
recommended that the first platform be located at a door, or other fixed point where height is
critical, regardless of its position in the deck.
1.13.1.1 If more than one platform is connected to the “first” platform, install a dual platform
connector on the remaining legs as needed. Planning is required before installing the
support tubes in the platform to make sure not only that the connectors are oriented
in the right direction, but also that the subsequent platforms are supported by at least
two legs as the deck is assembled (Refer to Section 1.13.8 for other requirements).
1.13.2 Install the legs and set the first platform at the required height as described in the previous
steps.
1.13.3 Bring all connectors up until they touch the bottoms of the corner pockets in the first platform
and tighten the setscrews securely (FIG. 8).
1.13.4 On the second platform (and all subsequent platforms), install the two legs that will be
opposite the first (previous) platform and set to the same height as the first platform, then set
the two corner pockets of the second platform on top of the platform connectors in the first
platform (FIG. 9).