Instructions SUITCASE® Top Lip Extension 10264 REV 05-27-2021 Patented. LIFETIME WARRANTY. Please register at www.ezaccess.com/warranty-satisfaction. ® © EZ-ACCESS , a division of Homecare Products, Inc. All rights reserved. All text and images contained in this document are proprietary and may not be shared, modified, distributed, reproduced, or reused without the express written permission of EZ-ACCESS.
INTRODUCTION 1. If the ramp’s top lip transition plates are not long enough to fully overlap a secure, unobstructed, level landing, a SUITCASE® Top Lip Extension (‘TLE’) is an available option that increases the standard 3” reach of the top lip transition plates to 9”, in many cases, allowing the ramp to clear an obstruction to create a smooth transition. Visit www.ezaccess.com or call 1-800-451-1903 for more information. Use of the TLE reduces overall ramp weight capacity to 500 lbs.
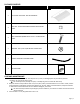
PACKAGE CONTENTS QTY DESCRIPTION 2 EZ-ACCESS® SUITCASE® TOP LIP EXTENSION 2 NUT HEX .25-20 NYLON INSERT LOCKNUT ZINC PLATED STEEL 2 BOLT CARRIAGE SQUARE NECK .25-20 x .75 ZINC PLATED STEEL 2 WASHER - FLAT 1/4 ID X 5/8 OD ZINC PLATED STEEL 1 HOOK & LOOP SELF-CINCHING STRAP 1 INSTRUCTIONS IMAGE (NOT SHOWN TO ACTUAL SIZE) CARE AND MAINTENANCE 1. Before each use, check the TLE and ramp for worn, loose, or damaged parts. If you find any of these conditions, do not use the TLE or ramp.
GETTING STARTED 1. Read this instruction manual in its entirety before use and follow all instructions before and during use. 2. Before using the TLE and ramp, refer to your mobility equipment's owner guide for acceptable ramp usage, including proper slope/incline, chair direction, etc.; never exceed its recommendations. 3. Before each use, check the TLE and ramp for worn, loose, or damaged parts. If you find any of these conditions, do not use the TLE or ramp. 4.
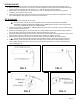
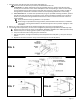
7. Securely anchor the TLE with ramp to the upper landing (FIG. 5). Ensure that the TLE with ramp is securely anchored before each use. a. TEMPORARILY: To attach temporarily using the provided clevis pins, position the TLE with ramp securely and use the hole in each TLE as a template to drill corresponding ¼” holes into the landing (ensure drilled holes are deep enough to fully seat each clevis pin). Fully insert a clevis pin (FIG.