
User Guide Owner's manual


Configuring KVM Functionality
KVM functionality permits remote collaboration between different endpoints on the network
by allowing a mouse and keyboard connected to the decoder to control a PC connected to
the encoder. Both the VND 250 and VNE 250 units must be configured.
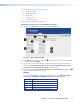
Before starting, ensure that a mouse and keyboard have been connected to the VND 250
and a PC has been connected to the VNE 250 (see USB Ports on page 17).
1. From the Device List tab (see page 30), click on one of the VNM 250 units that you
wish to configure. The Device tab opens.
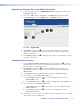
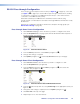
2. Click the Peripherals tab. The page opens with the Mouse & Keyboard Control panel
on the right hand side of the window:
11
Figure 71. Mouse & Keyboard Control Panel
3. Set the MK Mode
z For the VNE 250 encoder, set MK Mode to Enable (see figure 71,
1
).
z For the VND 250 decoder, set MK Mode to Keyboard (see figure 71,
1
).
4. Make sure that a video stream connection has been configured between the encoder
and decoder.
Once configured, the KVM mode is enabled using a hot key sequence on the keyboard
that is connected to the decoder.
To activate a remote control session using hot keys
5. Using the keyboard attached to the VN 250 decoder, press the <Ctrl> and <Shift> keys
simultaneously, followed by the <F1> key.
The decoder monitor briefly shows MK:Forward in the top left‑hand corner.
To terminate a remote control session using hot keys
6. Using the keyboard attached to the VN 250 decoder or encoder, press the <Ctrl> and
<Shift> keys simultaneously, followed by the <F2> key.
The decoder display monitor will briefly show MK:Local in the top left‑hand corner.
VNM 250 • Configuration with the VNM 250 GUI 89