
User Guide Owner's manual


Uploading the Firmware File to the VNM 250 Controller
1. Log in to the web interface (see VNM 250 GUI Login on page 28). The GUI opens to
the Device List page.
2. Click on the VNM 250 unit to be upgraded. The Device page for that unit opens.
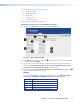
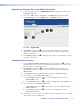
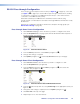
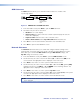
3. On the Device page, click the Upgrade tab. The Upgrade tab opens:
1122
3
3
4
455
Figure 70. Upgrade Tab
4. Click Browse (see figure 70,
1
) to open a file browser. Navigate to the required
upgrade file, or type the path and file name directly into the browser field. The file
extension must be .tar.
5. Click Upload (see figure 70,
2
) to begin uploading the file to the VN‑Matrix controller.
This takes a few minutes.
Installing the New Firmware
1. From the Select Firmware Version drop‑down list (see figure 70,
3
), select the
new firmware file that you wish to install. Usually, the file listed is the one that has just
been uploaded (see the previous section).
2. Click forward (see figure 70,
4
) ‑ the Device Upgrade Status initially shows
PREPARE0%. As it writes the upgrade to flash, the status changes incrementally to
PREPARE100%.
3. Click forward. The Device Upgrade Status changes to READYTOACTIVATE.
4. Once the device is in the READYTOACTIVATE state:
a. Click forward (see figure 70,
4
) to activate the upgrade and move to the
READYTOCOMMIT state.
b. Click reverse (see figure 70,
5
) to abandon the upgrade using the BACKOUT state.
5. Once the device is in the READYTOCOMMIT state:
a. click forward (see figure 70,
4
) to irrevocably commit to the upgrade using the
COMMITTING state.
b. click reverse (see figure 70,
5
) to return to the original firmware and the
READYTOACTIVATE state.
6. The unit reboots. Once the reboot is complete, the device upgrade process is complete
and the device enters the WAIT state.
VNM 250 • Configuration with the VNM 250 GUI 88