
User Guide Owner's manual

Constructing a custom user source format overview
There are four basic steps to create a custom user source format:
1. Configure a source to display the unrecognized source format and connect it to the
VN‑Matrix encoder.
2. Create a custom input mode to match the resolution and timing of the source.
3. Verify that the encoder can automatically detect (auto‑detect) the source format created
in step 2.
4. Fine‑tune the custom input mode.
NOTE: After the custom input mode is created for the VNE 250, you may need to
create a custom output mode to match.
TIPS: It is recommended that:
• When creating a custom input mode, monitors are connected to both the
video loop‑out of the VNE 250 and the video output of the VND 250.
• The same monitors be used in the final system configuration.
Constructing a custom user source format
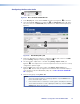
1. From the Device List, select the required encoder.
2. When the Device tab opens, click on the videoPort0 link.
3. When the Configure tab opens, click the Video Setup tab.
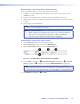
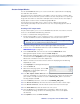
112233
4
4
Figure 67. Constructing a Custom User Source Format
4. Set the phase (see figure 67,
1
), macrovision defeat (see figure 67,
2
), and color
space (see figure 67,
3
) settings as desired (see Manual Overrides on page 78).
NOTE: The above values are not saved as part of the source format; they are
global settings saved for the mode selected in the mode drop‑down list. If auto is
selected from the mode drop‑down list, the settings apply to any detected mode.
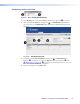
5. Set
blanking (see figure 67,
4
) to auto.
VNM 250 • Configuration with the VNM 250 GUI 80