
User Guide Owner's manual

Low Level Device
Configuration
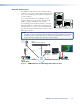
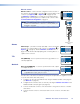
The RS‑232 control port is used to configure the network settings for the VNE 250 and the
VND 250. Follow these instructions:
1. Use an RS‑232 cable to connect a control PC to the rear panel Coms port of the
VNM 250 device (see page 19).
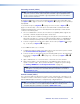
2. On the PC or laptop, open a terminal emulation program, such as Extron DataViewer,
with the following settings:
z Baud rate: 115200
z Data bits: 8
z Parity: None
z Stop bits: 1
z Flow control: None
NOTE: DataViewer can be downloaded, free of charge, from the Extron website
(www.extron.com).
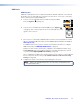
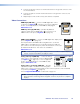
3. Enter the
User name and Password.
NOTES:
• When DataViewer first opens, it may be necessary to press <Enter> for the
User name prompt to appear.
• By default, the User name is config and the Password is also config.
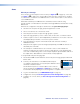
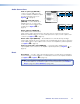
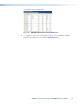
The low level configuration menu opens (figure 11 shows default values):
Control Network port
====================
Streaming Network port
======================
0. Speed/Duplex: auto_10_100_1000
1. IP Prov mode: static [dhcp]
2. address: 192.168.253.254
3. netmask: 255.255.255.0
6. mtu: 1500
7. VLAN ID: 0
8. controller ip: 192.168.254.254
9. Exit
10. Speed/Duplex: auto_10_100_1000
11. IP Prov mode: static [dhcp]
12. address: 192.168.254.254
13. netmask: 255.255.255.0
14. gateway: 192.168.254.1
16. mtu: 1500
17. VLAN ID: 0
18. Controller port: 5432
19. webserver port: 80
Please select an option
:
Figure 11. Low Level Configuration Menu Page 1
NOTE: These values are held in local memory on the unit itself.
VNM 250 • Low Level Device Configuration 2424