
User Guide Owner's manual

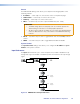

4. Use the rotary encoders to select the location (Transparent, Stored, or Fixed) and the
EDID name. The choices available in the EDID name selection depend on which location
you chose:
z Transparent — if you select Transparent, the EDID from the locally connected
display is passed to the source device.
The Location value shows Trans.
The EDID name value shows the name of the EDID provided by the local display.
If no local display is connected, the EDID name value displays "No EDID."
z Stored — the EDID values of previously connected local displays are stored
automatically and can be selected when no local display is present.
The Location value shows Stored.
The EDID name value shows the name of the stored value.
z Fixed — a specific preferred mode can be selected from a fixed list.
The Location value shows Fixed.
The EDID name value shows the mode currently selected in the format
[Horizontalresolution]x[Vertical resolution]@[Frequency].
A list of the fixed Supported EDID Modes is shown on pages 122‑123.
5. Press Next to return to the main EDID screen.
6. Press Menu to move to the main Test Pattern screen.
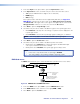
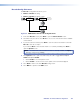
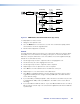
Test Pattern Sub-menu
The Test Pattern sub‑menu allows you to enable or disable test patterns and select a
pattern that displays on the VND 250 output to assist in calibrating the system.
Test
Pattern
MENU
NEXT
Test Pattern
[Enable] [Pattern 1]
NEXT
Select Test Pattern:
Select Pattern:
Enable
Disable
Patter
n type
Figure 81. VNE 250 Encoder Test Pattern Sub-menu
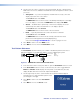
1. In the main Test Pattern screen, press Next to open the Test Pattern selection screen.
2. In the Test Pattern selection screen, use the left rotary encoder to toggle between
Enable and Disable. Enable displays the test pattern on the VND 250 (decoder)
display. Disable allows the normal video input to be displayed.
3. Use the right rotary encoder to select whether the test pattern will be displayed.
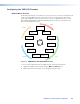
Currently there is a single Test Mode splash screen
(see the figure to the right).
4. Press Next to return to the main Test Pattern
screen.
5. Press Menu to move to the Reset screen.
VNM 250 • Front Panel Menu Configuration 98