
User Guide Owner manual


TP T 15HD 45 and TP T A 45 • Installation
Installation, cont’d
2-6
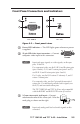
Cabling and Setup
To install the TP T 15HD 45 and TP T A 45 models, follow these
steps:
a
Turn all of the equipment off and, if applicable, disconnect it
from the power source.
b
Connect the TP T 15HD 45 and its receiver to either end of the
UTP cable. See Cable testing and Skew delay problems in this
chapter.
N
For best results, use Extron Skew-Free cable available in
bulk or in various preterminated lengths. If necessary,
regular CAT 5, CAT 5e, and CAT 6 cable may be used.
c
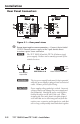
Connect the external power supply to the TP T 15HD 45 and TP
T A 45 (if installed). See Rear Panel Connectors in this chapter.
d
If the TP T A 45 is being installed, connect the TP T A 45 to the
transmitter. See Rear Panel Connectors in this chapter.
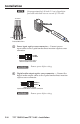
e
Connect an output display device to the output connector of the
receiver.
f
Connect a computer to the 15-pin video input connector of the
transmitter.
g
Connect and power up all input and output devices, then
apply power to the TP T 15HD 45 power supply and test for
the display and/or audio outputs. If a problem is encountered,
check all connections before proceeding further.
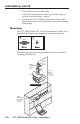
h
If the previous display and/or audio test was successful, power
off and disconnect all equipment, detach cables, and install the
TP T 15HD 45 and/or TP T A 45 modules. See Mounting in this
chapter.
N
If the transmitter or receiver is to be wall-mounted and
the power supply will be inaccessible, power must be
applied to the power supply before final mounting.
i
Connect all device and power cables. Power up all input and
output devices, apply power to the transmitter and receiver, and
test for the display, the audio, or both.
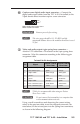
Compatibilty with other Extron products
As a pair, the TP T 15HD 45 and TP T A 45 are compatible with
the following Extron receivers and matrix switchers:
• TP R 15HD A
• TP R BNC A, TP R BNC AV